Linux Integration Guide
Version 2.4.1
Published December, 2019

Legal Notices
©
Copyright 2019 Hewlett Packard Enterprise Development LP. All rights reserved worldwide.
Notices
The information contained herein is subject to change without notice. The only warranties for Hewlett Packard
Enterprise products and services are set forth in the express warranty statements accompanying such products
and services. Nothing herein should be construed as constituting an additional warranty. Hewlett Packard Enterprise
shall not be liable for technical or editorial errors or omissions contained herein.
Confidential computer software. Valid license from Hewlett Packard Enterprise required for possession, use, or
copying. Consistent with FAR 12.211 and 12.212, Commercial Computer Software, Computer Software Documen-
tation, and Technical Data for Commercial Items are licensed to the U.S. Government under vendor's standard
commercial license.
Links to third-party websites take you outside the Hewlett Packard Enterprise website. Hewlett Packard Enterprise
has no control over and is not responsible for information outside the Hewlett Packard Enterprise website.
Acknowledgments
Intel
®
, Itanium
®
, Pentium
®
, Intel Inside
®
, and the Intel Inside logo are trademarks of Intel Corporation in the
United States and other countries.
Microsoft
®
and Windows
®
are either registered trademarks or trademarks of Microsoft Corporation in the United
States and/or other countries.
Adobe
®
and Acrobat
®
are trademarks of Adobe Systems Incorporated. Java
®
and Oracle
®
are registered trade-
marks of Oracle and/or its affiliates.
UNIX
®
is a registered trademark of The Open Group.
Publication Date
Tuesday December 10, 2019 15:18:04
Document ID
gob1536692193582
Support
All documentation and knowledge base articles are available on HPE InfoSight at https://infosight.hpe.com.
To register for HPE InfoSight, click the Create Account link on the main page.
Email: [email protected]
For all other general support contact information, go to https://www.nimblestorage.com/customer-support/.
Copyright
©
2019 by Hewlett Packard Enterprise Development LP. All rights reserved.
Documentation Feedback: [email protected]
Legal Notices
Contents
HPE Nimble Storage Linux Toolkit (NLT)...................................................6
Prerequisites.........................................................................................................................................6
NORADATAMGR Prerequisites................................................................................................6
NCM Prerequisites.....................................................................................................................7
Docker Prerequisites.................................................................................................................7
NLT Backup Service Prerequisites............................................................................................8
Nimbletune Prerequisites...........................................................................................................8
Kubernetes Prerequisites..........................................................................................................8
Download the NLT Installation Package..............................................................................................9
Install NLT Using the GUI.....................................................................................................................9
NLT Commands.................................................................................................................................10
HPE Nimble Storage Oracle Application Data Manager.........................12
The noradatamgr.conf File.................................................................................................................12
ASM_DISKSTRING Settings...................................................................................................13
Accessing NORADATAMGR..............................................................................................................13
NORADATAMGR Workflows..............................................................................................................14
Describe an Instance...............................................................................................................15
Describe a Diskgroup..............................................................................................................16
Enable NPM for an instance....................................................................................................17
Disable NPM for an instance...................................................................................................18
Edit an Instance.......................................................................................................................18
Take a Snapshot of an Instance..............................................................................................19
List and Filter Snapshots of an Instance.................................................................................21
List Pfile and Control File.........................................................................................................23
Clone an Instance....................................................................................................................24
Delete a Snapshot of an Instance...........................................................................................29
Destroy a Cloned Instance......................................................................................................30
Destroy an ASM Diskgroup.....................................................................................................30
Overview of Using RMAN with NORADATAMGR .............................................................................31
Add a NORADATAMGR Backup to an RMAN Recovery Catalog...........................................33
Clean Up Cataloged Diskgroups and Volumes Used With RMAN..........................................34
RAC Database Recovery........................................................................................................36
Oracle NPM and NLT Backup Service...............................................................................................38
NPM Commands.....................................................................................................................38
Troubleshooting NORADATAMGR....................................................................................................39
Log Files..................................................................................................................................39
SQL Plus..................................................................................................................................39
Copyright
©
2019 by Hewlett Packard Enterprise Development LP. All rights reserved.
Information for a noradatamgr Issue.......................................................................................39
ASM Disks Offline When Controller Failure Occurs................................................................40
noradatamgr Command Fails after NLT Installation................................................................40
Snapshot and Clone Workflows Fail if spfile not Specified......................................................40
Failover causes ASM to mark disks offline or Oracle database fails.......................................41
Bringing Up the RAC Nodes After an RMAN Recovery Operation..........................................41
HPE Nimble Storage Docker Volume Plugin............................................42
Docker Swarm and SwarmKit Considerations...................................................................................42
The docker-driver.conf File.................................................................................................................43
Docker Volume Workflows.................................................................................................................46
Create a Docker Volume.........................................................................................................48
Clone a Docker Volume...........................................................................................................49
Provisioning Docker Volumes..................................................................................................49
Import a Volume to Docker......................................................................................................50
Import a Volume Snapshot to Docker......................................................................................50
Restore an Offline Docker Volume with Specified Snapshot ..................................................51
Create a Docker Volume using the HPE Nimble Storage Local Driver...................................51
List Volumes............................................................................................................................52
Run a Container Using a Docker Volume................................................................................52
Remove a Docker Volume.......................................................................................................53
HPE Nimble Storage Connection Manager (NCM) for Linux..................54
Configuration......................................................................................................................................54
DM Multipath Configuration.....................................................................................................54
Considerations for Using NCM in Scale-out Mode..................................................................54
LVM Filter for NCM in Scale-Out Mode...................................................................................54
iSCSI and FC Configuration....................................................................................................55
Block Device Settings..............................................................................................................55
Discover Devices for iSCSI......................................................................................................55
Discover Devices for Fibre Channel........................................................................................56
List Devices.............................................................................................................................57
iSCSI Topology Scenarios.......................................................................................................57
iSCSI Connection Handling.....................................................................................................58
SAN Boot Device Support.......................................................................................................59
Create and Mount Filesystems................................................................................................59
Major Kernel Upgrades and NCM...........................................................................................63
Known Issues and Troubleshooting Tips...........................................................................................64
Information for a Linux Issue...................................................................................................64
Old iSCSI Targets IQNs Still Seen after Volume Rename on the Array..................................64
iSCSI_TCP_CONN_CLOSE Errors.........................................................................................65
rescan-scsi-bus.sh Hangs or Takes a Long Time While Scanning Standby Paths.................65
Long Boot Time With a Large Number of FC Volumes...........................................................65
Copyright
©
2019 by Hewlett Packard Enterprise Development LP. All rights reserved.
Duplicate Devices Found Warning..........................................................................................65
Newly Added iSCSI Targets Not Discovered..........................................................................66
System Enters Maintenance Mode on Host Reboot with iSCSI Volumes Mounted................66
hung_tasks_timeout Errors......................................................................................................66
RHEL 7.x: FC System Fails to Boot........................................................................................67
RHEL 7.x: Fibre Channel Active Paths are not Discovered Promptly.....................................67
During Controller Failover, multipathd Failure Messages Repeat...........................................67
LVM Devices Missing from Output..........................................................................................67
Various LVM and iSCSI Commands Hang on /dev/mapper/mpath Devices...........................67
Devices Not Discovered by Multipath......................................................................................68
System Drops into Emergency Mode......................................................................................68
NLT Installer by Default Disables dm-switch Devices on Upgrades........................................68
NCM with RHEL HA Configuration.....................................................................................................68
The reservation_key Parameter..............................................................................................69
Volume Move Limitations in HA Environments........................................................................69
multipath.conf Settings.......................................................................................................................70
HPE Nimble Storage Kubernetes FlexVolume Plugin and Kubernetes
Storage Controller..................................................................................71
Supported Plugins..............................................................................................................................71
Known Issues.....................................................................................................................................71
Installing the Kubernetes Storage Controller......................................................................................71
Configuring the Kubelet......................................................................................................................72
Kubernetes Storage Controller Workflows.........................................................................................73
Creating a Storage Class........................................................................................................73
Create a Persistent Volume.....................................................................................................77
Delete a Persistent Volume.....................................................................................................78
Nimbletune..................................................................................................79
Nimbletune Commands......................................................................................................................79
Change Nimbletune Recommendations.............................................................................................84
Block Reclamation.....................................................................................85
Reclaiming Space on Linux................................................................................................................86
Copyright
©
2019 by Hewlett Packard Enterprise Development LP. All rights reserved.

HPE Nimble Storage Linux Toolkit (NLT)
This document describes the HPE Nimble Storage Linux Toolkit version (NLT) and its services. The NLT can
install the following services:
• HPE Nimble Storage Connection Manager (NCM)
• HPE Nimble Storage Oracle Application Data Manager (NORADATAMGR)
• HPE Nimble Storage Docker Volume plugin
• HPE Nimble Storage Kubernetes FlexVolume Plugin and Kubernetes Storage Controller
• HPE Nimble Storage Backup Service
• HPE Nimble Host Tuning Utility
• The Config Collector Service
To use NLT and its services, the following knowledge is assumed:
• Basic Linux system administration skills
• Basic iSCSI SAN knowledge
• Basic Docker knowledge (to use Docker Volume plug-in)
• Oracle ASM and database technology (to use NORADATAMGR)
Note NLT collects and sends host-based information to the array, once daily per array, where the information
is archived for use by InfoSight predictive analytics. No proprietary data or personal information is collected.
Only basic information about the host is collected, such as the hostname, host OS, whether it is running as
a VM or in machine mode, and the MPIO configuration.
Prerequisites
To use HPE Nimble Storage Linux Toolkit (NLT) and its components, you must have administrator access
and a management connection from the host to the array. In addition, the following system requirements must
be met:
Hardware requirements
• 1GB of RAM or more
• 500MB to 1GB free disk space on the /root partition or on the /opt/ partition if mounted separately
• Hostname set other than “localhost” if Application Data Manager or Docker Volume Plugin are used
Software requirements vary depending upon what NLT features are installed. Refer to the following topics
for more information:
•
Prerequisites and Support on page 7 for HPE Nimble Storage Connection Manager
•
NORADATAMGR Prerequisites on page 6 for HPE Nimble Storage Oracle Application Data Manager
•
Docker Prerequisites on page 7 for HPE Nimble Storage Docker Volume Plugin
•
Kubernetes Prerequisites on page 8for HPE Nimble Storage Kubernetes FlexVolume Plugin and Dynamic
Provisioner
•
NLT Backup Service Prerequisites on page 8 for the NLT Backup Service
•
Nimbletune Prerequisites on page 8 for the Nimbletune utility
NORADATAMGR Prerequisites
To use NORADATAMGR and its components, the following prerequisites must be met.
Software requirements:
• NimbleOS 3.5 or higher
6Copyright
©
2019 by Hewlett Packard Enterprise Development LP. All rights reserved.
Documentation Feedback: [email protected]
HPE Nimble Storage Linux Toolkit (NLT)

• Oracle 11.2.x.x and Oracle 12cR1 (12.1.x.x)
• Oracle Automatic Storage Management (ASM) or ASMlib
• RHEL 6.5 and above
• RHEL 7.1 and above
• Oracle Linux 6.5 and above
• CentOS 6.5 and above
Note In RHEL/CentOS/Oracle Linux 7.3 and 7.4, the Clone a Database workflow fails due to Oracle bug
25638411. This bug has been fixed as part of Patch 19544733. Oracle patch "Patch 19544733: STRICT
BEHAVIOR OF LINKER IN 4.8.2 VERSION OF GCC-BINUTILS" has to be applied to the GRID_HOME to
be able to run the clone workflow on RHEL/CentOS/Oracle Linux 7.3 or 7.4. Refer to the HPE Nimble Storage
Linux Toolkit Release Notes for more information.
Partition requirement:
• Use whole multipath Linux disks for ASMLib disks/Oracle ASM diskgroups.
• Do not create partitions on multipath Linux disks that will make up the ASMLib disks/Oracle ASM diskgroups.
NCM Prerequisites
Prerequisites and Support
The NimbleOS and host OS prerequisites for Linux NCM are:
• NimbleOS 2.3.12 or higher
• RHEL 6.5 and above
• RHEL 7.1 and above
• CentOS 6.5 and above
• CentOS 7.1 and above
• Oracle Linux 6.5 and above
• Oracle Linux 7.1 and above
• Ubuntu LTS 14.04
• Ubuntu LTS 16.04
• Ubuntu LTS 18.04
Linux NCM is supported on the following protocols:
• iSCSI
• Fibre Channel
Host Prerequisites
Before you begin, ensure these packages are installed on the host.
• sg3_utils and sg3_utils-libs
• device-mapper-multipath
• iscsi-initiator-utils (for iSCSI deployments)
Port Requirement
Default REST port 5392 must not be blocked by firewalls or host IP tables.
Docker Prerequisites
To use Docker, the following prerequisites must be met.
Software requirements:
• NimbleOS 3.4 or higher
• CentOS 7.2 and above
7Copyright
©
2019 by Hewlett Packard Enterprise Development LP. All rights reserved.
Documentation Feedback: [email protected]
NCM Prerequisites

• RHEL 7.2 and above
• Ubuntu LTS 14.04
• Ubuntu LTS 16.04
• Docker 1.12.1 or later to use either as a standalone engine or with SwarmKit
• Docker 1.12.1-cs or later to use either as a standalone CS engine or with UCP
On RedHat and CentOS hosts, use root access from a terminal window and enter the following command:
[root@ ~]# yum install -y device-mapper-multipath iscsi-initiator-utils sg3_utils
On Ubuntu hosts, use root access from a terminal window and enter the following commands:
[root@ ~]# apt-get update
[root@ ~]# apt-get install -y multipath-tools open-iscsi sg3-utils xfsprogs
Follow the steps documented on the Docker website to install the latest Docker Engine on your Linux host
https://docs.docker.com/engine/installation/.
NLT Backup Service Prerequisites
The NimbleOS and host OS prerequisites for NLT Backup Service are:
• NimbleOS 5.0.x or higher
• For replication, the downstream group must be running NimbleOS 4.x or higher
Nimbletune Prerequisites
Nimbletune is supported on any of the following host operating systems:
• RHEL 6.5 and above
• RHEL 7.1 and above
• CentOS 6.5 and above
• CentOS 7.1 and above
• Oracle Linux 6.5 and above
• Oracle Linux 7.1 and above
• Ubuntu LTS OS 14.04
• Ubuntu LTS OS 16.04
• Ubuntu LTS OS 18.04
Kubernetes Prerequisites
To use Kubernetes, the following prerequisites must be met.
Software requirements:
• NimbleOS 5.0.2 or higher
• CentOS 7.2 and above
• RHEL 7.2 and above
• Ubuntu LTS 14.04
• Ubuntu LTS 16.04
• Docker 1.13 or later
• Internet connectivity
Follow the steps documented on the Kubernetes website to download and install Kubernetes on various
platforms https://kubernetes.io/docs/setup/.
8Copyright
©
2019 by Hewlett Packard Enterprise Development LP. All rights reserved.
Documentation Feedback: [email protected]
NLT Backup Service Prerequisites
Download the NLT Installation Package
There are two ways to install HPE Nimble Linux Tollkit, using the GUI or using the CLI.
Note The Application Data Manager and Docker Volume plugins are mutually exclusive.
Procedure
Choose one of the following methods to download the installation package.
DescriptionOption
Download
using
the GUI
1
Download the NLT installation package from one of the following two locations:
• If you have an InfoSight account, you can download the NLT installer from
https://update.nimblestorage.com/NLT/2.4.1/nlt_installer_2.4.1.13.
• If you do not have an InfoSight account, you can download the NLT installer from
https://infosight.hpe.com/InfoSight/media/software/active/public/17/211/Anonymous_NLT_241-13_Download_Form.html
2
Click Resources > Software Downloads.
3
In the Integration Kits pane, click Linux Toolkit (NLT).
4
From the Linux Toolkit (NLT) page, click NLT Installer under Current Version.
When prompted, save the installer to your local host.
Note The HPE Nimble Storage Linux Toolkit Release Notes for the package are also available from this page.
For unattended non-interactive installation, use any of the following methods to download NLT:
curl -o nlt_installer_2.4.1.13
Download
using
the CLI
https://infosight.hpe.com/InfoSight/media/software/active/public/17/211/nlt_installer_2.4.1.13?accepted_eula=yes&confirm=Scripted
wget -O nlt_installer_2.4.1.13
https://infosight.hpe.com/InfoSight/media/software/active/public/17/211/nlt_installer_2.4.1.13?accepted_eula=yes&confirm=Scripted
What to do next
Complete the steps in Install NLT Using the GUI on page 9.
Install NLT Using the GUI
The NLT installer detects your host information and prompts you to install the components that are supported
in your environment.
Before you begin
You must have the installation package stored locally on your host.
Procedure
1
Make sure the file is executable and run the installer as root:.
/path/to/download/nlt_installer_2.3.0
Note For automated installations, you can use the --silent-mode option. Use the --help option to see
more installation options.
2
Accept the EULA.
3
Enter yes to continue with the NLT installation.
4
If prompted, enter yes to install the Connection Manager (NCM).
9Copyright
©
2019 by Hewlett Packard Enterprise Development LP. All rights reserved.
Documentation Feedback: [email protected]
Download the NLT Installation Package

5
If installing NCM, choose one of the following: enter yes if scale-out (multi-array group) mode is required
with connection manager.
• Enter no if there is only a single array in the group.
• Enter yes only if you have a multi-array group connected to the host.
Note Refer to Considerations for Using NCM in Scale-out Mode on page 54 for more information.
6
If prompted, enter yes to install the Oracle plugin.
Note You are only prompted if your environment supports the NORADATAMGR.
7
If prompted, enter yes to install the Docker plugin.
Note You are only prompted if your environment supports the Docker Volume plugin.
8
If prompted, enter yes to install the Kubernetes FlexVolume plugin.
Note You are only prompted if you chose to install the Docker Volume plugin. Docker is required to use
the Kubernetes FlexVolume Plugin and the Kubernetes Storage Controller. For instructions on installing
the Kubernetes Storage Controller, see HPE Nimble Storage Kubernetes FlexVolume Plugin and Kubernetes
Storage Controller on page 71.
9
Enter yes to enable iSCSI services.
10
Verify the status of the plugins you installed.
nltadm --status
11
Add an array group to the NLT to enable the plugins to provision volumes.
nltadm --group --add --ip-address hostname or management IP address --username
username--password password
Note We recommend using the IP address as the API endpoint to avoid any unrelated connectivity issues
with NLT.
12
Verify management communication between the host and the array.
nltadm --group --verify --ip-address management IP address
NLT Commands
Use these commands to manage the NLT services (NCM, NORADATAMGR, and Docker).
nltadm --help
usage:
nltadm [--start <ncm|oracle|docker|collector|backup-service> ]
nltadm [--stop <ncm|oracle|docker|collector|backup-service> ]
nltadm [--enable <oracle|docker|collector|backup-service> ]
nltadm [--disable <oracle|docker|collector|backup-service> ]
nltadm [--status ]
nltadm [--config {--dry-run} {--format <xml|json>}]
nltadm [--version ]
nltadm [--diag {CASE NUMBER} ]
nltadm [--group --add --ip-address <GROUP MANAGEMEMT IP> --username
<GROUP USERNAME> {--password <GROUP PASSWORD> } ]
nltadm [--group --remove --ip-address <GROUP MANAGEMENT IP> ]
nltadm [--group --verify --ip-address <GROUP MANAGEMENT IP> ]
nltadm [--group --list ]
nltadm [--help ]
--add Add a Nimble Group
--config Send host configuration data to the
10Copyright
©
2019 by Hewlett Packard Enterprise Development LP. All rights reserved.
Documentation Feedback: [email protected]
NLT Commands

array.
--diag <CASE NUMBER> Collect diagnostic dump for NLT
components
--disable <SERVICE NAME> Disable a service
--dry-run Dump host configuration information
without sending to array.
--enable <SERVICE NAME> Enable a service
--format <OUTPUT FORMAT> Output format for host configuration
information. Should be only used with --dry-run option
--group Nimble Group commands
-h,--help Prints this help message
--ip-address <GROUP MANAGEMENT IP> Nimble Group management IP address
--list List Nimble Groups along with
connection status
--password <GROUP PASSWORD> Nimble Group password
--remove Remove a Nimble group
--start <SERVICE NAME> Start a service
--status Display the status of each service
--stop <SERVICE NAME> Stop a service
--username <GROUP USERNAME> Nimble Group username
-v,--version Display the version of Nimble Linux
Toolkit
--verify Verify connectivity to a Nimble Group
11Copyright
©
2019 by Hewlett Packard Enterprise Development LP. All rights reserved.
Documentation Feedback: [email protected]
HPE Nimble Storage Linux Toolkit (NLT)

HPE Nimble Storage Oracle Application Data Manager
The HPE Nimble Storage Oracle Application Data Manager enables you to take snapshots for backups and
recovery points and to create clones of both datastores and volumes. NORADATAMGR simplifies the backup
and cloning processes so that you do not need to understand the mapping between your database and the
objects in the array.
NORADATAMGR, which uses a command line interface, is part of the HPE Nimble Storage Linux Toolkit
(NLT) and works with Oracle Automatic Storage Management (ASM).
When you use NLT 2.4.0 or later, NORADATAMGR also supports Oracle Recovery Manager (RMAN). The
NORADATAMGR catalog-backup command makes HPE Nimble Storage snapshot data available to RMAN
for restore operations. This command is faster than actually copying the data and allows you use a snapshot
of an HPE Nimble Storage database instance for restore operations.
You can use role-based access control (RBAC) with NORADATAMGR. RBAC is provided at the host level.
You maintain a list of hosts that are allowed to access an instance.
The supported Oracle workflows can be performed on both local and remote hosts.
Note NORADATAMGR on a single host can connect to only one array group. Multiple hosts with instances
having the same SID connecting to the same group are not supported.
To use NORADATAMGR you must be running Oracle 11gR2 or later. For NLT V3.0, Oracle 12c is supported
as well. In addition, Oracle ASM must be installed on a system running Red Hat Enterprise Linux 6.5 or higher.
The HPE Nimble Storage Validated Configuration Matrix tool, which is online at
https://infosight.hpe.com/resources/nimble/validated-configuration-matrix, contains information about
requirements for using NLT with Oracle.
Note
For NORADATAMGR to work with ASMLIB, you must verify or adjust the Disc Scan Ordering in Oracle ASM.
To adjust the Disc Scan Ordering, ensure that Oracle ASMlib has the following parameters set in the
/etc/sysconfig/oracleasm file:
• 'ORACLEASM_SCANORDER' parameter is set to "dm- mpath".
• 'ORACLEASM_SCANEXCLUDE' parameter is set to "sd"
The noradatamgr.conf File
Below is the default noradatamgr.conf. file with explanations of the parameters. When setting the user and
group, ensure that the user is a valid OS user and that both the group and the user have sysdba privileges.
If the specified user does not have the correct sysdba privileges, NORADATAMGR operations will fail.
Changes to noradatamgr.conf require a NLT service restart to take effect.
/opt/NimbleStorage/etc/noradatamgr.conf
#Oracle user and group, and db user
orcl.user.name=oracle
orcl.user.group=oinstall
orcl.db.user=sysdba
# Maximum time in seconds that the Nimble Oracle App Data Manager will wait
for a database to get into and out of hotbackup mode.
orcl.hotBackup.start.timeout=14400
orcl.hotBackup.end.timeout=15
# Snapshot name prefix if a snapshot needs to be taken before cloning an
12Copyright
©
2019 by Hewlett Packard Enterprise Development LP. All rights reserved.
Documentation Feedback: [email protected]
HPE Nimble Storage Oracle Application Data Manager
instance
nos.clone.snapshot.prefix=BaseFor
# NPM parameter for enabling hot-backup mode for all instances on the host
during scheduled snapshots
npm.hotbackup.enable=false;
# NPM parameter for enabling hot-backup mode for all instances on the host
during scheduled snapshots
npm.hotbackup.enable=false;
ASM_DISKSTRING Settings
HPE Nimble Storage recommends the following options for the ASM_DISKSTRING setting when you use
HPE Nimble Storage Oracle Application Data Manager. This ensures proper discovery of devices by ASM
for building ASM disk groups.
On udev systems, ASM_DISKSTRING should be set to /dev/mapper.
On asmlib systems, ASM_DISKSTRING should either be blank to default to ORCL: glob style disk paths, or
set to /dev/oracleasm/disks.
Accessing NORADATAMGR
Use the following instructions to allow non-root users to execute noradatamgr.
To allow anyone in the DBA group to execute noradatamgr:
chgrp dba /opt/NimbleStorage/etc
chmod g+rx /opt/NimbleStorage/etc
chgrp dba /opt/NimbleStorage/etc/client
chmod g+rx /opt/NimbleStorage/etc/client
chgrp dba /opt/NimbleStorage/bin
chmod g+x /opt/NimbleStorage/bin
chgrp dba /opt/NimbleStorage/etc/nora*
chmod g+r /opt/NimbleStorage/etc/nora*
chgrp dba /usr/bin/noradatamgr
chmod g+x /usr/bin/noradatamgr
chgrp dba /opt/NimbleStorage/etc/client/log4j.properties
chmod g+x /opt/NimbleStorage/etc/client/log4j.properties
To allow the Oracle user to execute noradatamgr:
chown oracle /opt/NimbleStorage/etc
chmod u+rx /opt/NimbleStorage/etc
chown oracle /opt/NimbleStorage/etc/client
chmod u+rx /opt/NimbleStorage/etc/client
chown oracle /opt/NimbleStorage/bin
chmod u+x /opt/NimbleStorage/bin
chown oracle /opt/NimbleStorage/etc/nora*
chmod u+r /opt/NimbleStorage/etc/nora*
chown oracle /usr/bin/noradatamgr
chmod u+x /usr/bin/noradatamgr
chown oracle /opt/NimbleStorage/etc/client/log4j.properties
chmod u+x /opt/NimbleStorage/etc/client/log4j.properties
13Copyright
©
2019 by Hewlett Packard Enterprise Development LP. All rights reserved.
Documentation Feedback: [email protected]
ASM_DISKSTRING Settings

NORADATAMGR Workflows
The HPE Nimble Storage Oracle Application Data Manager (NORADATAMGR) uses the following command
options in the supported NORADATAMGR workflows:
[root]# noradatamgr --help
usage:
noradatamgr [--describe [--instance {SID}] [--diskgroup {DISKGROUP NAME}]
noradatamgr [--edit --instance {SID}
--allow-hosts {HOSTNAME1,HOSTNAME2... | ALL} ]
noradatamgr [--snapshot --instance {SID} --snapname {SNAPSHOT NAME}
[--hot-backup]
[--replicate] ]
noradatamgr [--clone --instance {SID} --clone-name {DB NAME}
[--snapname {SNAPSHOT NAME}] [--clone-sid {SID}]
[--clone-home {ORACLE HOME}] [--override-pfile
{ABSOLUTE PATH TO PFILE}]
[--folder {FOLDER NAME}] [--diskgroups-only] ]
noradatamgr [--list-snapshots --instance {SID} [--verbose] [--npm] [--cli]
noradatamgr [--delete-snapshot --instance {SID} --snapname {SNAPSHOT NAME}
[--delete-replica] ]
noradatamgr [--get-pfile --instance {SID} --snapname {SNAPSHOT NAME} ]
noradatamgr [--get-cfile --instance {SID} --snapname {SNAPSHOT NAME} ]
noradatamgr [--destroy [--instance {SID}] [--diskgroup {DISKGROUP NAME}]
[--silent-mode] ]
noradatamgr [--enable-npm --instance {SID}]
noradatamgr [--disable-npm --instance {SID}]
noradatamgr [--catalog-backup --instance {TARGET_DB_SID}
--snapname {SNAPSHOT_TO_RECOVER_FROM}
--diskgroup-prefix {PREFIX_FOR_NAMING_CLONED_DISKGROUPS}
--rcat {NET_SERVICE_NAME_FOR_RECOVERY_CATALOG}
--rcat-user {RECOVERY_CATALOG_USER}
noradatamgr [--uncatalog-backup --instance {TARGET_DB_SID}
--rcat-user {RECOVERY_CATALOG_USER}
[--rcat-passwd {PASSWORD_FOR_RCAT_USER}]
noradatamgr [--help]
Nimble Storage Oracle App Data Manager
--allow-hosts <HOSTNAME1[, HOSTNAME2 ...]> Comma separated list of
hostnames that a database instance can be cloned to.
-c,--clone Clone a database instance.
--cli Filter only NORADATAMGR CLI
triggered snapshots.
--clone-home <ORACLE HOME> ORACLE HOME of the cloned
instance.
--clone-name <DB NAME> Database name of the cloned
instance.
--clone-sid <INSTANCE SID> ORACLE SID of the cloned
instance.
-d,--describe Describe the storage for a
database instance or an ASM diskgroup.
--delete-replica Delete the snapshot from
remote replication group as well.
--destroy Destroy an ASM diskgroup.
--disable-npm Disable scheduled snapshots
for the given instance.
--diskgroup <DIKSGROUP NAME> ASM diskgroup name.
--diskgroups-only Only clone the diskgroups of
the specified instance, do not clone the instance itself.
-e,--edit Edit the storage properties
for a database instance.
14Copyright
©
2019 by Hewlett Packard Enterprise Development LP. All rights reserved.
Documentation Feedback: [email protected]
NORADATAMGR Workflows

--enable-npm Configure the volume collection
of the instance to enable scheduled snapshots.
--folder <FOLDER> Name of the folder in which
cloned volumes must reside.
-h,--help Display this help and exit.
--hot-backup Indicates the database must
be put in hot backup mode before a snapshot backup is taken.
--instance <ORACLE SID> Database Instance SID.
-l,--list-snapshots List the snapshot backups of
a database instance.
--no-rollback Do not rollback cloned disks
and diskgroups on failure of the clone workflow.
--npm Filter only NPM schedule
triggered snapshots.
--override-pfile <OVERRIDE PFILE> Absolute path to file
containing override values for pfile properties of a cloned instance.
-p,--get-pfile Print contents of the pfile
from a snapshot backup.
-r,--delete-snapshot Destroy the snapshot backup
for a database instance.
--replicate Replicate the snapshot.
-s,--snapshot Create an application
consistent or crash consistent snapshot backup of a database instance.
--silent-mode Initiate workflow in a
non-interactive/silent mode without user intervention.
--snapname <SNAPSHOT NAME> Name of the snapshot backup.
--verbose Verbose option.
-x,--get-cfile Retrieve the control file
from a snapshot backup.
Describe an Instance
You can obtain information about the storage footprint of an instance using the describe --instance command.
Instances must be local, live database instances backed by ASM diskgroups that contain disks backed by
volumes. The information you see in these cases includes the following:
• Diskgroup names
• Disk and device names
• HPE Nimble Storage volume names and sizes
• Hosts allowed to access the instance to perform operations such as cloning, or listing snapshots
If the instance is down, or not backed by diskgroups, or if the diskgroups do not contain disks backed by HPE
Nimble Storage volumes, you see messages describing the following conditions:
• Instances that are down or not backed by ASM diskgroups
• Diskgroups that do not contain any HPE Nimble Storage disks (disks backed by HPE Nimble Storage
volumes)
If Oracle database instance disk groups are backed by an HPE Nimble Storage array with NimOS 5.x or later,
the NPM status is displayed at the bottom of the describe output.
Procedure
Describe an instance.
noradatamgr --describe --instance instance_name
15Copyright
©
2019 by Hewlett Packard Enterprise Development LP. All rights reserved.
Documentation Feedback: [email protected]
Describe an Instance

Example
[root]# noradatamgr --describe --instance rac1db1
Diskgroup: FRADG
Disk: /dev/oracleasm/disks/FRA2
Device: dm-7
Volume: rac-scan1-fra2
Serial number: 30ee5255564250406c9ce9002c92b39c
Size: 120GB
Disk: /dev/oracleasm/disks/FRA1
Device: dm-5
Volume: rac-scan1-fra1
Serial number: a37f89039236cb1f6c9ce9002c92b39c
Size: 120GB
Diskgroup: DATADG
Disk: /dev/oracleasm/disks/DATA1
Device: dm-4
Volume: rac-scan1-data1
Serial number: e7b4816607f7b0146c9ce9002c92b39c
Size: 100GB
Disk: /dev/oracleasm/disks/DATA2
Device: dm-6
Volume: rac-scan1-data2
Serial number: 74278282d50260816c9ce9002c92b39c
Size: 100GB
Allowed hosts: ALL
NPM enabled: No
Describe a Diskgroup
You can obtain information about the storage footprint of any ASM diskgroup on a host using the describe
--diskgroup command. The information you see in these cases includes the following:
• Disk and device names
• Volume names and sizes for all the disks in the diskgroup
• Diskgroups that do not contain any HPE Nimble Storage disks (disks backed by HPE Nimble Storage
volumes)
If the instance is down, or not backed by diskgroups, or if the diskgroups do not contain disks backed by HPE
Nimble Storage volumes, you see messages describing the following condition:
• Diskgroups that do not contain any HPE Nimble Storage disks (disks backed by HPE Nimble Storage
volumes)
Procedure
Describe a diskgroup.
noradatamgr --describe --diskgroup diskgroup_name
Example
[root]# noradatamgr --describe --diskgroup DATADG
DATADG
Disk: /dev/oracleasm/disks/DATA1
Device: dm-0
Volume: rh68db-data1
16Copyright
©
2019 by Hewlett Packard Enterprise Development LP. All rights reserved.
Documentation Feedback: [email protected]
Describe a Diskgroup

Serial number: c0505f3bfe7fc7fe6c9ce900f4f8b199
Size: 100GB
Disk: /dev/oracleasm/disks/DATA2
Device: dm-1
Volume: rh68db-data2
Serial number: 336a1fae8363f4956c9ce900f4f8b199
Size: 100GB
Enable NPM for an instance
This command configures the volume collection and adds the application specific metadata to the volume
collection and the volumes.
Before you begin
You must be on NimbleOS 5.0.x and higher.
Procedure
Enable the NPM for an instance.
noradatamgr --enable-npm --instance SID
Example
Enable NPM for an instance
[root]# noradatamgr --instance xyz123 --enable-npm
Success: Scheduled snapshots have been enabled for instance xyz123.
Please create the required schedule on volume collection rac-scan1 to
start the Oracle scheduled snapshots.
[root]# noradatamgr --instance xyz123 --describe
Diskgroup: REDODG
Disk: /dev/oracleasm/disks/REDO1
Device: dm-1
Volume: rac-scan1-redo1
Serial number: 4556477f760e919f6c9ce9002c92b39c
Size: 30GB
Diskgroup: FRADG
Disk: /dev/oracleasm/disks/FRA1
Device: dm-5
Volume: rac-scan1-fra1
Serial number: a37f89039236cb1f6c9ce9002c92b39c
Size: 120GB
Diskgroup: DATADG
Disk: /dev/oracleasm/disks/DATA1
Device: dm-4
Volume: rac-scan1-data1
Serial number: e7b4816607f7b0146c9ce9002c92b39c
Size: 100GB
Allowed hosts: ALL
NPM enabled: Yes
17Copyright
©
2019 by Hewlett Packard Enterprise Development LP. All rights reserved.
Documentation Feedback: [email protected]
Enable NPM for an instance

Disable NPM for an instance
Before you begin
You must be on NimbleOS 5.0.x and higher.
Procedure
Disable NPM for an instance.
noradatamgr --disable-npm --instance SID
Example
Disable NPM for an instance
[root]# noradatamgr --instance xyz123 --disable-npm
Success: Scheduled snapshots have been disabled for instance xyz123.
Please delete the schedules on volume collection rac-scan1.
[root]# noradatamgr --instance xyz123 --describe
Diskgroup: REDODG
Disk: /dev/oracleasm/disks/REDO1
Device: dm-1
Volume: rac-scan1-redo1
Serial number: 4556477f760e919f6c9ce9002c92b39c
Size: 30GB
Diskgroup: FRADG
Disk: /dev/oracleasm/disks/FRA1
Device: dm-5
Volume: rac-scan1-fra1
Serial number: a37f89039236cb1f6c9ce9002c92b39c
Size: 120GB
Diskgroup: DATADG
Disk: /dev/oracleasm/disks/DATA1
Device: dm-4
Volume: rac-scan1-data1
Serial number: e7b4816607f7b0146c9ce9002c92b39c
Size: 100GB
Allowed hosts: ALL
NPM enabled: No
What to do next
Note If NLT is uninstalled or group information is removed from NLT, then NPM will automatically be disabled
for all database instances.
Edit an Instance
You can edit a local live instance to modify the list of hosts that are allowed to perform cloning and snapshot
listing operations on that instance.
If some or all of the data, and online redo volumes of the instance are not in a volume collection when you
run the edit command, a volume collection is created automatically. Data or online log volumes cannot be
part of two different volume collections.
The --allow-hosts command is used to place access control on a local live instance at a host level, by
specifying the host names which are allowed to access the instance. The following guidelines apply:
18Copyright
©
2019 by Hewlett Packard Enterprise Development LP. All rights reserved.
Documentation Feedback: [email protected]
Disable NPM for an instance

• You can use a comma-separated list of host names, or "all" to allow all hosts to access the instance. When
listing the host names, you must list the name as it is specified when running the hostname command
on the host to be added.
• The name of the host on which the edit workflow is run, will always be added to the list of allowed hosts.
• No host name validation is performed. You must enter a valid host name to ensure that operations (such
as listing snaps and clones) are successful.
• If you change a host name for any reason, you must run the edit workflow again using the updated list of
host names.
• If you want to add a new host to the list, you must run the edit workflow again listing all the host names
to be added, including the new host name.
Procedure
Edit an instance.
noradatamgr --edit --instance instance_name --allow-hosts hosts_list
Example
[root]# noradatamgr --edit --instance rh68db --allow-hosts
host-rhel1,host-rhel2
Allowed hosts set to: host-rhel1,host-rhel2
Success: Storage properties for database instance rh68db updated.
[root@host-rhel1 ~]# noradatamgr --describe --instance rh68db
Diskgroup: ARCHDG
Disk: /dev/oracleasm/disks/ARCH1
Device: dm-2
Volume: rh68db-arch1
Serial number: 4dc46ccf29cb4a216c9ce900f4f8b199
Size: 100GB
Diskgroup: REDODG
Disk: /dev/oracleasm/disks/REDO1
Device: dm-3
Volume: rh68db-redo1
Serial number: 62271db7e2578d7e6c9ce900f4f8b199
Size: 50GB
Diskgroup: DATADG
Disk: /dev/oracleasm/disks/DATA1
Device: dm-0
Volume: rh68db-data1
Serial number: c0505f3bfe7fc7fe6c9ce900f4f8b199
Size: 100GB
Disk: /dev/oracleasm/disks/DATA2
Device: dm-1
Volume: rh68db-data2
Serial number: 336a1fae8363f4956c9ce900f4f8b199
Size: 100GB
Allowed hosts: host-rhel1,host-rhel2
Take a Snapshot of an Instance
You can use the NORADATAMGR to take a snapshot of a local live instance from both a standalone an
Oracle Real Application Clusters (RAC) setup.
Note Before specifying that the snapshot be replicated, ensure that replication has been set on the array on
the volume collection that contains the data and online redo log volumes of the instance.
For taking a snapshot of a local live instance, the snapshot command places the data and online log volumes
in a single volume collection (which is created if one does not already exist). You can optionally specify that
19Copyright
©
2019 by Hewlett Packard Enterprise Development LP. All rights reserved.
Documentation Feedback: [email protected]
Take a Snapshot of an Instance

the instance be placed in hot backup mode before taking the snapshot, or that the snapshot be replicated to
a downstream group. To place the instance in hot backup mode, you must enable archive log mode on the
host.
A snapshot of an Oracle instance taken by NORADATAMGR is a snapshot collection of the volume collection
that contains the data and log volumes backing the instance. This snapshot can be used at a later time to
create a clone of the instance. All snapshots taken by NORADATAMGR are application consistent, and can
provide instance-level recovery on an instance cloned from the snapshot. Point-in-time recovery is not
supported.
A snapshot of any instance in an Oracle RAC cluster is a snapshot collection of the entire RAC database and
contains all the Oracle metadata necessary to recover the database, including the data and redo logs. The
snapshot can also be used to clone the RAC database.
The NORADATAMGR tool mandates that a snapshot of a RAC instance is always taken with hot-backup
mode enabled. The tool will try to get a RAC instance in hot-backup mode even if that option is not specified
while taking a snapshot.
Before you begin
Archive log mode must be enabled on the host before you take a snapshot of a RAC instance. Archive log
mode ensures that the RAC instance can be successfully taken into hot backup mode.
Procedure
Take a snapshot of an instance.
noradatamgr --snapshot --instance instance_name --snapname snapshot_name [--hot-backup]
[--replicate]
Example
Take a Snapshot
[root]# noradatamgr --snapshot --instance rh68db --snapname rh68.snap.603
Success: Snapshot backup rh68.snap.603 completed.
Take a Snapshot and Replicate
[root]# noradatamgr --snapshot --instance rh68db --snapname
rh68db.snap.repl --replicate
Success: Snapshot backup rh68db.snap.repl completed.
[root]# noradatamgr --list-snapshot --instance rh68db --verbose
Snapshot Name: rh68db.snap.repl taken at 16-10-24 14:47:14
Instance: rh68db
Snapshot can be used for cloning rh68db: Yes
Hot backup mode enabled: No
Replication status: complete
Database version: 11.2.0.4.0
Host OS Distribution: redhat
Host OS Version: 6.8
Take a Snapshot in Hot Backup Mode
SQL> archive log list;
Database log mode Archive Mode
Automatic archival Enabled
Archive destination +ARCHDG
Oldest online log sequence 103008
Next log sequence to archive 103010
Current log sequence 103010
20Copyright
©
2019 by Hewlett Packard Enterprise Development LP. All rights reserved.
Documentation Feedback: [email protected]
HPE Nimble Storage Oracle Application Data Manager

SQL>
[root]# noradatamgr --snapshot --instance rh68db --snapname
rh68db.snap.hotbackup --hot-backup-mode
Putting instance rh68db in hot backup mode...
Success: Snapshot backup rh68db.snap.hotbackup completed.
Taking instance rh68db out of hot backup mode...
[root@hiqa-sys-rhel1 ~]#
[root]# noradatamgr --list-snapshot --instance rh68db --verbose
Snapshot Name: rh68db.snap.hotbackup taken at 16-10-24 14:55:37
Instance: rh68db
Snapshot can be used for cloning rh68db: Yes
Hot backup mode enabled: Yes
Replication status: N/A
Database version: 11.2.0.4.0
Host OS Distribution: redhat
Host OS Version: 6.8
List and Filter Snapshots of an Instance
You can list snapshots of an instance that were taken using the NORADATAMGR snapshot command or
through a NLT Backup Service schedule. The list can contain snapshots taken from both local and remote
instances (remote instances are those which are not running on the host from which the list-snapshots
command is invoked). Snapshots taken of instances that are shut down are also listed.
You can filter snapshots by those taken only through NPM or only with the CLI.
Note The list-snapshots command will fail if the host does not appear in the list of allowed hosts, or if the
instance does not have the correct storage configuration (data and log volumes of the instance are in one
volume collection) and the required metadata is not tagged to the volume collection.
Procedure
List snapshots of an instance.
noradatamgr –-list-snapshots --instance instance_name {--npm ,--cli }--verbose
Example
List Snapshots
[root]# noradatamgr --list-snapshot --instance rh68db
-----------------------------------+--------------+--------+-------------------
Snap Name Taken at Instance Usable for
cloning
-----------------------------------+--------------+--------+-------------------
rh68.snap.603 16-10-24 12:01 rh68db Yes
rh68db.snap.601 16-10-21 10:36 rh68db Yes
rh68db.snap.600 16-10-20 14:48 rh68db Yes
rh68db.snap.602 16-10-21 15:21 rh68db Yes
List Snapshots (Verbose Mode)
[root]# noradatamgr --list-snapshot --instance rh68db --verbose
Snapshot Name: rh68.snap.603 taken at 16-10-24 12:01:40
Instance: rh68db
Snapshot can be used for cloning rh68db: Yes
Hot backup mode enabled: No
21Copyright
©
2019 by Hewlett Packard Enterprise Development LP. All rights reserved.
Documentation Feedback: [email protected]
List and Filter Snapshots of an Instance

Replication status: N/A
Database version: 11.2.0.4.0
Host OS Distribution: redhat
Host OS Version: 6.8
Snapshot Name: rh68db.snap.601 taken at 16-10-21 10:36:20
Instance: rh68db
Snapshot can be used for cloning rh68db: Yes
Hot backup mode enabled: No
Replication status: N/A
Database version: 11.2.0.4.0
Host OS Distribution: redhat
Host OS Version: 6.8
Snapshot Name: rh68db.snap.600 taken at 16-10-20 14:48:27
Instance: rh68db
Snapshot can be used for cloning rh68db: Yes
Hot backup mode enabled: No
Replication status: N/A
Database version: 11.2.0.4.0
Host OS Distribution: redhat
Host OS Version: 6.8
Snapshot Name: rh68db.snap.602 taken at 16-10-21 15:21:44
Instance: rh68db
Snapshot can be used for cloning rh68db: Yes
Hot backup mode enabled: No
Replication status: N/A
Database version: 11.2.0.4.0
Host OS Distribution: redhat
Host OS Version: 6.8
List Snapshots (from Remote Host)
(Note: instance rh68db is running on host-rhel1)
[root@host-rhel2]# noradatamgr --list-snapshots --instance rh68db
-----------------------------------+--------------+--------+-------------------
Snap Name Taken at Instance Usable for
cloning
-----------------------------------+--------------+--------+-------------------
rh68db.hot.repl.102 16-10-24 17:36 rh68db Yes
rh68.snap.603 16-10-24 12:01 rh68db Yes
rh68db.snap.601 16-10-21 10:36 rh68db Yes
rh68db.snap.600 16-10-20 14:48 rh68db Yes
rh68db.snap.repl 16-10-24 14:47 rh68db Yes
rh68db.snap.hotbackup 16-10-24 14:55 rh68db Yes
rh68db.hot.repl.101 16-10-24 17:13 rh68db Yes
List Snapshots With Filters
[root]# noradatamgr --instance xyz123 --list-snapshot --npm
-----------------------------------+---------------+---------+--------+--------
Snap Name Taken at Instance Cloning
Created
possible
using
-----------------------------------+---------------+---------+--------+--------
rac-scan1-30-min-2017-10-10::14... 17-10-10 14:00 rac1db2 Yes
NPM
rac-scan1-30-min-2017-10-10::13... 17-10-10 13:00 rac1db2 Yes
NPM
rac-scan1-30-min-2017-10-10::12... 17-10-10 12:30 rac1db2 Yes
NPM
22Copyright
©
2019 by Hewlett Packard Enterprise Development LP. All rights reserved.
Documentation Feedback: [email protected]
HPE Nimble Storage Oracle Application Data Manager

[root]# noradatamgr --instance xyz123 --list-snapshot --cli
-----------------------------------+---------------+---------+--------+--------
Snap Name Taken at Instance Cloning
Created
possible
using
-----------------------------------+---------------+---------+--------+--------
rac1db2.cli.snap.2 17-10-09 15:04 rac1db2 Yes
CLI
rac1db2.cli.snap.3 17-10-09 15:04 rac1db2 Yes
CLI
rac1db2.cli.snap.4 17-10-09 15:05 rac1db2 Yes
CLI
rac1db2.cli.snap.1 17-10-09 15:03 rac1db2 Yes
CLI
rac1db2.cli.snap.21 17-10-09 18:39 rac1db2 Yes
CLI
List Pfile and Control File
Use these commands to check the pfile and control file of a database instance as captured in a snapshot
taken by NORADATAMGR. If a database instance is cloned from this snapshot, the clone inherits the
parameters from these files. You can use the --override-pfile option while cloning to specify the pfile parameter
values.
Procedure
List a pfile or a control file.
noradatamgr --get-pfile --instance instance_name --snapname snapshot_name
noradatamgr --get-cfile --instance instance_name --snapname snapshot_name
Example
Retrieve a pfile from a snapshot
[root]# noradatamgr --get-pfile --instance rh68db --snapname
rh68db.snap.repl
Pfile contents:
rh68db.__db_cache_size=35567697920
rh68db.__java_pool_size=805306368
rh68db.__large_pool_size=268435456
rh68db.__oracle_base='/u01/app/base'#ORACLE_BASE set from environment
rh68db.__pga_aggregate_target=13555990528
rh68db.__sga_target=40667971584
rh68db.__shared_io_pool_size=0
rh68db.__shared_pool_size=3489660928
rh68db.__streams_pool_size=268435456
*.audit_file_dest='/u01/app/base/admin/rh68db/adump'
*.audit_trail='db'
*.compatible='11.2.0.4.0'
*.control_files='+REDODG/rh68db/controlfile/current.256.921347795'
*.db_block_size=8192
*.db_create_file_dest='+DATADG'
*.db_create_online_log_dest_1='+REDODG'
*.db_domain=''
*.db_name='rh68db'
*.diagnostic_dest='/u01/app/base'
*.dispatchers='(PROTOCOL=TCP) (SERVICE=rh68dbXDB)'
23Copyright
©
2019 by Hewlett Packard Enterprise Development LP. All rights reserved.
Documentation Feedback: [email protected]
List Pfile and Control File
*.log_archive_dest_1='LOCATION=+ARCHDG'
*.log_archive_format='%t_%s_%r.dbf'
*.open_cursors=300
*.pga_aggregate_target=13535019008
*.processes=150
*.remote_login_passwordfile='EXCLUSIVE'
*.sga_target=40607154176
*.undo_tablespace='UNDOTBS1'
Retrieve a cfile from a snapshot
[root]# noradatamgr --get-cfile --instance fcrac1db1 --snapname snap.1
Control file contents:
STARTUP NOMOUNT
CREATE CONTROLFILE REUSE DATABASE "FCRAC1DB" NORESETLOGS ARCHIVELOG
MAXLOGFILES 192
MAXLOGMEMBERS 3
MAXDATAFILES 1024
MAXINSTANCES 32
MAXLOGHISTORY 4672
LOGFILE
GROUP 19 '+REDODG/fcrac1db/onlinelog/group_19.266.957110493' SIZE
120M BLOCKSIZE 512,
GROUP 20 '+REDODG/fcrac1db/onlinelog/group_20.264.957110499' SIZE
120M BLOCKSIZE 512,
GROUP 21 '+REDODG/fcrac1db/onlinelog/group_21.268.957110505' SIZE
120M BLOCKSIZE 512,
GROUP 22 '+REDODG/fcrac1db/onlinelog/group_22.267.957110509' SIZE
120M BLOCKSIZE 512,
GROUP 23 '+REDODG/fcrac1db/onlinelog/group_23.265.957110513' SIZE
120M BLOCKSIZE 512,
GROUP 24 '+REDODG/fcrac1db/onlinelog/group_24.263.957110547' SIZE
120M BLOCKSIZE 512
DATAFILE
'+DATADG/fcrac1db/datafile/system.262.955105763',
'+DATADG/fcrac1db/datafile/sysaux.260.955105763',
'+DATADG/fcrac1db/datafile/undotbs1.261.955105763',
'+DATADG/fcrac1db/datafile/users.259.955105763',
'+DATADG/fcrac1db/datafile/undotbs2.257.955105853',
'+DATADG/fcrac1db/datafile/soe.263.955389549',
'+DATADG/fcrac1db/datafile/undotbs3.264.956339675'
CHARACTER SET WE8MSWIN1252
Clone an Instance
The clone workflow can be used for cloning a local live database instance or cloning from a snapshot of the
database instance that has already been taken.
An instance cloned from a snapshot of a RAC instance will always be a stand-alone instance. The DBA should
manually create a cluster from this cloned instance if required.
When cloning a local live instance, a new snapshot of the instance is taken. This snapshot has a default prefix
of "BaseFor" in its name. This prefix is configurable in /opt/NimbleStorage/etc/noradatamgr.conf. Changes
to noradatamgr.conf require an NLT service restart to take effect.
To provide a snapshot name that has already been taken, the list-snapshots workflow can be invoked. The
required snapshot can then be used to clone the instance. The instance to be cloned can be local or remote.
If the source instance to be cloned is based on a remote host, its volumes must reside on the same group
that the host from which the CLI is invoked is configured to use. Also, this host (from which the CLI is invoked)
must also appear in the list of allowed hosts of the remote instance, for it to be able to clone the instance.
24Copyright
©
2019 by Hewlett Packard Enterprise Development LP. All rights reserved.
Documentation Feedback: [email protected]
Clone an Instance

You can also clone only the diskgroups of an instance (without creating a cloned instance containing the
cloned diskgroups). This is useful when you want to restore just a single file from a particular snapshot.
Procedure
Clone an instance.
noradatamgr --clone --instance instance_name --clone-name clone_name [--snapname snapshot_name]
[--clone-sid clone_sid_name] [--clone-home ORACLE_HOME] [--inherit-pfile][--override_pfile
absolute_path_to_pfile] [--folder folder_name] [--diskgroups-only]
• --clone-home - The clone workflow will use this as the ORACLE_HOME for the cloned instance. If you
do not use the --clone-home command and a local instance is being cloned, the cloned instance's
ORACLE_HOME value is set to that of the source instance. If you do not use the --clone-home
command and a remote instance is being cloned, the cloned instance's ORACLE_HOME value is set
to the value of the environment variable $ORACLE_HOME.
• --inherit-pfile - This option allows the cloned instance to inherit all the pfile parameters (except the basic
ones that are needed to bring the cloned instance up) of the source instance captured in the snapshot.
Do not use this option if there is a parameter in the source instance pfile that is incompatible and
prevents the cloned instance from starting.
• --override-pfile - This allows you to override the pfile for the cloned instance. If you do not use the
--override-pfile command, a pfile is generated for the cloned instance. If you use the --override-pfile
command but specify an incorrect pfile value, cloning will fail.
Example
Clone a database instance from local host
(Instance rh68db is running on host-rhel1)
[root@host-rhel1 ~]# noradatamgr --clone --instance rh68db --clone-name
clonedDB --snapname rh68.snap.603 --clone-home
/u01/app/base/product/11.2.0/dbhome_1/
Initiating clone ...
[##################################################] 100%
Success: Cloned instance rh68db to clonedDB.
Diskgroup: CLONEDDBDATADG
Disk: /dev/oracleasm/disks/CLONEDDB0002
Device: dm-8
Volume: clonedDB-DATA2
Serial number: ee11f455cc0e40376c9ce900f4f8b199
Size: 100GB
Disk: /dev/oracleasm/disks/CLONEDDB0001
Device: dm-4
Volume: clonedDB-DATA1
Serial number: 51e1732dbf0abf326c9ce900f4f8b199
Size: 100GB
Diskgroup: CLONEDDBLOGDG
Disk: /dev/oracleasm/disks/CLONEDDB
Device: dm-10
Volume: clonedDB-LOG1
Serial number: 8b999dffa7607ffb6c9ce900f4f8b199
Size: 50GB
Allowed hosts: host-rhel1
[root@host-rhel1 ~]#
[root@host-rhel1 ~]# ps aux|grep pmon
oracle 16983 0.0 0.0 39960408 28976 ? Ss 13:19 0:00
ora_pmon_clonedDB
25Copyright
©
2019 by Hewlett Packard Enterprise Development LP. All rights reserved.
Documentation Feedback: [email protected]
HPE Nimble Storage Oracle Application Data Manager

root 18993 0.0 0.0 103324 868 pts/0 S+ 13:21 0:00 grep
pmon
grid 28472 0.0 0.0 1340504 26864 ? Ss Oct20 0:31
asm_pmon_+ASM
oracle 29160 0.0 0.0 39960684 20904 ? Ss Oct20 0:34
ora_pmon_rh68db
[root@host-rhel1 ~]#
[grid@host-rhel1 ~]$ asmcmd lsdg
State Type Rebal Sector Block AU Total_MB Free_MB
Req_mir_free_MB Usable_file_MB Offline_disks Voting_files Name
MOUNTED EXTERN N 512 4096 1048576 102400 14554
0 14554 0 N ARCHDG/
MOUNTED NORMAL N 512 4096 1048576 204800 89780
0 44890 0 N CLONEDDBDATADG/
MOUNTED EXTERN N 512 4096 1048576 51200 50835
0 50835 0 N CLONEDDBLOGDG/
MOUNTED NORMAL N 512 4096 1048576 204800 89782
0 44891 0 N DATADG/
MOUNTED EXTERN N 512 4096 1048576 10236 10177
0 10177 0 N OCRDG/
MOUNTED EXTERN N 512 4096 1048576 51200 50956
0 50956 0 N REDODG/
Clone a database instance from a remote host
(Instance rh68db is running on host-rhel1 and we clone this instance on
host-rhel2. Please ensure rh68db on host-rhel1 allows host-rhel2 to
list snapshots or clone.)
[root@host-rhel2 ~]# noradatamgr --clone --instance rh68db --clone-name
db603 --snapname rh68.snap.603 --clone-home
/u01/app/base/product/11.2.0/dbhome_1
Initiating clone ...
[##################################################] 100%
Success: Cloned instance rh68db to db603.
Diskgroup: DB603DATADG
Disk: /dev/mapper/mpathy
Device: dm-26
Volume: db603-DATA2
Serial number: 02fcdccbfed7ee536c9ce900f4f8b199
Size: 100GB
Disk: /dev/mapper/mpathz
Device: dm-27
Volume: db603-DATA1
Serial number: 7542d8330bd19cae6c9ce900f4f8b199
Size: 100GB
Diskgroup: DB603LOGDG
Disk: /dev/mapper/mpathaa
Device: dm-28
Volume: db603-LOG1
Serial number: 7fe12c89e12a72926c9ce900f4f8b199
Size: 50GB
Allowed hosts: host-rhel2
[root@host-rhel2 ~]# ps aux|grep pmon
root 5035 0.0 0.0 112644 956 pts/0 S+ 18:09 0:00 grep
--color=auto pmon
grid 9908 0.0 0.0 1343280 24088 ? Ss Oct20 0:35
asm_pmon_+ASM
oracle 11735 0.0 0.0 4442960 16880 ? Ss Oct20 0:37
ora_pmon_rh72db
26Copyright
©
2019 by Hewlett Packard Enterprise Development LP. All rights reserved.
Documentation Feedback: [email protected]
HPE Nimble Storage Oracle Application Data Manager

oracle 26029 0.0 0.0 39963196 24896 ? Ss 18:08 0:00
ora_pmon_db603
Clone diskgroups only
ASM diskgroups before cloning:
[grid@host-rhel1 ~]$ asmcmd lsdg
State Type Rebal Sector Block AU Total_MB Free_MB
Req_mir_free_MB Usable_file_MB Offline_disks Voting_files Name
MOUNTED EXTERN N 512 4096 1048576 102400 14554
0 14554 0 N ARCHDG/
MOUNTED NORMAL N 512 4096 1048576 204800 89782
0 44891 0 N DATADG/
MOUNTED EXTERN N 512 4096 1048576 10236 10177
0 10177 0 N OCRDG/
MOUNTED EXTERN N 512 4096 1048576 51200 50956
0 50956 0 N REDODG/
[grid@host-rhel1 ~]$
Only clone the diskgroups of the specified instance
[root@host-rhel1 ~]# noradatamgr --clone --instance rh68db --clone-name
destDB --snapname rh68.snap.603 --diskgroups-only
Initiating clone ...
[##################################################] 100%
Success: Cloning diskgroups of instance rh68db completed.
DESTDBLOGDG
Disk: /dev/oracleasm/disks/DESTDB
Device: dm-11
Volume: destDB-LOG1
Serial number: 90e8b1d1b0e605b76c9ce900f4f8b199
Size: 50GB
DESTDBDATADG
Disk: /dev/oracleasm/disks/DESTDB0002
Device: dm-12
Volume: destDB-DATA1
Serial number: 0dac7bca494ad93d6c9ce900f4f8b199
Size: 100GB
Disk: /dev/oracleasm/disks/DESTDB0001
Device: dm-13
Volume: destDB-DATA2
Serial number: 9add48220356e99c6c9ce900f4f8b199
Size: 100GB
[root@host-rhel1 ~]#
ASM diskgroups after cloning:
[grid@host-rhel1 ~]$ asmcmd lsdg
State Type Rebal Sector Block AU Total_MB Free_MB
Req_mir_free_MB Usable_file_MB Offline_disks Voting_files Name
MOUNTED EXTERN N 512 4096 1048576 102400 14554
0 14554 0 N ARCHDG/
MOUNTED NORMAL N 512 4096 1048576 204800 89782
0 44891 0 N DATADG/
MOUNTED NORMAL N 512 4096 1048576 204800 89782
0 44891 0 N DESTDBDATADG/
MOUNTED EXTERN N 512 4096 1048576 51200 50956
0 50956 0 N DESTDBLOGDG/
MOUNTED EXTERN N 512 4096 1048576 10236 10177
0 10177 0 N OCRDG/
MOUNTED EXTERN N 512 4096 1048576 51200 50956
0 50956 0 N REDODG/
27Copyright
©
2019 by Hewlett Packard Enterprise Development LP. All rights reserved.
Documentation Feedback: [email protected]
HPE Nimble Storage Oracle Application Data Manager

The 'processes' value was set to 150 for instance rh68db when snapshot was taken.
[root@host-rhel1 14]# noradatamgr --get-pfile --instance rh68db --snapname
rh68db.snap.110
Pfile contents:
rh68db.__db_cache_size=35567697920
rh68db.__java_pool_size=805306368
rh68db.__large_pool_size=268435456
rh68db.__oracle_base='/u01/app/base'#ORACLE_BASE set from environment
rh68db.__pga_aggregate_target=13555990528
rh68db.__sga_target=40667971584
rh68db.__shared_io_pool_size=0
rh68db.__shared_pool_size=3489660928
rh68db.__streams_pool_size=268435456
*.audit_file_dest='/u01/app/base/admin/rh68db/adump'
*.audit_trail='db'
*.compatible='11.2.0.4.0'
*.control_files='+REDODG/rh68db/controlfile/current.256.921347795'
*.db_block_size=8192
*.db_create_file_dest='+DATADG'
*.db_create_online_log_dest_1='+REDODG'
*.db_domain=''
*.db_name='rh68db'
*.diagnostic_dest='/u01/app/base'
*.dispatchers='(PROTOCOL=TCP) (SERVICE=rh68dbXDB)'
*.log_archive_dest_1='LOCATION=+ARCHDG'
*.log_archive_format='%t_%s_%r.dbf'
*.open_cursors=300
*.pga_aggregate_target=13535019008
*.processes=150
*.remote_login_passwordfile='EXCLUSIVE'
*.sga_target=40607154176
*.undo_tablespace='UNDOTBS1'
Create a text file on the host and set the ‘processes’ value to 300
[root@host-rhel1 14]# cat /tmp/my-pfile-new-value.txt
*.processes=300
[root@host-rhel1 14]#
Clone a new instance from rh68db snapshot and override pfile
[root@host-rhel1 14]# noradatamgr --clone --instance rh68db --clone-name
rh68c110 --snapname rh68db.snap.110 --override-pfile
/tmp/my-pfile-new-value.txt
Initiating clone ...
[##################################################] 100%
Success: Cloned instance rh68db to rh68c110.
Diskgroup: RH68C110LOGDG
Disk: /dev/oracleasm/disks/RH68C110
Device: dm-35
Volume: rh68c110-LOG1
Serial number: 109895d6f7fd35486c9ce900f4f8b199
Size: 50GB
Diskgroup: RH68C110DATADG
Disk: /dev/oracleasm/disks/RH68C1100002
Device: dm-34
Volume: rh68c110-DATA2
Serial number: 0b91b7feee77e1856c9ce900f4f8b199
Size: 100GB
Disk: /dev/oracleasm/disks/RH68C1100001
28Copyright
©
2019 by Hewlett Packard Enterprise Development LP. All rights reserved.
Documentation Feedback: [email protected]
HPE Nimble Storage Oracle Application Data Manager

Device: dm-33
Volume: rh68c110-DATA1
Serial number: 6e9f5eef661518d36c9ce900f4f8b199
Size: 100GB
Allowed hosts: host-rhel1
Verify ‘processes’ value in cloned instance parameter file
[root@host-rhel1 14]# su - oracle
[oracle@hiqa-sys-rhel1 ~]$ . oraenv
ORACLE_SID = [rh68db] ? rh68c110
The Oracle base has been set to /u01/app/base
[oracle@hiqa-sys-rhel1 ~]$ sqlplus / as sysdba
SQL*Plus: Release 11.2.0.4.0 Production on Tue Nov 15 14:41:16 2016
Copyright (c) 1982, 2013, Oracle. All rights reserved.
Connected to:
Oracle Database 11g Enterprise Edition Release 11.2.0.4.0 - 64bit
Production
With the Partitioning, Automatic Storage Management, OLAP, Data Mining
and Real Application Testing options
SQL> show parameter processes
NAME TYPE VALUE
--------------------------------- --------- ------------------------------
aq_tm_processes integer 1
db_writer_processes integer 3
gcs_server_processes integer 0
global_txn_processes integer 1
job_queue_processes integer 1000
log_archive_max_processes integer 4
processes integer 300
SQL>
Delete a Snapshot of an Instance
Use this command to delete a snapshot of an instance. If this snapshot was created using the --replica option
in the snapshot CLI, you can also use this command to delete the replicated snapshot, if one exists.
Procedure
Delete a snapshot of an instance.
noradatamgr --delete-snapshot --instance instance_name --snapname snapshot_name [--delete-replica]
Example
Delete Snapshots of a Given Instance
[root]# noradatamgr --list-snapshot --instance rh68db
-----------------------------------+--------------+--------+-------------------
Snap Name Taken at Instance Usable for
cloning
-----------------------------------+--------------+--------+-------------------
rh68.snap.603 16-10-24 12:01 rh68db Yes
29Copyright
©
2019 by Hewlett Packard Enterprise Development LP. All rights reserved.
Documentation Feedback: [email protected]
Delete a Snapshot of an Instance
rh68db.snap.601 16-10-21 10:36 rh68db Yes
rh68db.snap.600 16-10-20 14:48 rh68db Yes
rh68db.snap.602 16-10-21 15:21 rh68db Yes
Delete a Specified Snapshot
[root]# noradatamgr --delete-snapshot --instance rh68db --snapname
rh68db.snap.602
Success: Snapshot rh68db.snap.602 deleted.
Verify the Specified Snapshot is Removed
[root]# noradatamgr --list-snapshot --instance rh68db
-----------------------------------+--------------+--------+-------------------
Snap Name Taken at Instance Usable for
cloning
-----------------------------------+--------------+--------+-------------------
rh68.snap.603 16-10-24 12:01 rh68db Yes
rh68db.snap.601 16-10-21 10:36 rh68db Yes
rh68db.snap.600 16-10-20 14:48 rh68db Yes
Destroy a Cloned Instance
This workflow destroys a cloned database instance with the specified SID. The database to be destroyed
must be based on cloned volumes.
The workflow completes these activities:
1
Deletes the database instance
2
Deletes the underlying diskgroups in the database instance
3
Attempts to delete the volume collection associated with the volumes that back the disks for the instance
Procedure
Destroy a cloned database instance.
noradatamgr --destroy --instance instance_name
Example
Destroy a cloned database instance.
[root]# noradatamgr --destroy --instance DESTDB
Instance DESTDB deleted.
Do you really want to proceed with destroying the
instance/diskgroup?(yes/no)yes
Diskgroup DESTDBDATADG deleted.
Diskgroup DESTDBLOGDG deleted.
Success: Instance DESTDB and its backing Nimble volumes cleaned up
successfully.
Destroy an ASM Diskgroup
To destroy a diskgroup, the Oracle instance using that diskgroup must be shut down, and no active processes
can be reading from or writing to the diskgroup. You can only destroy a diskgroup based on HPE Nimble
Storage volumes that have been cloned.
30Copyright
©
2019 by Hewlett Packard Enterprise Development LP. All rights reserved.
Documentation Feedback: [email protected]
Destroy a Cloned Instance

Procedure
Destroy an ASM diskgroup.
noradatamgr --destroy --diskgroup diskgroup_name
Example
Destroy an ASM Diskgroup
[root]# noradatamgr --destroy --diskgroup DESTDBLOGDG
Do you really want to proceed with destroying the
instance/diskgroup?(yes/no)yes
Success: Diskgroup DESTDBLOGDG deleted.
Verify the specified ASM Diskgroup is removed
[grid]$ asmcmd lsdg
State Type Rebal Sector Block AU Total_MB Free_MB
Req_mir_free_MB Usable_file_MB Offline_disks Voting_files Name
MOUNTED EXTERN N 512 4096 1048576 102400 14554
0 14554 0 N ARCHDG/
MOUNTED NORMAL N 512 4096 1048576 204800 89782
0 44891 0 N DATADG/
MOUNTED NORMAL N 512 4096 1048576 204800 89782
0 44891 0 N DESTDBDATADG/
MOUNTED EXTERN N 512 4096 1048576 10236 10177
0 10177 0 N OCRDG/
MOUNTED EXTERN N 512 4096 1048576 51200 50956
0 50956 0 N REDODG/
Overview of Using RMAN with NORADATAMGR
You can use the HPE Nimble Storage Oracle Application Data Manager (NORADATAMGR) to catalog the
backup instances you created with NORADATAMGR so that they are listed as valid Oracle Recovery Manager
(RMAN) backups. Then you can use RMAN to restore these backups.
Starting with HPE Nimble Linux Toolkit (NLT) 2.4.0, NORADATAMGR includes the catalog-backup command
and the uncatalog-backup command. The catalog-backup command clones the diskgroups in the database
instance snapshot captured by NORADATAMGR and registers them in the RMAN recovery catalog. RMAN
can now access the data. After you use RMAN to restore the data, you must run the uncatalog-backup
command. This command removes the cloned diskgroups from the recovery catalog, deletes the diskgroups,
and cleans up the volumes.
You can only restore from one instance snapshot at a time. You must run the uncatalog-backup command
after each restore operation to remove that instance from the recovery catalog. After the cleanup operation,
you can restore data from another NORADATAMGR snapshot by using the catalog-backup command to
add cloned diskgroups from another NORADATAMGR snapshot to the recovery catalog.
You always execute the catalog-backup and uncatalog-backup commands on the host where the target
backup instance resides.
Note You cannot recover an instance by using replicated downstream snapshots from a replication partner.
You can, however, clone an instance from a replicated snapshot.
The following is a high-level overview of the steps required to enable RMAN to create a backup from
NORADATAMGR data.
Before you begin
You must have the following:
31Copyright
©
2019 by Hewlett Packard Enterprise Development LP. All rights reserved.
Documentation Feedback: [email protected]
Overview of Using RMAN with NORADATAMGR

• A recovery catalog. The NORADATAMGR target database backup instance must be registered with the
recovery catalog.
• Login credentials and the correct role-based access control (RBAC) role are required by the recovery
catalog. Normally, these are the operating system login credentials and the RBAC role
RECOVERY_CATALOG_OWNER.
• Archive log mode should be enabled for the instance. RMAN requires this mode for recovery operations.
• The clock on the host (or server) should be synchronized with the HPE Nimble Storage group. If the NTP
daemon has been disabled on the host, and the clocks on the host and the HPE Nimble Storage group
are out-of-sync, you must make sure you choose the snapshot that contains the required changes for the
restore operation. The "creation-time" for the snapshot is based on the HPE Nimble Storage group clock.
• NLT 2.4.0 or later installed on the host.
Note Unless controlfile autobackup is enabled in RMAN, snapshots created using earlier versions of
NLT NORADATAMGR might not contain an RMAN controlfile backup. The controlfile is required for a
successful recovery.
Procedure
1
Use NORADATAMGR to create a backup snapshot.
2
Locate the HPE Nimble Storage snapshot that has the backup data you need by executing the noradatamgr
--list-snapshot command line.
3
Confirm that none of the diskgroups are cataloged with the recovery catalog by executing the noradatamgr
--describe output command line.
4
If there no cataloged diskgroups, create an RMAN backup copy from the NORADATAMGR snapshot by
executing the noradatamgr --catalog-backup command line.
The catalog-backup command clones the diskgroups in the snapshot you selected and adds them to
RMAN as a valid backup copy. It uses the format {PREFIX}-{DGTYPE(data/log)} to name the cloned
diskgroups.
5
Restore the files using RMAN.
For information about using RMAN, refer to your Oracle documentation. You will need to connect the
target database where the RMAN recovery catalog resides by executing RMAN commands.
Make sure you use any time up until the snapshot creation time in the UNTIL TIME line for the RMAN
recovery. Doing this ensures that RMAN uses the cataloged diskgroup cloned from the snapshot for the
recovery operation. After restoring to the snapshot, RMAN uses the archived redo logs to recover data
up to the time that is provided in the RMAN command.
The following is an example of the type of RMAN commands you might need to execute to restore a
backup instance called [email protected]:1522/CATDB:
1
2
RMAN> shutdown immediate
3
RMAN> startup mount;
4
RMAN> run {
2> SET UNTIL TIME "TO_DATE('2018 Apr 11 14:33','yyyy mon dd hh24:mi')";
3> restore database;
4> recover database;
5> }
5
RMAN> alter database open resetlogs;
6
Remove the cloned diskgroups from the RMAN recovery catalog, delete the diskgroups, and clean up the
underlying volumes by running the noradatamgr --uncatalog-backup command line on the target database
host.
32Copyright
©
2019 by Hewlett Packard Enterprise Development LP. All rights reserved.
Documentation Feedback: [email protected]
HPE Nimble Storage Oracle Application Data Manager

Note You must always use the uncatalog-backup command to remove the current cataloged instance
snapshot from the RMAN recovery catalog before you can recover another NORADATAMGR instance
snapshot.
7
Confirm that none of the diskgroups are cataloged with the recovery catalog by executing the noradatamgr
--describe output command line.
8
If you want to use RMAN to recover another NORADATAMGR instance snapshot, repeat steps 1 through
6.
Add a NORADATAMGR Backup to an RMAN Recovery Catalog
The catalog-backup command included with HPE Nimble Storage Oracle Application Data Manager
(NORADATAMGR) allows you to use Oracle Recovery Manager (RMAN) to create backups of data stored
in snapshots created with NORADATAMGR. The command clones the diskgroups located in the
NORADATAMGR snapshot and catalogs them so that they show up in the RMAN recovery catalog.
Note This command is available with HPE Nimble Storage Linux Toolkit (NLT) 2.4.0 and later.
Before you run any RMAN commands, you must run the catalog-backup command on the host where the
target database resides.
The catalog-backup command uses the format:
noradatamgr --catalog-backup --instance {target_db_SID} --snapname {snapshot_to_recover_from}
--diskgroup-prefix {prefix_for_naming_cloned_diskgroups} --rcat {net_service_name_for_recovery_catalog}
--rcat-user {recovery_catalog_user} [--rcat-passwd {password_for_rcat_user}]
If the RMAN recovery catalog is on the host where the target database is running, you can use the recovery
catalog name as the value for the --rcat parameter. If the recovery catalog is on a remote host, you must use
a net service name for the parameter.
For example, if you have a backup instance called PRODDB that has a listener running on port 1521, the net
service name would be node01.<company-domain.com>:1521/PRODDB.
If you do not provide a value for the --rcat_passwd parameter, you will be prompted to enter a password
when you execute the command..
To identify the cloned diskgroups, you must use the following format as the name:
{PREFIX}-{DGTYPE(data/log)}
Each backup instance can have only one set of cataloged diskgroups that can be used for the restore operation.
If you need to use another NORADATAMGR snapshot as part of the restore operation, you must run the
NORADATAMGR uncatalog-backup command to delete the existing cataloged diskgroups and then re-run
the catalog-backup command with the other NORADATAMGR snapshot.
You must execute the catalog-backup command on the host where the target backup instance resides.
Before you begin
You must have the following:
• A snapshot backup or clone created using NORADATAMGR.
• A recovery catalog. The NORADATAMGR target database backup instance must be registered with the
recovery catalog.
• Login credentials and the correct role-based access control (RBAC) role are required by the recovery
catalog. Normally, these are the operating system login credentials and the RBAC role
RECOVERY_CATALOG_OWNER.
• NLT 2.4.0 or later installed on the host.
Note Unless controlfile autobackup is enabled in RMAN, snapshots created using earlier versions of
NLT NORADATAMGR might not contain an RMAN controlfile backup. The controlfile is required for a
successful recovery.
33Copyright
©
2019 by Hewlett Packard Enterprise Development LP. All rights reserved.
Documentation Feedback: [email protected]
Add a NORADATAMGR Backup to an RMAN Recovery Catalog

Procedure
1
Check to see if there are any cataloged diskgroups for that target instance by running the command
noradatamgr --describe --instance <instance_name> .
This example uses proddb as the target instance.
# noradatamgr --instance proddb -d
Diskgroup: ARCHDG
Disk: /dev/oracleasm/disks/ARCH
Device: dm-3
Volume: prod-arch
Serial number: 6024de7dc66a60f46c9ce8004c92b39c
Size: 120GB
Diskgroup: REDODG
Disk: /dev/oracleasm/disks/REDO
Device: dm-2
Volume: prod-redo
Serial number: 6db13e1bf84f48036c9ce8004c92b39c
Size: 100GB
Diskgroup: DATADG
Disk: /dev/oracleasm/disks/DATA
Device: dm-5
Volume: prod-data
Serial number: 999cb6128f05af506c9ce8004c92b39c
Size: 110GB
Allowed hosts: ALL
NPM enabled: No
Cataloged diskgroups: None
2
If there are no cataloged diskgroups, run noradatamgr --catalog-backup to catalog the diskgroup.
Note If there are cataloged diskgroups, run noradatamgr --uncatalog-backup to remove then. Then run
noradatamgr --catalog-backup.
# noradatamgr --instance proddb --catalog-backup
--snapname my.snapshot.4 --diskgroup-prefix MS4 --rcat
tester.vlab.hpstorage.com:1521/CATDB
--rcat-user rtest --rcat-passwd rtest
[##################################################] 100%
Successfully completed cataloging backups from snapshot my.snapshot.4.
Cloned and cataloged the following diskgroups: MS4LOGDG, MS4DATADG
#
3
You can now complete the restore operation using RMAN. For instructions about using RMAN, see your
Oracle documentation.
Clean Up Cataloged Diskgroups and Volumes Used With RMAN
After you use Oracle Recovery Manager (RMAN) to recover data from an HPE Nimble Storage Oracle
Application Data Manager (NORADATAMGR) snapshot, you should clean up the cataloged diskgroups and
underlying HPE Nimble Storage volumes. The NORADATAMGR uncatalog-backup command removes the
cloned, cataloged diskgroups that were used for the RMAN restore operation, deletes the diskgroups, and
cleans up the volumes.
Note This command is available with HPE Nimble Storage Linux Toolkit (NLT) 2.4.0 and later.
This command uses the format:
noradatamgr --uncatalog-backup --instance {target_db_SID} --rcat {net_service_name_for_recovery_catalog}
--rcat-user {recovery_catalog_user} [--rcat-passwd {password_for_rcat_user}]
34Copyright
©
2019 by Hewlett Packard Enterprise Development LP. All rights reserved.
Documentation Feedback: [email protected]
Clean Up Cataloged Diskgroups and Volumes Used With RMAN

If the RMAN recovery catalog is on the target database host, you can use the recovery catalog name as the
parameter for the --rcat parameter of the uncatalog-backup command. If the recovery catalog is on a remote
host, you must use a net service name for the parameter.
For example, if you have a backup instance called PRODDB that has a listener running on port 1521, the net
service name would be node01.<company-domain.com>:1521/PRODDB.
You do not need to include the diskgroup prefix that you created with the catalog-backup command because
you can have only one set of cataloged NORADATAMGR diskgroups in the recovery catalog at one time.
This command uses the instance name to locate the diskgroups.
If you do not provide a value for the --rcat_passwd parameter, you will be prompted to enter a password.
You must execute the uncatalog-backup command after each RMAN restore operation that uses data from
a NORADATAMGR backup instance. This is because you can only restore from one NORADATAMGR
instance backup at a time.
You must execute the uncatalog-backup command on the host where the target backup instance resides.
Before you begin
You must have the following:
• A recovery catalog. The NORADATAMGR target database backup instance must be registered with the
recovery catalog.
• Login credentials and the correct role-based access control (RBAC) role are required by the recovery
catalog. Normally, these are the operating system login credentials and the RBAC role
RECOVERY_CATALOG_OWNER.
• NLT 2.4.0 or later installed on the host.
Note Unless controlfile autobackup is enabled in RMAN, snapshots created using earlier versions of
NLT NORADATAMGR might not contain an RMAN controlfile backup. The controlfile is required for a
successful recovery.
You should only execute this command after you have performed an RMAN restore operation using an
instance snapshot created by NORADATAMGR.
Procedure
1
Check to see if there are any diskgroups cataloged for the specified database.
Note This example uses the instance rhtest and locates two cataloged diskgroups that use the prefix
"MS4".
# noradatamgr --instance rhtest -d
Diskgroup: RHTESTARCHDG
Disk: /dev/oracleasm/disks/RHTESTARCH
Device: dm-3
Volume: rhtest-arch
Serial number: 6024md6nj66a60f46c9ce9002c92b39c
Size: 120GB
Diskgroup: RHTESTDATADG
Disk: /dev/oracleasm/disks/RHTESTDATA
Device: dm-2
Volume: rhtest-data
Serial number: 5md13njbf74f48036c9ce9002c92b59c
Size: 100GB
Diskgroup: RHTESTREDODG
Disk: /dev/oracleasm/disks/RHTESTREDO
Device: dm-5
35Copyright
©
2019 by Hewlett Packard Enterprise Development LP. All rights reserved.
Documentation Feedback: [email protected]
HPE Nimble Storage Oracle Application Data Manager
Volume: rhtest-redo
Serial number: 533md6128f93nj506c9ce9002c92b39c
Size: 110GB
Allowed hosts: ALL
NPM enabled: No
Cataloged diskgroups: MS4DATADG,MS4LOGDG
#
2
Run uncatalog-backup:
# noradatamgr --uncatalog-backup --instance proddb
--rcat tester.vlab.hpstorage.com:1521/CATDB --rcat-user rtest --rcat-passwd
rtest
Uncataloged RMAN backups for datafile and controlfile on cloned diskgroups.
Diskgroup MS4DATADG deleted.
Diskgroup MS4LOGDG deleted.
Success: Completed cleaning up cataloged backup and cloned diskgroups for
instance rhtest.
3
Verify that there is no longer any diskgroup that is cataloged.
# noradatamgr --instance rhtest -d
Diskgroup: RHTESTARCHDG
Disk: /dev/oracleasm/disks/RHTESTARCH
Device: dm-3
Volume: rhtest-arch
Serial number: 6024md6nj66a60f46c9ce9002c92b39c
Size: 120GB
Diskgroup: RHTESTDATADG
Disk: /dev/oracleasm/disks/RHTESTDATA
Device: dm-2
Volume: rhtest-data
Serial number: 5md13njbf74f48036c9ce9002c92b59c
Size: 100GB
Diskgroup: RHTESTREDODG
Disk: /dev/oracleasm/disks/RHTESTREDO
Device: dm-5
Volume: rhtest-redo
Serial number: 533md6128f93nj506c9ce9002c92b39c
Size: 110GB
Allowed hosts: ALL
NPM enabled: No
Cataloged diskgroups: None
#
RAC Database Recovery
If you have an Oracle Real Application Clusters (RAC) database, you can use the following procedure to
recover an HPE Nimble Storage Oracle Application Data Manager (NORADATAMGR) backup instance of it
using Oracle Recovery Manager (RMAN). You must add the database instance snapshot that you want to
use for the recovery operation to the RMAN catalog.
Important You must execute all the commands for this procedure from the same node.
36Copyright
©
2019 by Hewlett Packard Enterprise Development LP. All rights reserved.
Documentation Feedback: [email protected]
RAC Database Recovery

Before you begin
You must have the following:
• A recovery catalog. The NORADATAMGR target database backup instance must be registered with the
recovery catalog.
• Login credentials and the correct role-based access control (RBAC) role are required by the recovery
catalog. Normally, these are the operating system login credentials and the RBAC role
RECOVERY_CATALOG_OWNER.
• Archive log mode should be enabled for the instance. RMAN requires this mode for recovery operations.
• The clock on the host (or server) should be synchronized with the HPE Nimble Storage group. If the NTP
daemon has been disabled on the host, and the clocks on the host and the HPE Nimble Storage group
are out-of-sync, you must make sure you choose the snapshot that contains the required changes for the
restore operation. The "creation-time" for the snapshot is based on the HPE Nimble Storage group clock.
• NLT 2.4.0 or later installed on the host.
Note Unless controlfile autobackup is enabled in RMAN, snapshots created using earlier versions of
NLT NORADATAMGR might not contain an RMAN controlfile backup. The controlfile is required for a
successful recovery.
Procedure
1
Run the noradatamgr --catalog-backup command to add the snapshot of the RAC database to the
RMAN catalog. This is the snapshot you will use for the RMAN backup.
2
Convert the RAC database to a stand-alone database instance by setting the CLUSTER_DATABASE
parameter to false.
3
Shutdown your system and then restart it and mount the database.
4
Restore the database using RMAN.
For information about using RMAN, refer to your Oracle documentation. You must connect the target
database where the RMAN recovery catalog resides by executing RMAN commands.
Make sure you use any time up until the snapshot creation time in the UNTIL TIME line for the RMAN
recovery. Doing this ensures that RMAN uses the cataloged diskgroup cloned from the snapshot for the
recovery operation. After restoring to the snapshot, RMAN uses the archived redo logs to recover data
up to the time that is provided in the RMAN command.
The following is an example of the type of RMAN commands you might need to execute to restore a
backup instance called [email protected]:1522/TESTDB:
1
2
RMAN> shutdown immediate
3
RMAN> startup mount;
4
RMAN> run {
2> SET UNTIL TIME "TO_DATE('2018 Apr 11 14:33','yyyy mon dd hh24:mi')";
3> restore database;
4> recover database;
5> }
5
RMAN> alter database open resetlogs;
5
When the RMAN recovery of the database is complete, remove the cloned diskgroups from the RMAN
recovery catalog, delete the diskgroups, and clean up the underlying volumes by running the noradatamgr
--uncatalog-backup command line on the target database host.
This command also cleans up the entries for the cataloged diskgroups from the crsctl and srvctl
configuration. If these configurations are not cleaned up, the rest of the nodes in the RAC environment
cannot be started. For information about manually cleaning up these configurations and restarting the
RAC nodes, see Bringing Up the RAC Nodes After an RMAN Recovery Operation on page 41.
37Copyright
©
2019 by Hewlett Packard Enterprise Development LP. All rights reserved.
Documentation Feedback: [email protected]
HPE Nimble Storage Oracle Application Data Manager

Note You must always use the uncatalog-backup command to remove the current cataloged instance
snapshot from the RMAN recovery catalog before you can recover another NORADATAMGR instance
snapshot.
6
Change the CLUSTER_DATABASE parameter back to true and shut down the database.
7
Start database by using the srvctl start database command.
8
Confirm that the database has been started on all the RAC nodes.
Oracle NPM and NLT Backup Service
Oracle NPM and the NLT Backup Service are two additional modules in the NLT framework.
Important Replication of database snapshots taken by Oracle NPM is not supported unless the downstream
array in the replication partnership has NimbleOS 4.x or a later version installed. If the downstream array
does not meet this requirement, the replicated snapshots cannot be used to clone the database instance
using the NoradataMgr tool.
Oracle NPM provides the ability to create Oracle-aware scheduled snapshots for an instance without need
for doing this manually using the NORADATAMGR snapshot CLI. This makes use of the schedules that are
present on a volume collection in the Nimble group.
NLT Backup Service can be started and stopped by running the nltadm start and stop commands. This
service must be in the running state to use Oracle NPM. The status of the server can be viewed by running
the nltadm --status command.
The NLT Backup Service requires a group to be added in NLT for it to start. The port on which it starts can
be controlled through the following configuration in /etc/nlt.conf: nlt.daemon.backup-service.port=9000.
By default, it starts on port 9000.
Hotbackup mode is not used by default for NPM scheduled snapshots, except in the case of a RAC instance.
If hot-backup mode needs to be enabled for instances on the host, the following entry needs to be added to
/opt/NimbleStorage/etc/noradatamgr.conf.
npm.hotbackup.enable=true
Any change in the conf files requires a restart of the NLT service to take effect.
Requirements for enabling NPM for a particular database instance:
• NLT Backup Service should be in the running state.
This can be verified by running the nltadm --status command.
• The NimbleOS version of the group added to NLT should be 5.0.x or later.
• Running hostname --fqdn should display the full hostname along with the domain name (FQDN).
The group will try to access the host on this hostname.
NPM Commands
Use these commands to manage the Oracle NPM Service
• To enable NPM, use
noradatamgr --enable-npm --instance {SID}
For more information, refer to Enable NPM for an instance on page 17.
• To disable NPM, use
noradatamgr --disable-npm --instance {SID}
38Copyright
©
2019 by Hewlett Packard Enterprise Development LP. All rights reserved.
Documentation Feedback: [email protected]
Oracle NPM and NLT Backup Service

For more information, refer to Disable NPM for an instance on page 18.
• To check the status of whether NPM has been enabled for an instance, use
noradatamgr --describe --instance {SID}
For more information, refer to Describe an Instance on page 15.
• To filter for snapshots that have been triggered by NPM, use
noradatamgr -list --instance <SID> --npm
For more information, refer to List and Filter Snapshots of an Instance on page 21.
Troubleshooting NORADATAMGR
Use the following sections to help troubleshoot any issues you might encounter.
Log Files
–NLT logs:
• /opt/NimbleStorage/log/{nlt.log + noradatamgr.log}
–Oracle logs:
• ASM alert log @ $ORACLE_BASE/diag/asm/+asm/+ASM/trace/alert_+ASM.log
• Instance alert log @ $ORACLE_BASE/diag/rdbms/<INSTANCE NAME>/<SID>/alert/alert_<SID>.log
• ASMLib log @ /var/log/oracleasm
SQL Plus
–Oracle SqlPlus:
• Connect to the +ASM instance using:
• –sqlplus / as sysasm
• –Views of interest: v$ASM_DISKGROUP, v$ASM_DISK
• Connect to the db instance using:
• –sqlplus / as sysdba
Information for a noradatamgr Issue
Use the following as a guide when gathering information to report a troubleshooting issue related to
noradatamgr.
–Get the ASM and storage footprint of the instance:
•
noradatamgr --describe --instance [SID]
–Get the group information:
•
nltadm -–group -–list
–Get information about the storage objects for the instance and their metadata:
39Copyright
©
2019 by Hewlett Packard Enterprise Development LP. All rights reserved.
Documentation Feedback: [email protected]
Troubleshooting NORADATAMGR

• Get authentication token
curl -k -X POST -d '{"data":{"username":“<name>", "password":
"<password>"}}' https://<management-ip>:5392/v1/tokens
• Get information about volumes/volume collections/snapshot collections of the instance
curl -k -H "X-Auth-Token:<auth-token>" -X
GET https://xx.xx.xxx.xx:5392/v1/volume/<id>
curl -k -H "X-Auth-Token:<auth-token>" -X
GET https://xx.xx.xxx.xx:5392/v1/volume_collection/<id>
ASM Disks Offline When Controller Failure Occurs
On controller failover, an ASM diskgroup goes offline and the following error messages are seen in the ASM
alert.log.
WARNING: Waited 15 secs for write IO to PST disk 0 in group 1.
WARNING: Waited 15 secs for write IO to PST disk 0 in group 1.
WARNING: Waited 15 secs for write IO to PST disk 0 in group 2.
NOTE: process _b000_+asm (4515) initiating offline of disk 0.3915944537 (DATA1)
with mask 0x7e in group 2
NOTE: process _b000_+asm (4515) initiating offline of disk 1.3915944538 (DATA2)
with mask 0x7e in group 2
This is a known issue with Oracle. Change the _asm_hbeatiowait from 15 to 120 seconds to avoid this. Run
the following command in an ASM instance to set the desired value for _asm_hbeatiowait:
alter system set "_asm_hbeatiowait"=120 scope=spfile sid='*';
And then restart the ASM instance / crs, to take new parameter value in effect.
noradatamgr Command Fails after NLT Installation
A noradatamgr command fails soon after NLT installation with the following error message:
ERROR CliClient: - The required files were not found. Make sure service is
running using nltadm --status
Also, the Oracle-App-Data-Manager service is shown as “STOPPED” in nltadm —status.
This error message is expected when array information is not added into NLT. Add group information using
the nltadm --group --add --ip-address <IP> --username <admin user> command, and start the service
using the nltadm --start oracle command. The noradatamgr command should now work.
Snapshot and Clone Workflows Fail if spfile not Specified
An spfile must be specified for each DB instance for snapshot and clone workflows. It gives the following
error in the log:
ORA-01565: error in identifying file '?/dbs/[email protected]'
ORA-27037: unable to obtain file status
An spfile must be used. To create an spfile from memory, use the following command:
SQL> create pfile='/tmp/initFGTEST.ora.5881b834-b914-4df2-8da5-7a46e4abd87e'
40Copyright
©
2019 by Hewlett Packard Enterprise Development LP. All rights reserved.
Documentation Feedback: [email protected]
ASM Disks Offline When Controller Failure Occurs

Failover causes ASM to mark disks offline or Oracle database fails
Failover on the array causes ASM to mark disks offline and/or become inaccessible for a very short period
of time, or the Oracle database fails to start due to ASM not being able to locate or find its disks.
If any of the above issues occur, verify that Oracle ASMlib has the correct parameters set in the
/etc/sysconfig/oracleasm file. For information, see HPE Nimble Storage Oracle Application Data
Manager on page 12
Bringing Up the RAC Nodes After an RMAN Recovery Operation
If you are working with Oracle Real Application Clusters (RAC), you might have an issue where the RAC
nodes are not able to start after you perform a recovery operation using Oracle Recovery Manager (RMAN).
This can happen when entries from the cataloged disk groups appear in the crsctl and srvctl repositories.
In a RAC recovery operation, cloned diskgroups are added to the crsctl and srvctl repositories after you run
the catalog-backup command and the RMAN recovery commands to recover the database instance.
If the RAC nodes are not starting after the recovery operation finishes, you must remove these entries manually.
Procedure
1
Confirm that the cloned diskgroups were added to the crsctl repository by executing the crsctl status res
–t command.
2
If there are diskgroups in the crsctl repository, remove them by executing the crsctl delete resource
'ora.<DG-NAME>.dg' –f command.
<DB-NAME> is the name of the diskgroup.
3
Check to see whether any diskgroups were added to the srvctl configuration dependency list for the target
RAC database by executing the srvctl config database -d <RAC-DB-NAME> command.
<RAC-DB-NAME> is the name of the RAC database.
4
If there are diskgroups in the dependency list, update the srvctl configuration to remove them by executing
the srvctl modify database -d <RAC-DB-NAME> -a '<COMMA-SEPARATED-LIST-DISKGROUPS>'
command.
<RAC-DB-NAME> is the name of the RAC database.
<COMMA-SEPARATED-LIST-DISKGROUPS> contains the names of the diskgroups remaining in the
dependency list of the RAC database. You must separate the names of the diskgroups using commas.
Do not include any diskgroups that were cataloged and cloned.
The nodes in the RAC instance should now be able to come back up.
5
If you did not run the uncatalog-backup command after the RMAN recovery operation, you should run
it now.
41Copyright
©
2019 by Hewlett Packard Enterprise Development LP. All rights reserved.
Documentation Feedback: [email protected]
Failover causes ASM to mark disks offline or Oracle database fails

HPE Nimble Storage Docker Volume Plugin
The HPE Nimble Storage Docker Volume plugin supports the following capabilities:
• Create Docker volumes backed by HPE Nimble Storage volumes to efficiently persist application data and
specify various volume options.
• Clone a Docker volume in order to have multiple copies of production data for development and testing.
• Import HPE Nimble Storage volumes from existing environments into a Docker environment.
• Import clones of HPE Nimble Storage volume snapshots into Docker.
• Make HPE Nimble Storage-based Docker volumes available on any Docker container node.
• Remove HPE Nimble Storage volumes from Docker control.
• Delete HPE Nimble Storage volumes from Docker to reclaim space.
• Set defaults for HPE Nimble Storage-based Docker volumes.
• Set filesystem defaults for HPE Nimble Storage-based Docker volumes. The following create time attributes
can be set in the /opt/NimbeStorage/etc/docker-driver.conf file:
• Performance policy
• Pool name
• Folder name
• Thick or thin provisioning
• Deduplication
• Encryption
• Assign one of several predefined performance policies to Docker volumes.
Important The Docker driver will not be able to communicate with NimbleOS if the Nimble group is using
custom SSL certificates.
Docker Swarm and SwarmKit Considerations
If you are considering using any Docker clustering technologies for your Docker deployment, it is important
to understand the fencing mechanism used to protect data. Attaching the same Docker Volume to multiple
containers on the same host is fully supported. Mounting the same volume on multiple hosts is not supported.
Docker does not provide a fencing mechanism for nodes that have become disconnected from the Docker
Swarm. This results in the isolated nodes continuing to run their containers. When the containers are
rescheduled on a surviving node, the Docker Engine will request that the Docker Volume(s) be mounted. In
order to prevent data corruption, the Docker Volume Plugin will stop serving the Docker Volume to the original
node before mounting it on the newly requested node.
During a mount request, the Docker Volume Plugin inspects the ACR (Access Control Record) on the volume.
If the ACR does not match the initiator requesting to mount the volume, the ACR is removed and the volume
taken offline. The volume is now fenced off and other nodes are unable to access any data in the volume.
The volume then receives a new ACR matching the requesting initiator, and it is mounted for the container
requesting the volume. This is done because the volumes are formatted with XFS, which is not a clustered
filesystem and can be corrupted if the same volume is mounted to multiple hosts.
The side effect of a fenced node is that I/O hangs indefinitely, and the initiator is rejected during login. If the
fenced node rejoins the Docker Swarm using Docker SwarmKit, the swarm tries to shut down the services
that were rescheduled elsewhere to maintain the desired replica set for the service. This operation will also
hang indefinitely waiting for I/O.
42Copyright
©
2019 by Hewlett Packard Enterprise Development LP. All rights reserved.
Documentation Feedback: [email protected]
HPE Nimble Storage Docker Volume Plugin

We recommend running a dedicated Docker host that does not host any other critical applications besides
the Docker Engine. Doing this supports a safe way to reboot a node after a grace period and have it start
cleanly when a hung task is detected. Otherwise, the node can remain in the hung state indefinitely.
The following kernel parameters control the system behavior when a hung task is detected:
# Reset after these many seconds after a panic
kernel.panic = 5
# I do consider hung tasks reason enough to panic
kernel.hung_task_panic = 1
# To not panic in vain, I'll wait these many seconds before I declare
a hung task
kernel.hung_task_timeout_secs = 150
Add these parameters to the /etc/sysctl.d/99-hung_task_timeout.conf file and reboot the system.
Note Docker SwarmKit declares a node as failed after five (5) seconds. Services are then rescheduled and
up and running again in less than ten (10) seconds. The parameters noted above provide the system a way
to manage other tasks that may appear to be hung and avoid a system panic.
The docker-driver.conf File
The /opt/NimbleStorage/etc/docker-driver.conf file is provided with the Docker Driver plugin so
that you can customize its behavior. When using a configuration management system, the options set in this
configuration file support consistency across nodes.
Note Any change to the Docker configuration file requires that NLT be restarted.
General Options
The first section of the file is used to control the general behaviors of the plugin as described below.
• docker.volume.dir Describes where on the host running the Docker engine the driver should make HPE
Nimble Storage volumes available.
• nos.volume.name.prefix Describes the prefix to add to volume name (created by the Docker driver) on
the group.
• nos.volume.name.suffix Describes the suffix to add to volume name (created by the Docker driver) on
the group.
• nos.volume.destroy.when.removed Controls the action taken by the driver when you remove a volume
using the docker volume rm command. If this option is set to true, the volume and all of its snapshots
are deleted from the group, and are no longer available. If this option is set to false, the volume is removed
from Docker control, but remains in the group in an offline state.
• nos.default.perfpolicy.name Describes the name of the policy to use as the default performance policy.
If no performance policy with this name is found, one is created.
• nos.clone.snapshot.prefix Describes the prefix of the name of the snapshot used to clone a Docker
volume.
Below is the content of this section of the configuration file with the default values:
docker.volume.dir=/opt/nimble/
nos.volume.name.prefix=
nos.volume.name.suffix=.docker
nos.volume.destroy.when.removed=false
nos.default.perfpolicy.name=DockerDefault
nos.clone.snapshot.prefix=BaseFor
43Copyright
©
2019 by Hewlett Packard Enterprise Development LP. All rights reserved.
Documentation Feedback: [email protected]
The docker-driver.conf File

Create Options
The second section of the file is used to set your own default options to use with the create command. These
options are used when a you do not specify values when creating Docker volumes. To set your own defaults,
update and uncomment these lines, save your changes, and restart NLT for the settings to take effect.
• docker.vol.create.sizeInGiB The size of the volume in GiB.
• docker.vol.create.fsOwner The user ID and group ID that should own the root directory of the filesystem,
in the form of [userId:groupId].
• docker.vol.create.fsMode 1 to 4 octal digits that represent the file mode to apply to the root directory of
the filesystem.
• docker.vol.create.description The text to use as a volume description.
• docker.vol.create.perfPolicy The name of the performance policy to assign to the volume.
• docker.vol.create.pool The name of pool in which to place the volume.
• docker.vol.create.folder The name of folder in which to place the volume.
• docker.vol.create.encryption Indicates whether the volume should be encrypted.
• docker.vol.create.thick Optional. Indicates that the volume should be thick provisioned.
• docker.vol.create.dedupe
Note Thick provisioning and deduplication are mutually exclusive.
• docker.vol.create.limitMBPS The IOPS limit of the volume. The IOPS limit should be in the range [256,
4294967294], or -1 for unlimited.
• docker.vol.create.limitMBPS The MB/s throughput limit for the volume. If both limitIOPS and limitMBPS
are specified, limitMBPS must not be reached before limitIOPS.
• docker.vol.create.protectionTemplate The name of the protection template.
Below is the content of this section of the configuration file with the default values:
#
# Default settings for create operations
# These settings are used when not
# specified on the command line or API.
#
#docker.vol.create.sizeInGiB=10
#docker.vol.create.limitIOPS=-1
#docker.vol.create.limitMBPS=-1
#docker.vol.create.fsOwner=
#docker.vol.create.fsMode=
#docker.vol.create.description=
#docker.vol.create.perfPolicy=
#docker.vol.create.protectionTemplate=
#docker.vol.create.pool=
#docker.vol.create.folder=
#docker.vol.create.encryption=true/false
#docker.vol.create.thick=true/false
#docker.vol.create.dedupe=true/false
Create Override Options
The third section of the file is used to set override (forced) options for use with the create command. These
options override the default options asnullnullnullnullnull
• override.docker.vol.create.sizeInGiB The size of the volume in GiB.
• override.docker.vol.create.fsOwner The user ID and group ID that should own the root directory of the
filesystem, in the form of [userId:groupId].
• override.docker.vol.create.fsMode 1 to 4 octal digits that represent the file mode to apply to the root
directory of the filesystem.
44Copyright
©
2019 by Hewlett Packard Enterprise Development LP. All rights reserved.
Documentation Feedback: [email protected]
HPE Nimble Storage Docker Volume Plugin

• override.docker.vol.create.description The text to use as a volume description.
• override.docker.vol.create.perfPolicy The name of the performance policy to assign to the volume.
• override.docker.vol.create.encryption Indicates whether the volume should be encrypted.
• override.docker.vol.create.thick Optional. Indicates that the volume should be thick provisioned.
• override.docker.vol.create.dedupe Optional. Indicates that the volume should be deduplicated.
Note Thick provisioning and deduplication are mutually exclusive.
• override.docker.vol.create.limitMBPS The IOPS limit of the volume. The IOPS limit should be in the
range [256, 4294967294], or -1 for unlimited.
• override.docker.vol.create.limitMBPSOptional. Indicates that the volume The MB/s throughput limit for
the volume. If both limitIOPS and limitMBPS are specified, limitMBPS must not be reached before limitIOPS.
• override.docker.vol.create.protectionTemplate The name of the protection template.
Below is the content of the override settings of the configuration file with the default values:
# _ _ _
# / \ __| |_ ____ _ _ __ ___ ___ __| |
# / _ \ / _` \ \ / / _` | '_ \ / __/ _ \/ _` |
# / ___ \ (_| |\ V / (_| | | | | (_| __/ (_| |
#/_/ \_\__,_| \_/ \__,_|_| |_|\___\___|\__,_|
#
# Override settings for create operations
# These settings are used regardless of what
# is specified on the command line or API.
#
#override.docker.vol.create.sizeInGiB=10
#override.docker.vol.create.limitIOPS=-1
#override.docker.vol.create.limitMBPS=-1
#override.docker.vol.create.fsOwner=
#override.docker.vol.create.fsMode=
#override.docker.vol.create.description=
#override.docker.vol.create.perfPolicy=
#override.docker.vol.create.protectionTemplate=
#override.docker.vol.create.encryption=true/false
#override.docker.vol.create.thick=true/false
#override.docker.vol.create.dedupe=true/false
The final two override settings significantly change the behavior of the driver.
• override.docker.volume.create.pool The name of pool in which to place the volume.
• override.docker.volume.create.folder The name of folder in which to place the volume.
Important Be careful when making changes to these two override settings. Note the additional behaviors
described in the configuration file.
To set these two override values, update and uncomment these lines, save your changes, and restart NLT
for the settings to take effect.
Below is the content of this section of the configuration file with the default values:
# The following setting work as described
# above, but introduce additional behaviors.
# 1.) The folder and/or pool specified must exist
# or the driver becomes unusable.
# 2.) Look ups for Volumes will be limited to
# the folder and/or pools specified here.
# 3.) Importing a volume or a snapshot will fail when;
# a.) The source is on a pool other than the one specified
45Copyright
©
2019 by Hewlett Packard Enterprise Development LP. All rights reserved.
Documentation Feedback: [email protected]
HPE Nimble Storage Docker Volume Plugin
# b.) The source is not in the default pool when folder is specified
#
#override.docker.vol.create.pool=
#override.docker.vol.create.folder=
If you are using NimbleOS 5.0.5 or later, you can use a file to configure docker volume override options. The
file is stored in /opt/NimbleStorage/etc/volume-driver.json:
{
"global":{"volumeDir":"/opt/nimble/", "logDebug":"true"},
"defaults":{"dedupe":"true","limitIOPS":"-1","limitMBPS":"-1","perfPolicy":"DockerDefault","sizeInGiB":"10"},
"overrides":{"description":"User self-defined description"}
}
Docker Volume Workflows
The help option (-o) flag may be passed to the Docker Volume plugin to display all commands and options
used with the supported workflows.
Enter the command docker volume create -d nimble -o help.
Note Docker treats the help option as an error condition with a non-zero exit code and displays a short error
message.
Error response from daemon: create
b0e2b5e882b31424d41eae0958752663bf6477d8f68db30ac6eb7ab47bbf3608:
Nimble Storage Docker Volume Driver: Create Help
Create or Clone a Nimble Storage backed Docker Volume or Import an existing
Nimble Volume or Clone of a Snapshot into Docker.
Universal options:
-o mountConflictDelay=X X is the number of seconds to delay a mount
request when there is a conflict (default is 0)
Create options:
-o sizeInGiB=X X is the size of volume specified in GiB
-o size=X X is the size of volume specified in GiB (short
form of sizeInGiB)
-o fsOwner=X X is the user id and group id that should own
the root directory of the filesystem, in the
form of [userId:groupId]
-o fsMode=X X is 1 to 4 octal digits that represent the file
mode to be applied to the root directory of the
filesystem
-o description=X X is the text to be added to volume description
(optional)
-o perfPolicy=X X is the name of the performance policy (optional)
Performance Policies: Exchange 2003 data store,
Exchange 2007 datastore, Exchange log, SQL Server,
SharePoint, Exchange 2010 data store, SQL Server
Logs, SQL Server 2012, Oracle OLTP, Windows File
Server, Other Workloads, DockerDefault, zoe,
Backup Repository, Veeam Backup Repository
-o pool=X X is the name of pool in which to place the volume
(optional)
-o folder=X X is the name of folder in which to place the
volume (optional)
46Copyright
©
2019 by Hewlett Packard Enterprise Development LP. All rights reserved.
Documentation Feedback: [email protected]
Docker Volume Workflows

-o encryption indicates that the volume should be encrypted
(optional, dedupe and encryption are mutually
exclusive)
-o thick indicates that the volume should be thick
provisioned (optional, dedupe and thick are
mutually exclusive)
-o dedupe indicates that the volume should be deduplicated
-o limitIOPS=X X is the IOPS limit of the volume. IOPS limit
should be in range [256, 4294967294] or -1 for
unlimited.
-o limitMBPS=X X is the MB/s throughput limit for this volume.
If both limitIOPS and limitMBPS are specified,
limitMBPS must not be hit before limitIOPS.
-o destroyOnRm indicates that the Nimble volume (including
snapshots) backing this volume should be destroyed
when this volume is deleted
-o protectionTemplate=X X is the name of the protection template
(optional) Protection Templates: Retain-30Daily,
Retain-90Daily, Retain-48Hourly-30Daily-52Weekly
Clone options:
-o cloneOf=X X is the name of Docker Volume to be cloned
-o snapshot=X X is the name of the snapshot to base the clone
on (optional, if missing, a new snapshot is
created)
-o createSnapshot indicates that a new snapshot of the volume should
be taken and used for the clone (optional)
-o destroyOnRm indicates that the Nimble volume (including
snapshots) backing this volume should be destroyed
when this volume is deleted
-o destroyOnDetach indicates that the Nimble volume (including
snapshots) backing this volume should be destroyed
when this volume is unmounted or detached
.
Import Volume options:
-o importVol=X X is the name of the Nimble Volume to import.
-o pool=X X is the name of the pool in which the volume to
be imported resides (optional).
-o folder=X X is the name of the folder in which the volume to
be imported resides (optional)
-o forceImport forces the import of the volume. Note that
overwrites application metadata (optional).
-o restore restores the volume to the last snapshot taken on
the volume (optional)
-o snapshot=X X is the name of the snapshot which the volume will
be restored to, only used with -o restore (optional)
-o takeover indicates the current group will takeover the
ownership of the Nimble volume and volume collection (optional)
-o reverseRepl reverses the replication direction so that writes
to the Nimble volume are replicated back to the group where it was replicated
from (optional)
Import Clone of Snapshot options:
-o importVolAsClone=X X is the name of the Nimble volume and Nimble
snapshot to clone and import
-o snapshot=X X is the name of the Nimble snapshot to clone and
import (optional, if missing, will use the most
recent snapshot)
-o createSnapshot indicates that a new snapshot of the volume should
47Copyright
©
2019 by Hewlett Packard Enterprise Development LP. All rights reserved.
Documentation Feedback: [email protected]
HPE Nimble Storage Docker Volume Plugin

be taken and used for the clone (optional).
-o pool=X X is the name of the pool in which the volume to
be imported resides (optional)
-o folder=X X is the name of the folder in which the volume
to be imported resides (optional)
-o destroyOnRm indicates that the Nimble volume (including
snapshots) backing this volume should be destroyed
when this volume is deleted
-o destroyOnDetach indicates that the Nimble volume (including
snapshots) backing this volume should be destroyed
when this volume is unmounted or detached
Create a Docker Volume
Note The plugin applies a set of default options when you create new volumes unless you override them
using the volume create option flags.
Procedure
1
Create a Docker volume with the --description option.
docker volume create -d nimble --name volume_name [-o description="volume_description"]
2
(Optional) Inspect the new volume.
docker volume inspect volume_name
3
(Optional) Attach the volume to an interactive container.
docker run -it --rm -v volume:/mountpoint --name= volume_name
The volume is mounted inside the container specified in the volume:/mountpoint variable.
Example
Create a Docker volume with the name twiki and the description “Hello twiki”.
docker volume create -d nimble --name twiki -o description="Hello twiki"
Inspect the new volume.
volume inspect twiki
[
{
"Driver": "nimble",
"Labels": {},
"Mountpoint": "/",
"Name": "twiki",
"Options": {
"description": "Hello twiki"
},
"Scope": "global",
"Status": {
"ApplicationCategory": "Other",
"Blocksize": 4096,
"CachePinned": false,
"CachingEnabled": true,
"Connections": 2,
"DedupeEnabled": false,
"Description": "Hello twiki",
"EncryptionCipher": "aes_256_xts",
"Folder": "smoke-10.18.238.68-default",
"Group": "group-auto-nonafa-vm1",
48Copyright
©
2019 by Hewlett Packard Enterprise Development LP. All rights reserved.
Documentation Feedback: [email protected]
Create a Docker Volume

"ID": "067340c04d598d01860000000000000000000000ab",
"LimitIOPS": -1,
"LimitMBPS": -1,
"LimitSnapPercentOfSize": -1,
"LimitVolPercentOfSize": 100,
"PerfPolicy": "default",
"Pool": "default",
"Serial": "0362a739df9e4b1d6c9ce900cbc1cd2a",
"SnapUsageMiB": 0,
"ThinlyProvisioned": true,
"VolSizeMiB": 32768,
"VolUsageMiB": 0,
"VolumeName": "twiki.docker"
}
}
]
Attach the volume to an interactive container.
docker run -it --rm -v twiki:/data alpine /bin/sh
Clone a Docker Volume
Use the create command with the cloneOf option to clone a Docker volume to a new Docker volume.
Procedure
Clone a Docker volume.
[root] # docker volume create -d nimble --name=clone_name -o
cloneOf=volume_namesnapshot=snapshot_name
Example
Clone the Docker volume named twiki to a new Docker volume named twikiClone.
[root]# docker volume create -d nimble --name=twikiClone -o cloneOf=twiki
twikiClone
[root]
Select the snapshot on which to base the clone.
$ docker volume create -d nimble -o cloneOf=somevol -o snapshot=mysnap
--name myclone
Provisioning Docker Volumes
There are several ways to provision a Docker volume depending on what tools are used:
• Docker Engine (CLI)
• Docker SwarmKit
• Docker Compose file with either Docker UCP or Docker Engine
The Docker Volume plugin leverages the existing Docker CLI and APIs, therefor all native Docker tools may
be used to provision a volume.
Note The plugin applies a set of default volume create options. Unless you override the default options using
the volume option flags, the defaults are applied when you create volumes. For example, the default volume
49Copyright
©
2019 by Hewlett Packard Enterprise Development LP. All rights reserved.
Documentation Feedback: [email protected]
Clone a Docker Volume

size is 10GiB. Refer to the The docker-driver.conf File on page 43 for information about how to change the
default options to suit your needs.
Note
In NimbleOS 5.0.5 and later, the docker-driver.conf file is replaced by volume-driver.json, which
is automatically placed on the host when you first create a docker volume. The file is stored in
/opt/NimbleStorage/etc/volume-driver.json:
{
"global":{"volumeDir":"/opt/nimble/"},
"defaults":{"dedupe":"true","limitIOPS":"-1","limitMBPS":"-1","perfPolicy":"DockerDefault","sizeInGiB":"10"},
"overrides":{"description":"User self-defined description"}
}
Import a Volume to Docker
Use the create command with the importVol option to import an HPE Nimble Storage volume to Docker and
name it.
Before you begin
Take the volume you want to import offline before importing it.
For information about how to take a volume offline, refer to either the CLI Administration Guide or the GUI
Administration Guide.
Procedure
Import an HPE Nimble Storage volume to Docker.
[root] # docker volume create –d nimble--name=volume_name-o importVol=imported_volume_name
Example
Import the HPE Nimble Storage volume named importMe as a Docker volume named imported.
[root]# docker volume create -d nimble --name=imported -o
importVol=importMe
imported
[root]
Import a Volume Snapshot to Docker
Use the create command with the importVolAsClone option to import a HPE Nimble Storage volume snapshot
as a Docker volume. Optionally, specify a particular snapshot on the HPE Nimble Storage volume using the
snapshot option. The new Docker volume name is in the format of volume:snapshot
Procedure
Import a HPE Nimble Storage volume snapshot to Docker.
[root] # docker volume create -d nimble --name=imported_snapshot -o importVolAsClone= volume-o
snapshot=snapshot
Note If no snapshot is specified, the latest snapshot on the volume is imported.
50Copyright
©
2019 by Hewlett Packard Enterprise Development LP. All rights reserved.
Documentation Feedback: [email protected]
Import a Volume to Docker

Example
Import the HPE Nimble Storage snapshot aSnapshot on the volume importMe as a Docker volume
named importedSnap.
[root] # docker volume create –d nimble –-name=importedSnap –o
importVolAsClone=importMe –o snapshot=aSnapshot
importedSnap
[root]
Restore an Offline Docker Volume with Specified Snapshot
Procedure
If the volume snapshot is not specified, the last volume snapshot is used.
Example
[user@host ~]$ docker volume create -d nimble -o importVol=mydockervol
-o forceImport -o restore -o snapshot=snap.for.mydockervol.1
Create a Docker Volume using the HPE Nimble Storage Local Driver
A Docker volume created using the HPE Nimble Storage local driver is only accessible from the Docker host
that created the HPE Nimble Storage volume. No other Docker hosts in the Docker Swarm will have access
to that HPE Nimble Storage volume.
Procedure
1
Create a Docker volume using the HPE Nimble Storage local driver.
[root] # docker volume create -d nimble-local--name=local
2
(Optional) Inspect the new volume.
[root] # dockervolume inspectlocal
Example
Create a Docker volume with the HPE Nimble Storage local driver, and then inspect it.
[root] # docker volume create –d nimble-local –-name=local
local
[root] # docker volume inspect local
[
{
"Driver": "nimble-local",
"Labels": {},
"Mountpoint": "/",
"Name": "local",
"Options": {},
"Scope": "local",
"Status": {
"ApplicationCategory": "Other",
"Blocksize": 4096,
"CachePinned": false,
51Copyright
©
2019 by Hewlett Packard Enterprise Development LP. All rights reserved.
Documentation Feedback: [email protected]
Restore an Offline Docker Volume with Specified Snapshot
"CachingEnabled": true,
"Connections": 0,
"DedupeEnabled": false,
"Description": "default",
"EncryptionCipher": "aes_256_xts",
"Folder": "smoke-10.18.238.68-default",
"Group": "group-auto-nonafa-vm1",
"ID": "067340c04d598d01860000000000000000000000ac",
"LimitIOPS": -1,
"LimitMBPS": -1,
"LimitSnapPercentOfSize": -1,
"LimitVolPercentOfSize": 100,
"PerfPolicy": "default",
"Pool": "default",
"Serial": "4c017c282eeaec486c9ce900cbc1cd2a",
"SnapUsageMiB": 0,
"ThinlyProvisioned": true,
"VolSizeMiB": 32768,
"VolUsageMiB": 0,
"VolumeName": "local.docker"
}
}
]
List Volumes
Procedure
List Docker volumes.
[root] # docker volume ls
Example
[root]# docker volume ls
DRIVER VOLUME NAME
nimble twiki
nimble twikiClone
[root]#
Run a Container Using a Docker Volume
Procedure
Run a container dependent on a HPE Nimble Storage-backed Docker volume.
docker run -it -v volume:/mountpoint --name= volume_name
Example
Start the container twiki:/foo using the volume twiki.
docker run -it -v twiki:/foo alpine /bin/sh --name=twiki
52Copyright
©
2019 by Hewlett Packard Enterprise Development LP. All rights reserved.
Documentation Feedback: [email protected]
List Volumes

Remove a Docker Volume
When you remove volumes from Docker control they are set to the offline state on the array. Access to the
volumes and related snapshots using the Docker Volume plugin can be reestablished.
Note To delete volumes from the HPE Nimble Storage array using the remove command, edit the
/opt/NimbleStorage/etc/docker-driver.conf file and change the
nos.volume.destroy.when.removed option to true.
Important Be aware that when this option is set to true, volumes and all related snapshots are deleted from
the group, and can no longer be accessed by the Docker Volume plugin.
Procedure
Remove a Docker volume.
docker volume rm volume_name
Example
Remove the volume named twikiClone.
docker volume rm twikiClone
53Copyright
©
2019 by Hewlett Packard Enterprise Development LP. All rights reserved.
Documentation Feedback: [email protected]
Remove a Docker Volume

HPE Nimble Storage Connection Manager (NCM) for Linux
This section covers the configuration and use of HPE Nimble Storage Connection Manager (NCM) on the
Linux operating system. You can use NCM to:
• Manage multipath connections (at the I/O region level) to volumes striped across multiple arrays.
• Migrate volumes between storage pools.
• Merge two storage pools within a group.
• Automatically manage iSCSI and multipath configuration.
• Provide flexibility to mount volumes based on volume names.
• Configure block device level settings for optimal performance.
• Ensure that connection redundancy is always maintained to the array.
Configuration
This section covers the various configuration changes made as part of the NCM installation, as well as
configuration changes you must make manually.
DM Multipath Configuration
NCM automatically applies the recommended configuration for HPE Nimble Storage devices in
/etc/multipath.conf for both RHEL 6.x and 7.x OS versions. After the NCM installation, use the following
command to verify and configure multipath settings for both RHEL 6.x and 7.x OS versions.
ncmadm --config --mpath validate
If the settings are not correct, enter the following command to correct them:
ncadmin --config --mpath configure
HPE Nimble Storage recommends enabling user_friendly_names in the defaults section. Refer to
multipath.conf Settings on page 70 for example settings.
Considerations for Using NCM in Scale-out Mode
During NLT installations, you can choose scale-out mode for NCM. In silent-install mode, you can use the
—enable-scaleout option to do this. By default, scale-out mode is disabled. Scale-out mode for NCM, creates
additional /dev/dm and /dev/mapper devices managed by the dm-switch kernel module, present in RHEL
6.7 and 7.1 onwards. Scale-out mode is recommended only if you have a volume pool striped across multiple
arrays in a group. For single array use cases, this is not necessary. For a striped volume pool, scale-out mode
(dm-switch devices), ensures that no performance overhead is encountered by properly routing I/O to the
correct array in the pool based on the I/O region. The following considerations must be taken into account
when enabling scale-out mode:
1
Applications and filesystems must be reconfigured to make use of these new devices rather than traditional
/dev/mapper/mpath devices.
2
A host reboot is necessary when installing using this mode.
3
If Oracle DB is installed with ASMLIB packages, then scale-out mode is not supported. Also if aliases are
configured for device names in /etc/multipath.conf then scale-out mode is not recommended.
4
Scale-out mode is not supported in OpenStack environments.
LVM Filter for NCM in Scale-Out Mode
If NCM is installed with scale-out mode (dm-switch) devices enabled, then LVM filters must be changed to
make use of these new devices.
54Copyright
©
2019 by Hewlett Packard Enterprise Development LP. All rights reserved.
Documentation Feedback: [email protected]
HPE Nimble Storage Connection Manager (NCM) for Linux

Add/modify the following filters in /etc/lvm/lvm.conf to use LVM devices with NCM. Also, run
lvdisplay/pvdisplay commands after adding these filters, and check and correct any parsing errors
(such as missing quotes) that are reported in the output, before proceeding further.
filter = ["r|^/dev/nimblestorage/lower_tier_devices/.*|"]
global_filter = ["r|^/dev/nimblestorage/lower_tier_devices/.*|"]
preferred_names = [ "^/dev/nimblestorage/", "^/dev/mapper/mpath", "^/dev/[hs]d"]
Note If LVM filters are not set up properly with NCM, I/O forwarding can be seen on the array, and LVM
commands display "duplicate device found" errors.
Note
For SAN boot systems, if any changes are made to lvm.conf after NCM installation, sync the changes with
lvm.conf in initramfs using the following command.
dracut –add "multipath ncm" –f /boot/initramfs-'uname –r'-ncm.img
iSCSI and FC Configuration
NCM configures best practice settings in /etc/iscsi/iscsid.conf for an iSCSI stack as part of the installation
process. These settings are as follows:
• noop_out_interval = 5
• noop_out_timeout = 10
• replacement_timeout = 10
• queue_depth = 64
After the NCM installation, if you need to verify/configure iSCSI settings, use the following command:
ncmadm --config --iscsi validate | configure
This command will not apply the settings for existing sessions. For existing sessions, it is necessary to log
out and log back into each session to apply the settings. NCM automatically configures the recommended
transport timeout for Fibre Channel in /etc/multipath.conf, as follows:
• dev_loss_tmo=infinity
• fast_io_fail_tmo=5
Block Device Settings
NCM will copy a udev rule to assist in tuning block settings for devices (under
/etc/udev/rules.d/99-nimble-tune.rules). Based on the application needs, you can enable the
following settings.
Note These settings are disabled by default.
• max_sectors_kb set to max_hw_sectors_kb
• nr_requests set to 512
• scheduler set to "noop"
Discover Devices for iSCSI
Procedure
1
Note down the iSCSI discovery IP address of the array that you configured. You can use the Network
Configuration screen in the GUI to do this.
55Copyright
©
2019 by Hewlett Packard Enterprise Development LP. All rights reserved.
Documentation Feedback: [email protected]
iSCSI and FC Configuration
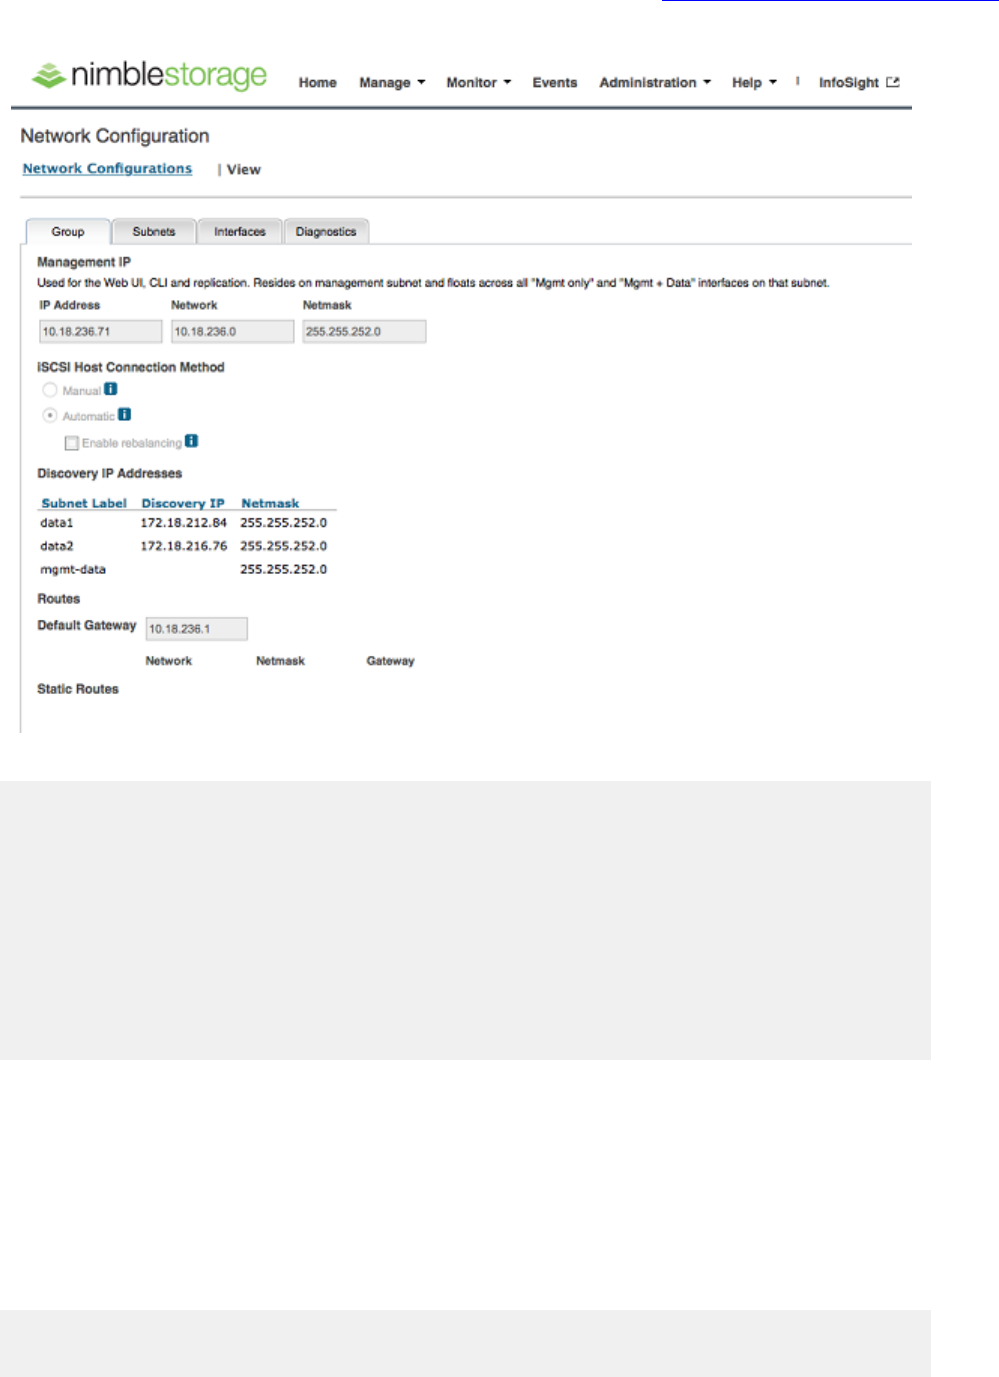
2
Perform the discovery using the ncmadm --rescan <discovery_ip> command.
-bash-4.1# ncmadm --rescan 172.18.212.84
Discovery IP :
172.18.212.84
List of discovered devices:
target:iqn.2007-11.com.nimblestorage:linux-vol-3-v5406993b0c2187fd.0000025d.58271ec6
portal:172.18.216.76:3260,2460
Login to the new devices:
target:iqn.2007-11.com.nimblestorage:linux-vol-3-v5406993b0c2187fd.0000025d.58271ec6
portal:172.18.216.76:3260,2460
Rescan initiated. Use ncmadm -l to list Nimble device
Once the initial discovery is done, if any additional volumes are added to an initiator group on an array,
successive discoveries on the host can be done using the command ncmadm --rescan without needing
to specify the discovery IP address. NCM automatically scans and logs into newly mapped volumes.
Discover Devices for Fibre Channel
Procedure
1
Use the command ncmadm --fcrescan to discover the Fibre Channel-based volumes.
[root@~]# ncmadm --fcrescan
Fc rescan initiated
56Copyright
©
2019 by Hewlett Packard Enterprise Development LP. All rights reserved.
Documentation Feedback: [email protected]
Discover Devices for Fibre Channel

2
Use the command ncmadm --list to display the discovered devices.
Note You can also follow the Red Hat documentation to discover new volumes on the host using
rescan-scsi-bus.sh. However, NCM-based rescan is optimized to discover active paths prior to standby
paths, which makes active-path discovery faster.
List Devices
Procedure
Use the command ncmadm -l to list the discovered devices.
[root@t_rhel7u0x64 ~]# ncmadm -l
size=100G uuid=2d8874e3b8ac7d5fe6c9ce9002ae1012c mount-device:
/dev/nimblestorage/linux-vol-2d8874e3b8ac7d5fe6c9ce9002ae1012c
target:
iqn.2007-11.com.nimblestorage:linux-vol-v3e28972c12297606.00000003.2c01e12a
connection_mode=automatic
` + array_id=1 device=/dev/dm-0
|- 7:0:0:0 sdb 8:16 session=5 sess_st=LOGGED_IN dev_st=running
iface=default tgtportal=172.16.39.66 data_ip=172.16.39.65
|- 5:0:0:0 sdd 8:48 session=3 sess_st=LOGGED_IN dev_st=running
iface=default tgtportal=172.16.231.66 data_ip=172.16.231.65
|- 6:0:0:0 sde 8:64 session=4 sess_st=LOGGED_IN dev_st=running
iface=default tgtportal=172.16.231.66 data_ip=172.16.231.65
|- 8:0:0:0 sdf 8:80 session=6 sess_st=LOGGED_IN dev_st=running
iface=default tgtportal=172.16.39.66 data_ip=172.16.39.65
iSCSI Topology Scenarios
Single Subnet Topology
If the host has a single subnet, redundancy can be achieved by creating logical iSCSI interfaces as shown
in the figure below. Logical iSCSI interfaces can be created using the command:
ncmadm -b eth0
where eth0 is the data interface on the host.
Note Use iSCSI port binding only if all Ethernet ports you intend to use are configured with a single IP subnet
and broadcast doman.
Regarding sessions:
• New sessions will use these interfaces.
• For existing sessions to use these interfaces, you must log out and then rescan.
• If additional interfaces are added when sessions are already present on other interfaces, NCM automatically
creates connections on the missing interfaces during the next interval.
57Copyright
©
2019 by Hewlett Packard Enterprise Development LP. All rights reserved.
Documentation Feedback: [email protected]
List Devices
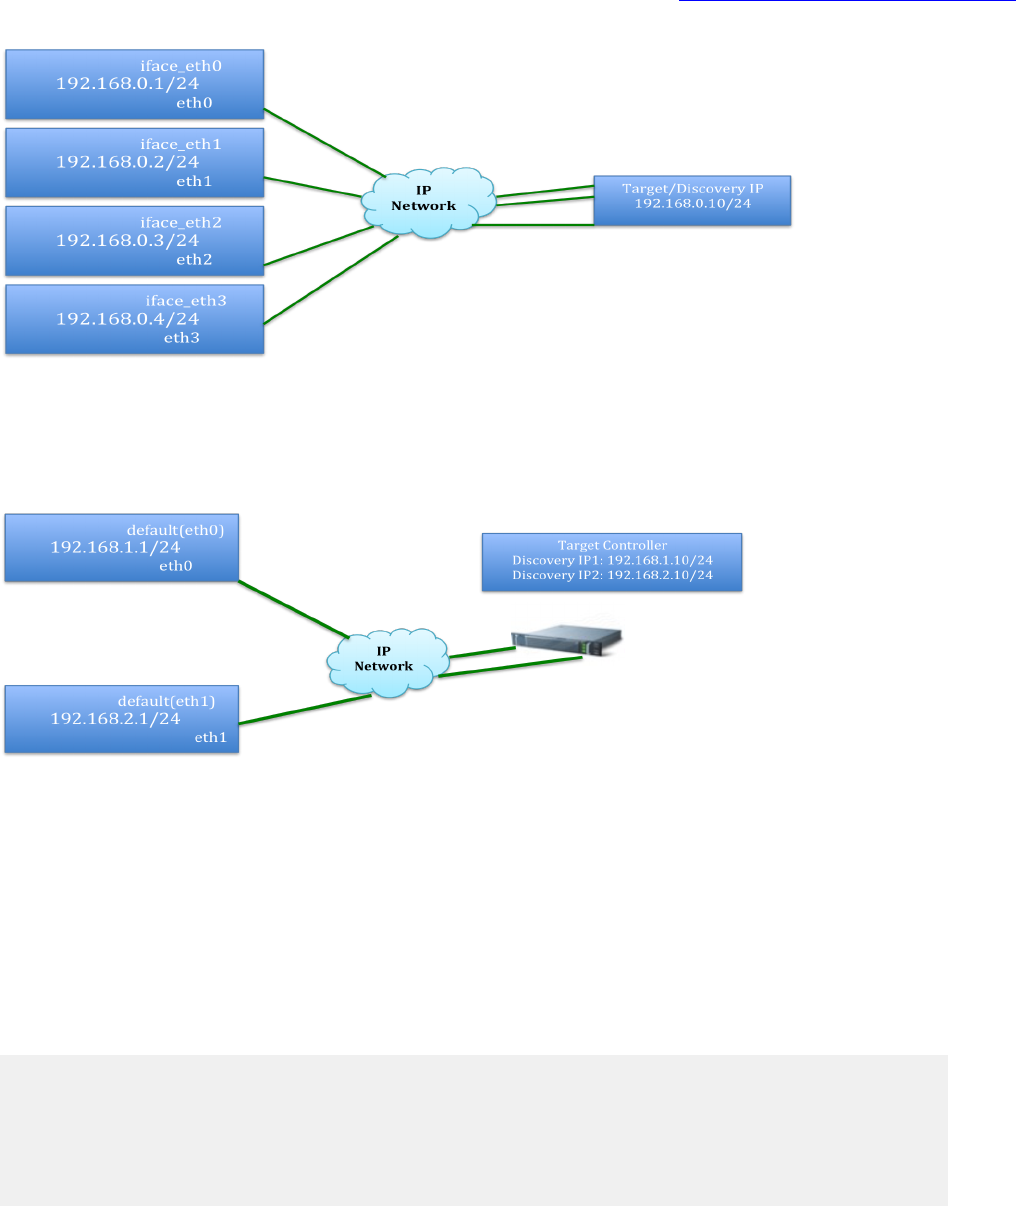
Multiple Subnet Topology
Ethernet interfaces are configured with different IP subnets (eth0 and eth1) as shown in the figure below;
therefore, don't create iSCSI interfaces. Sessions are created on the default interface on both target portals
(192.168.1.10 and 192.168.2.10 in the figure below).
iSCSI Connection Handling
The following parameters have been added to /etc/ncm.conf to control the number of sessions to be
created per array, per available target portal in a group, in automatic connection mode. HPE Nimble Storage
Connection Manager (NCM) attempts to create connections through each interface for single subnet scenarios.
If multiple target portals are available, then NCM will try to make connections to each one of them.
For static (manual) connection mode, NCM will not dynamically manage iSCSI sessions.
A service restart of NCM is necessary if any of these values are changed manually.
#Maximum number of sessions to be created for each array in Nimble Group per
iSCSI Portal (Maximum <=8)
max_sessions_per_array=8
#Minimum number of sessions to be created for each array in Nimble Group per
iSCSI Portal (Minimum >=1)
min_sessions_per_array=2
Note
For SAN boot systems, you must rebuild the initramfs file after any changes to ncm.conf. Use the
following command that is appropriate for your system.
If NCM is installed with scale-out mode disabled, the command is:
dracut --add “multipath” --force /boot/initramfs-`uname -r`-ncm.img
58Copyright
©
2019 by Hewlett Packard Enterprise Development LP. All rights reserved.
Documentation Feedback: [email protected]
Multiple Subnet Topology

If scale-out mode is enabled (multi-array group), the command is:
dracut --add “multipath ncm” --force /boot/initramfs-`uname -r`-ncm.img
where `uname -r` returns the current running kernel version.
SAN Boot Device Support
It is not recommended to create a root/boot device on a volume that is striped across multiple arrays in a
group. If a striped volume is used, then I/O performance degradation may occur.
New initramfs Creation and GRUB Updates
As part of the installation, NCM rebuilds the initramfs file under the /boot directory with naming format
initramfs-`uname –r`-ncm.img
where `uname –r` is the current running kernel version.
This is required to keep /etc/multipath.conf, /etc/lvm/lvm.conf and other NCM files in sync with
initramfs and to apply correct configuration parameters during the early boot process.
After the NCM installation has completed, a new menu entry is added to the GRUB configuration file. This
entry contains the newly created initramfs file.
An example grub.conf entry is shown below:
title Red Hat Enterprise Linux 6 with NCM (2.6.32-573.el6.x86_64)
root (hd0,0)
kernel /tboot.gz logging=vga,serial,memory
module /vmlinuz-2.6.32-573.el6.x86_64 ro root=UUID=893e4a15-8ac2-
41dc-94aa-0d7ff13cc82a intel_iommu=on amd_iommu=on rd_NO_LUKS
KEYBOARDTYPE=pc KEYTABLE=us LANG=en_US.UTF-8 rd_NO_MD
SYSFONT=latarcyrheb-sun16 crashkernel=auto rd_NO_LVM rd_NO_DM
rhgb quiet rhgb quiet
module /initramfs-2.6.32-573.el6.x86_64-ncm.img
Any additional changes to /etc/multipath.conf or /etc/lvm.conf after NCM installation requires
you to manually update the initramfs created by NCM. The command for this is as follows:
dracut –add multipath –f /boot/initramfs-`uname –r`-ncm.img
If NCM was installed in scale-out mode, use the command below:
dracut –add “multipath ncm” –f /boot/initramfs-`uname –r`-ncm.img
Note NCM makes the newly added entry the default selection during boot. Therefore, NCM configuration
parameters are applied by default during the early boot process.
Create and Mount Filesystems
Create file systems on top of the mount-device listed in the output from command ncmadm –l. The symbolic
links to devices on which filesystems can be created are listed in the /dev/nimblestorage directory.
-bash-4.1# ls -l /dev/nimblestorage/
total 0
lrwxrwxrwx. 1 root root 8 Mar 14 15:03
linux-vol-1-255a3eb706da66cc76c9ce900c61e2758 -> ../dm-12
lrwxrwxrwx. 1 root root 8 Mar 14 15:03
linux-vol-2-2b83629bac96756356c9ce900c61e2758 -> ../dm-10
lrwxrwxrwx. 1 root root 7 Mar 14 15:03
linux-vol-3-2e7f4333b869bc3d36c9ce900c61e2758 -> ../dm-6
lrwxrwxrwx. 1 root root 7 Mar 14 15:03
59Copyright
©
2019 by Hewlett Packard Enterprise Development LP. All rights reserved.
Documentation Feedback: [email protected]
SAN Boot Device Support

linux-vol-4-22b726298fb5bdbc16c9ce900c61e2758 -> ../dm-3
drwxr-xr-x. 2 root root 120 Mar 9 17:52 lower_tier_devices
Create and mount file systems as shown below.
-bash-4.1# mkfs.ext4
/dev/nimblestorage/linux-vol-1-255a3eb706da66cc76c9ce900c61e2758
mke2fs 1.41.12 (17-May-2010)
Discarding device blocks: done
Filesystem label=
OS type: Linux
Block size=4096 (log=2)
Fragment size=4096 (log=2)
Stride=0 blocks, Stripe width=0 blocks
655360 inodes, 2621440 blocks
131072 blocks (5.00%) reserved for the super user
First data block=0
Maximum filesystem blocks=2684354560
80 block groups
32768 blocks per group, 32768 fragments per group
8192 inodes per group
Superblock backups stored on blocks:
32768, 98304, 163840, 229376, 294912, 819200, 884736, 1605632
Writing inode tables: done
Creating journal (32768 blocks): done
Writing superblocks and filesystem accounting information: done
This filesystem will be automatically checked every 27 mounts or
180 days, whichever comes first. Use tune2fs -c or -i to override.
-bash-4.1#
-bash-4.1# mkdir /mnt/linux-vol-1
-bash-4.1# mount
/dev/nimblestorage/linux-vol-1-255a3eb706da66cc76c9ce900c61e2758
/mnt/linux-vol-1/
-bash-4.1#
-bash-4.1# mount
/dev/mapper/255a3eb706da66cc76c9ce900c61e2758 on /mnt/linux-vol-1 type ext4
(rw)
-bash-4.1#
Mandatory mount options include the following:
• Specify the _netdev option in /etc/fstab to mount iSCSI based volumes. For example:
/dev/nimblestorage/linux-vol-1-255a3eb706da66cc76c9ce900c61e2758
/mnt/linux-vol-1 ext4 defaults,rw,_netdev 0 0
• For RHEL 7.x hosts, also specify the nofail option to prevent boot issues due to temporary mount
failures. For example:
/dev/nimblestorage/linux-vol-1-255a3eb706da66cc76c9ce900c61e2758
mnt/linux-vol-1 ext3 defaults,_netdev,nofail 0 0
Note Red Hat recommends that filesystems always be mounted by UUID. You can use volume names for
ease of use, but you can mount filesystems either way.
60Copyright
©
2019 by Hewlett Packard Enterprise Development LP. All rights reserved.
Documentation Feedback: [email protected]
HPE Nimble Storage Connection Manager (NCM) for Linux

Note Even if filesystems are mounted using /dev/nimblestorage/ symbolic link names, the mount
command will only display /dev/mapper/UUID switch device names or /dev/mapper/mpath device
names. This is expected.
LVM Usage
To create logical volume management (LVM) on top of a volume, use the following steps.
Procedure
1
Make sure LVM filters are set up as mentioned in LVM Filter for NCM in Scale-Out Mode on page 54.
2
Create physical volumes as below.
-bash-4.1# pvcreate
/dev/nimblestorage/linux-vol-2-2b83629bac96756356c9ce900c61e2758
Physical volume
"/dev/nimblestorage/linux-vol-2-2b83629bac96756356c9ce900c61e2758" successfully
created
-bash-4.1#
-bash-4.1# pvcreate
/dev/nimblestorage/linux-vol-3-2e7f4333b869bc3d36c9ce900c61e2758
Physical volume
"/dev/nimblestorage/linux-vol-3-2e7f4333b869bc3d36c9ce900c61e2758" successfully
created
-bash-4.1#
-bash-4.1# pvdisplay
--- Physical volume ---
PV Name /dev/sda2
VG Name vg_rkumarlinuxredhat67
PV Size 15.51 GiB / not usable 3.00 MiB
Allocatable yes (but full)
PE Size 4.00 MiB
Total PE 3970
Free PE 0
Allocated PE 3970
PV UUID xJazhZ-J1rH-uYs5-nSmf-xMdB-Lt2D-CJOVkR
"/dev/nimblestorage/linux-vol-3-2e7f4333b869bc3d36c9ce900c61e2758" is a new
physical volume of "10.00 GiB"
--- NEW Physical volume ---
PV Name
/dev/nimblestorage/linux-vol-3-2e7f4333b869bc3d36c9ce900c61e2758
VG Name
PV Size 10.00 GiB
Allocatable NO
PE Size 0
Total PE 0
Free PE 0
Allocated PE 0
PV UUID AMrsb2-VrYM-k9hM-Qb3I-AEAh-1UeL-AnYZ9G
"/dev/nimblestorage/linux-vol-2-2b83629bac96756356c9ce900c61e2758" is a new
physical volume of "10.00 GiB"
--- NEW Physical volume ---
PV Name
/dev/nimblestorage/linux-vol-2-2b83629bac96756356c9ce900c61e2758
VG Name
PV Size 10.00 GiB
Allocatable NO
PE Size 0
61Copyright
©
2019 by Hewlett Packard Enterprise Development LP. All rights reserved.
Documentation Feedback: [email protected]
LVM Usage

Total PE 0
Free PE 0
Allocated PE 0
PV UUID 0uxL1b-vu7T-1Cfh-tYJQ-VcHQ-IIh3-xpo3Jw
3
Create a volume group using the physical volumes created above.
-bash-4.1# vgcreate nimble_volume_group
/dev/nimblestorage/linux-vol-2-2b83629bac96756356c9ce900c61e2758
/dev/nimblestorage/linux-vol-3-2e7f4333b869bc3d36c9ce900c61e2758
Volume group "nimble_volume_group" successfully created
-bash-4.1#
-bash-4.1# vgdisplay
--- Volume group ---
VG Name nimble_volume_group
System ID
Format lvm2
Metadata Areas 2
Metadata Sequence No 1
VG Access read/write
VG Status resizable
MAX LV 0
Cur LV 0
Open LV 0
Max PV 0
Cur PV 2
Act PV 2
VG Size 19.99 GiB
PE Size 4.00 MiB
Total PE 5118
Alloc PE / Size 0 / 0
Free PE / Size 5118 / 19.99 GiB
VG UUID ad08aT-SEcM-P7kI-vSrG-EVNX-Myzu-JCLnFU
4
Create logical volumes in the volume group created above.
-bash-4.1# lvcreate -L10G -n nimble_logical_volume nimble_volume_group
Logical volume "nimble_logical_volume" created.
-bash-4.1# lvdisplay
--- Logical volume ---
LV Path /dev/nimble_volume_group/nimble_logical_volume
LV Name nimble_logical_volume
VG Name nimble_volume_group
LV UUID prV5hg-5roS-QMmk-8r45-d23m-kren-6MNB2y
LV Write Access read/write
LV Creation host, time rkumar-linux-redhat67, 2016-03-14 15:31:24 -0700
LV Status available
# open 0
LV Size 10.00 GiB
Current LE 2560
Segments 2
Allocation inherit
Read ahead sectors auto
- currently set to 256
Block device 253:5
62Copyright
©
2019 by Hewlett Packard Enterprise Development LP. All rights reserved.
Documentation Feedback: [email protected]
HPE Nimble Storage Connection Manager (NCM) for Linux

5
Create file systems on a logical volume and mount them.
-bash-4.1# mkfs.ext4 /dev/nimble_volume_group/nimble_logical_volume
mke2fs 1.41.12 (17-May-2010)
Discarding device blocks: done
Filesystem label=
OS type: Linux
Block size=4096 (log=2)
Fragment size=4096 (log=2)
Stride=0 blocks, Stripe width=0 blocks
655360 inodes, 2621440 blocks
131072 blocks (5.00%) reserved for the super user
First data block=0
Maximum filesystem blocks=2684354560
80 block groups
32768 blocks per group, 32768 fragments per group
8192 inodes per group
Superblock backups stored on blocks:
32768, 98304, 163840, 229376, 294912, 819200, 884736, 1605632
Writing inode tables: done
Creating journal (32768 blocks): done
Writing superblocks and filesystem accounting information: done
This filesystem will be automatically checked every 21 mounts or
180 days, whichever comes first. Use tune2fs -c or -i to override.
-bash-4.1#
-bash-4.1#
-bash-4.1# mkdir /mnt/nimble_logical_volume
-bash-4.1#
-bash-4.1# mount /dev/nimble_volume_group/nimble_logical_volume
/mnt/nimble_logical_volume
-bash-4.1#
-bash-4.1# mount
/dev/mapper/255a3eb706da66cc76c9ce900c61e2758 on /mnt/linux-vol-1 type ext4
(rw)
/dev/mapper/nimble_volume_group-nimble_logical_volume on
/mnt/nimble_logical_volume type ext4 (rw)
-bash-4.1#
Note For iSCSI devices, pass the _netdev and nofail options during mount.
Major Kernel Upgrades and NCM
The NCM installation copies different sets of files for both RHEL 6.x and 7.x OS versions. Therefore, when
the system is upgraded from RHEL 6.x to 7.x, NCM must be reinstalled as well.
After reinstalling NCM, reboot the system for proper device management. If the system is not rebooted, NCM
will not discover the devices and application I/O might fail.
Removing a LUN from the Host
Before removing (also known as unmapping) the LUN from the host, follow the Red Hat recommendation for
steps to properly shut down applications, unmount filesystems and remove devices from LVM if used. Red
Hat recommended steps can be found in the Red Hat Storage Administration Guide
Use the ncmadm --remove command to clean up the complete device stack, and for iSCSi to log out from
the target. If the device removal is successful, the LUN can be unmapped from the initiator group.
63Copyright
©
2019 by Hewlett Packard Enterprise Development LP. All rights reserved.
Documentation Feedback: [email protected]
Major Kernel Upgrades and NCM
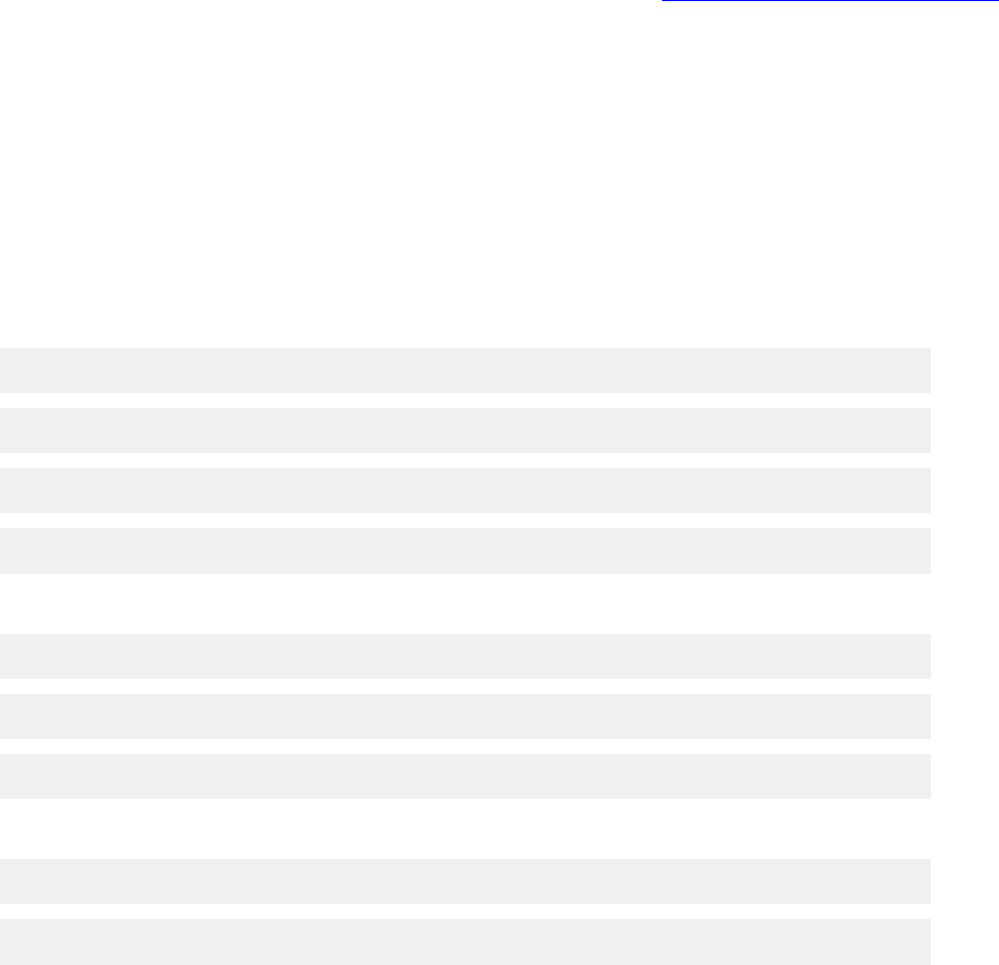
Refer to the ncmadm man page for more details on the --remove option.
Known Issues and Troubleshooting Tips
This section describes the most common issues. Refer to the NCM release notes for more information and
troubleshooting steps, if any of these issues are observed.
Information for a Linux Issue
Use the following as a guide when gathering information to report a troubleshooting issue related to Linux.
–Verify dm-multipath devices, UUID not populated, orphan paths etc.
•
multipath –ll
•
multipathd show paths format "%i %o %w %d %t %C"
•
dmsetup table | egrep "mpath|switch"
•
multipath.conf settings
–Verify iSCSI connections if paths don’t appear under multipath.
•
iscsiadm –m session –P3
•
lsscsi –gld
•
Verify if port binding is enabled with dual subnet network configurations
–Collect sosreport and NLT diag logs.
•
sosreport
•
nltadm --diag
Old iSCSI Targets IQNs Still Seen after Volume Rename on the Array
Connections to old iSCSI target IQN are still seen after volume rename on array.
Rename the iSCSI-based volume.
Procedure
1
Offline the volume and rename.
2
Log out of the iSCSI target using ncmadm –logout <old target iqn>
3
Set the volume online.
4
Do a rescan on the host using ncmadm –rescan.
5
Run ncmadm -rename to refresh the names.
64Copyright
©
2019 by Hewlett Packard Enterprise Development LP. All rights reserved.
Documentation Feedback: [email protected]
Known Issues and Troubleshooting Tips

iSCSI_TCP_CONN_CLOSE Errors
iSCSI_TCP-CONN_CLOSE errors are displayed in a system with a large number of iSCSI volumes.
Jan 26 16:04:49 hiqa-sys-rhel2 kernel: connection480:0: detected conn error
(1020) ISCSI_ERR_TCP_CONN_CLOSE
These errors might be caused by iscsid using duplicate iSCSI session IDs (isids) if there are more than
256 sessions. This will cause the target to disconnect existing sessions and create new ones. For more
information, refer to https://bugzilla.redhat.com/show_bug.cgi?id=1309488
Procedure
• This issue is fixed in the RHEL 6.x version of iscsi-initiator-utils-6.2.0.873-18.el6. For
RHEL 7.x, this issue is not fixed at the time of this documentation.
rescan-scsi-bus.sh Hangs or Takes a Long Time While Scanning Standby Paths
rescan-scsi-bus.sh has a testonline() function which issues TUR and retry messages 8 times, with an
interval of 1 second sleep. This causes a delay when scanning a large number of volumes if standby paths
are present. Issuing TUR on standby paths returns a 2/4/0b check condition. This condition is not handled in
rescan-scsi-bus.sh and therefore loops in testonline().
This is a known issue and raised with Red Hat, at https://bugzilla.redhat.com/show_bug.cgi?id=1299708
Procedure
• To work around the issue, comment out the “sleep 1” statement in the testonline() function.
Long Boot Time With a Large Number of FC Volumes
Under some conditions, it may take a long time to boot if there are a large number of FC volumes mapped
to the host.
If standby paths are first discovered on the SCSI bus during boot, any SCSI discovery commands on
device-mapper devices will cause repeated “reinstated” messages and failed events. This might slow down
the entire boot process, as multipathd is busy processing failed events. For more information, refer to
https://bugzilla.redhat.com/show_bug.cgi?id=1291406
Procedure
• A fix is available for RHEL 7.x in device-mapper-multipath-0.4.9-88.el7.
Duplicate Devices Found Warning
LVM commands output warnings stating that duplicate devices were found . For example:
Found duplicate PV LXUG8bh0Xbnvt1pyUxBj1BRDFzQjqw1x: using
/dev/nimblestorage/linux-vol-2d8874e3b8ac7d5fe6c9ce9002ae1012c not
/dev/mapper/mpatha
Found duplicate PV LXUG8bh0Xbnvt1pyUxBj1BRDFzQjqw1x: using /dev/mapper/mpathb
not /dev/nimblestorage/linux-vol-2d8874e3b8ac7d5fe6c9ce9002ae1012c
This is not an error condition, but a warning indicating multiple device mapper devices appear with the same
LVM metadata (for example, dm-switch, dm-multipath).
65Copyright
©
2019 by Hewlett Packard Enterprise Development LP. All rights reserved.
Documentation Feedback: [email protected]
iSCSI_TCP_CONN_CLOSE Errors

Procedure
• By default, NCM will apply filters to ignore all dm-mpath devices if the dm-switch module is supported on
the host. Refer to LVM Filter for NCM in Scale-Out Mode on page 54 to apply the correct LVM filters in
/etc/lvm/lvm.conf.
Newly Added iSCSI Targets Not Discovered
NCM does not discover newly added iSCSI targets on rescan based on the discovery IP address.
Procedure
• Verify whether iSCSI port binding is used in a dual subnet IP address configuration. iSCSI port binding
(iface) is only recommended in single IP address subnet configurations.
• Verify network settings, and whether the target discovery IP address can be pinged from the host.
• If Jumbo frames (MTU 9000 bytes) are enabled on the host, make sure they are enabled end to end in
the network all the way to the target.
System Enters Maintenance Mode on Host Reboot with iSCSI Volumes Mounted
On reboot, the RHEL 7.x iSCSI system goes into maintenance mode.
Procedure
• Make sure the “_netdev” option is added in /etc/fstab to allow the network to come up before the file
systems are mounted.
• Add the “nofail” option and manually mount all the file systems using the command mount –a after system
reboot.
• Reboot the system.
hung_tasks_timeout Errors
During controller upgrades, a controller might take more than 150 seconds with large configurations, and
hung_tasks_timeout errors might appear in /var/log/messages. For example:
May 4 11:11:00 rtp-fuji-qa31-2-rhel65-6 kernel: INFO: task jbd2/sdb-8:2321
blocked for more than 150 seconds.
May 4 11:11:00 rtp-fuji-qa31-2-rhel65-6 kernel: Not tainted
2.6.32-431.17.1.el6.x86_64 #1
May 4 11:11:00 rtp-fuji-qa31-2-rhel65-6 kernel: "echo 0 >
/proc/sys/kernel/hung_task_timeout_secs" disables this message.
May 4 11:11:00 rtp-fuji-qa31-2-rhel65-6 kernel: jbd2/sdb-8 D
0000000000000000 0 2321 2 0x00000000
May 4 11:11:00 rtp-fuji-qa31-2-rhel65-6 kernel: ffff8802360d9c20
0000000000000046 ffff8802360d9bb0 ffffffff81083e2d
May 4 11:11:00 rtp-fuji-qa31-2-rhel65-6 kernel: ffff8802360d9b90
ffffffff810149b9 ffff8802360d9bd0 ffffffff810a6d01
May 4 11:11:00 rtp-fuji-qa31-2-rhel65-6 kernel: ffff880239585098
ffff8802360d9fd8 000000000000fbc8 ffff880239585098
May 4 11:11:00 rtp-fuji-qa31-2-rhel65-6 kernel: Call Trace:
May 4 11:11:00 rtp-fuji-qa31-2-rhel65-6 kernel: [<ffffffff81083e2d>] ?
del_timer+0x7d/0xe0
May 4 11:11:00 rtp-fuji-qa31-2-rhel65-6 kernel: [<ffffffff810149b9>] ?
read_tsc+0x9/0x20
66Copyright
©
2019 by Hewlett Packard Enterprise Development LP. All rights reserved.
Documentation Feedback: [email protected]
Newly Added iSCSI Targets Not Discovered

Procedure
• You can safely ignore these messages. NCM will configure multipathd to queue I/Os for more than 150
seconds. Therefore, these messages will appear during controller reboot/upgrade scenarios. I/O will
continue once connectivity is restored to the controller.
RHEL 7.x: FC System Fails to Boot
The RHEL 7.x: FC System fails to boot and drops into an emergency shell after failing to mount /boot on a
multipath device.
When multipathd creates a new multipath device, no more paths can be added until the udev event changes
for the multipath device being created, even if the device was created with no usable paths. Therefore, udev
hangs trying to get information on the device, and bootup can timeout.
The issue is resolved in update of device-mapper-multipath-0.4.9-95.el7. Update to this package using the
yum update device-mapper-multipath command.
RHEL 7.x: Fibre Channel Active Paths are not Discovered Promptly
The RHEL 7.x: FC System fails to discover active paths in a timely manner.
When multipathd creates a new multipath device, no more paths can be added until the udev event changes
for the multipath device being created, even if the device was created with no usable paths. Therefore, udev
hangs trying to get information on the device. Until multipathd times out, no active paths can be added to
the device.
The issue is resolved in update of device-mapper-multipath-0.4.9-95.el7. Update to this package using the
yum update device-mapper-multipath command.
During Controller Failover, multipathd Failure Messages Repeat
On Fibre Channel systems, the following message can appear repeatedly in /var/log/messages:
Nov 23 15:10:36 hitdev-rhel67 multipathd: 8:96: reinstated
Nov 23 15:10:36 hitdev-rhel67 multipathd: mpathal: queue_if_no_path enabled
Nov 23 15:10:36 hitdev-rhel67 multipathd: mpathal: Recovered to normal mode
Nov 23 15:10:36 hitdev-rhel67 multipathd: mpathal: remaining active paths: 1
Nov 23 15:10:36 hitdev-rhel67 kernel: sd 8:0:5:1: alua: port group 02 state S
The issue is fixed in device-mapper-multipath-0.4.9-88.el7 on RHEL 7.x and
device-mapper-multipath-0.4.9-94.el6 for RHEL 6.x versions.
LVM Devices Missing from Output
Logical volume management (LVM) devices on non-HPE Nimble Storage volumes are missing from
lvdisplay/pvdisplay output.
Procedure
•
Verify the LVM filters in /etc/lvm/lvm.conf using the information in LVM Filter for NCM in Scale-Out
Mode on page 54.
Various LVM and iSCSI Commands Hang on /dev/mapper/mpath Devices
By default, NCM enables infinite queuing on dm-multipath devices.
If all paths of a multipath device are removed or logged out, there may be empty multipath maps on the host.
Empty maps can be verified using the multipath -ll command. Empty multipath maps with queueing enabled
(that is, queue_if_no_path enabled), will cause any command issued to hang until at least one path is
restored.
67Copyright
©
2019 by Hewlett Packard Enterprise Development LP. All rights reserved.
Documentation Feedback: [email protected]
RHEL 7.x: FC System Fails to Boot

Procedure
• If the intention is to remove the device completely, then use the ncmadm --remove /dev/dm-x command
to disable queueing and properly clean up the device. If that fails, manually disable infinite queueing using
the command dmsetup message mpathx 0 fail_if_no_path where mpathx is replaced with the actual
device name from the multipath -ll output. Contact HPE Nimble Storage Support to recover the paths
if the LUN was not unmapped from the host and the I/O is hung.
Devices Not Discovered by Multipath
Verify that none of the HPE Nimble Storage devices are blacklisted in multipath.conf. Common errors
of this sort can happen with the patterns listed below. Avoid these in the blacklist section:
blacklist {
wwid *
devnode sd*
device {
vendor *
product *
}
}
Procedure
• Correct the blacklist section and run multipathd reconfigure to apply the changes.
System Drops into Emergency Mode
On a RHEL 6.8 SAN boot system, sometimes if the /boot/initramfs-<kernel version>.img image is rebuilt
after adding or removing volumes to the host using dracut, the system fails to boot and drops into emergency
mode.
Always make a backup of the default initramfs image on the SAN boot system before overwriting it. (For
example, cp /boot/initramfs-`uname -r`.img /boot/initramfs-`uname -r`.img.bak ).
NLT always creates a new initramfs image on installation with -ncm appended to the name, and the entry is
added to the GRUB menu list. If boot is failing, select the default image name from the GRUB menu during
boot. (Press 'e' during boot loader).
NLT Installer by Default Disables dm-switch Devices on Upgrades
The NLT installer by default disables the creation of dm-switch devices to handle striped volumes. If dm-switch
devices were previously enabled (either by NCM 1.0 or by NLT 2.0 with the --enable-scaleout option), they
will be disabled on a fresh install if the default options are used, and the following warning message is
displayed:
WARNING: dm-switch(scale-out) devices are in use, please revert LVM rules and
reboot host to disable scale-out configuration.
Reboot the host after NLT installation to cleanup dm-switch devices. If the volume is striped across multiple
arrays and dm-switch devices are needed, re-install NLT with --ncm --enable-scaleout options. This will
ensure that the scale-out host configuration is not modified.
NCM with RHEL HA Configuration
This section describes additional configuration steps and limitations when using NCM on RHEL HA nodes.
Refer to the following Red Hat cluster configuration guides for detailed steps to configure an HA cluster and
fencing methods.
68Copyright
©
2019 by Hewlett Packard Enterprise Development LP. All rights reserved.
Documentation Feedback: [email protected]
Devices Not Discovered by Multipath

•
Red Hat Enterprise Linux 6 Cluster Administration Guide
•
Red Hat Enterprise Linux 7 High Availability Add-On Administration Guide
The reservation_key Parameter
To install NCM in an HA environment, choose fence-mpath instead of fence-scsi agent if an SCSI PR
reservation fencing method is used.
Add the "reservation_key" parameter to the "Nimble" device section in /etc/multipath.conf.
For example, to add key "0x123abc":
devices {
device {
vendor "Nimble"
product "Server"
.
.
reservation_key "0x123abc"
}
}
After this change, run multipathd reconfigure for the change to take effect.
This must be done on each node in the cluster, with a node-specific reservation key. This reservation key
must match with the corresponding entry in the /etc/cluster/cluster.conf file for the node.
Note I/O errors with status reservation_conflict can occur, if the "reservation_key" parameter is not added to
multipath.conf. This is because paths can be added and deleted dynamically, and the multipathd process
will not automatically register keys on those new paths without the "reservation_key" configuration parameter.
Note RHEL 6.x and 7.x versions do not support the APTPL (Active Persist Through Power Loss) flag for
SCSI PR reservations. Therefore, SCSI PR registrations/reservations will be lost on controller upgrades or
reboots. This might also lead to reservation conflict I/O errors.
Volume Move Limitations in HA Environments
If a volume is moved from one storage pool to another storage pool within a group, new /dev/mapper/mpath
devices will be created for destination arrays. Once the volume move is complete, mpath devices representing
source arrays will become stale. NCM will remove these devices once the volume move is complete.
However, /etc/cluster/cluster.conf will still reference these old /dev/mapper/mpath names, and
cluster fence services might fail during startup. Therefore, once the volume move is complete, all the stale
mpath devices must be removed from /etc/cluster/cluster.conf and new entries can be added based
on dm-* devices from the ncmadm –l output.
For example, before a volume move, lower_tier mpath device:
/dev/mapper/mpatha
<fencedevices>
<fencedevice agent="fence_mpath" debug="/var/log/fence_mpath.log"
devices="/dev/mapper/mpatha" name="nimble-mpath-fencing"/>
</fencedevices>
After volume move, lower_tier mpath device:
./dev/mapper/mpathb
<fencedevices>
<fencedevice agent="fence_mpath" debug="/var/log/fence_mpath.log"
devices="/dev/mapper/mpathb" name="nimble-mpath-fencing"/>
</fencedevices>
69Copyright
©
2019 by Hewlett Packard Enterprise Development LP. All rights reserved.
Documentation Feedback: [email protected]
The reservation_key Parameter

If /etc/cluster/cluster.conf still has references to the source array /dev/mapper/mpatha, cluster
services might fail during startup. To prevent this from happening, add the updated mpath names and remove
the old ones from /etc/cluster/cluster.conf on all the nodes. Sync the config file to all nodes in the
cluster, and restart cluster services as necessary for the new changes to take effect.
multipath.conf Settings
This section can be used as a reference to validate /etc/multipath.conf settings. NCM automatically
configures a "device” section for HPE Nimble Storage devices as part of installation.
Below are the multipath.conf settings for RHEL 6.x and 7.x.
defaults {
user_friendly_names yes
find_multipaths no
}
blacklist {
devnode "^(ram|raw|loop|fd|md|dm-|sr|scd|st)[0-9]*"
devnode "^hd[a-z]"
device {
vendor ".*"
product ".*"
}
}
blacklist_exceptions {
device {
vendor "Nimble"
product "Server"
}
}
devices {
device {
vendor "Nimble"
product "Server"
path_grouping_policy group_by_prio
prio "alua"
hardware_handler "1 alua"
path_selector "service-time 0"
path_checker tur
features "1 queue_if_no_path"
no_path_retry 30
failback immediate
fast_io_fail_tmo 5
dev_loss_tmo infinity
rr_min_io_rq 1
rr_weight uniform
}
}
The above blacklist and blacklist_exceptions configuration causes multipathd to blacklist all non HPE Nimble
Storage devices. If there are other vendor devices connected to the host, remove these entries and manually
blacklist just the local disk using wwid <local disk wwid> under the blacklist section.
You must also replace the sample wwid information with information for the local disk on your system.
Note After making changes to the /etc/multipath.conf file, you must run the multipathd reconfigure
command for the changes to take effect.
70Copyright
©
2019 by Hewlett Packard Enterprise Development LP. All rights reserved.
Documentation Feedback: [email protected]
multipath.conf Settings

HPE Nimble Storage Kubernetes FlexVolume Plugin and
Kubernetes Storage Controller
Kubernetes is a platform for automating deployment, scaling, and operations of application containers across
clusters of hosts. Kubernetes works with Docker and other OCI compliant container interfaces, and is designed
to allow a Google Container Engine to run behind a firewall.
The Kubernetes FlexVolume Driver for Docker Volume Plugins and Kubernetes Storage Controller are open
source software products from Hewlett Packard Enterprises. The FlexVolume Driver allows the creation of
Kubernetes volumes using the Docker Volume option specification syntax. It translates Flexvolume requests
to Docker Volume Plugin requests, allowing you to leverage existing legacy Docker Volume Plugins or existing
managed Docker Volume Plugins in a Kubernetes cluster.
The Kubernetes FlexVolume Driver communicates directly with the Docker Volume Plugin, not with the
container engine. This allows the FlexVolume Driver to work with any container engine supported by
Kubernetes.
The Kubernetes Storage Controller dynamically provisions persistent storage using the Docker Volume Plugin
API.
Supported Plugins
The following Docker plugins are known to work with the Kubernetes FlexVolume Driver and Kubernetes
Storage Controller:
• HPE Nimble Storage Docker Volume Plugin, version 2.1.1, works with Kubernetes 1.6, 1.7, and 1.8
Note This plugin was also tested with OpenShift 3.5 and 3.6. Testing was performed using the version
included in the HPE Nimble Storage Linux Toolkit, available on HPE InfoSight.
• HPE 3PAR Volume Plug-in for Docker, version 1.0.0
Note This plugin was also tested with OpenShift 3.5.
Known Issues
In Kubernetes 1.6, FlexVolume did not provide the Persistent Volume name to its driver, so you must provide
the Docker Volume name as an option in the Persistent Volume definition. As of Kubernetes 1.7, the Persistent
Volume name is passed to the driver.
Installing the Kubernetes Storage Controller
To install the Kubernetes Storage Controller, you must have internet connectivity and a Kubernetes environment
already up and running. The Kubernetes Storage Controller can run only on the master, because it needs to
access the Kubernetes config file (/etc/kubernetes/admin.conf) which is present only on the master.
Procedure
1
Run the installation command.
kubectl create -f /opt/NimbleStorage/etc/dep-kube-storage-controller.yaml
You see the message "Deployment kube-storage-controller created."
2
Verify that the Kubernetes Storage Controller is running.
71Copyright
©
2019 by Hewlett Packard Enterprise Development LP. All rights reserved.
Documentation Feedback: [email protected]
HPE Nimble Storage Kubernetes FlexVolume Plugin and Kubernetes
Storage Controller

kubectl get deployment --namespace=kube-system | grep kube-storage-controller
You see:
NAME DESIRED CURRENT UP-TO-DATE AVAILABLE AGE
kube-storage-controller-doryd 1 1 1 1 2d
Note The controller can run on worker nodes on Kubernetes 1.8 and above, using the following command
kubectl create -f /opt/NimbleStorage/etc/deb-kube-storage-controller-1.8.yaml
What to do next
If Kubernetes was selected when installing the NLT, the HPE Nimble Storage Kubernetes FlexVolume driver
is copied to this location on the
host:/usr/libexec/kubernetes/kubelet-plugins/volume/exec/hpe.com~nimble/. An optional
configuration file, nimble.json, can be created and placed in the same location. A sample file and a description
of the configuration options are provided below.
{
"logFilePath": "/var/log/dory.log",
"enable1.6": false,
"defaultOptions":[ {"mountConflictDelay": 30}]
}
• logFilePath The log file path for the Kubernetes FlexVolume driver. The default value is "/var/log/dory.log."
• enable1.6 This setting should be set to "true" only when using Kubernetes version 1.6. It is set to "false"
by default.
• defaultOptions This setting refers to the default Docker options passed by the storage controller. By
default, mountConflictDelay is set to 30 seconds for Docker volumes.
Configuring the Kubelet
To leverage the FlexVolume driver, the kubelet node agent must be configured to support node attachment.
You configure this in the /etc/systemd/system/kubelet.service.d/10-kubeadm.conffile.
Procedure
1
Add the following option to the configuration file on each of the nodes.
--enable-controller-attach-detach=false
In the example below, the a new environment variable called KUBELET_STORAGE_ARGS has been
added with a value of “--enable-controller-attach-detach=false”. This variable is then passed to the ExecStart
line.
2
Reload the service definition.
$ systemctl daemon-reload
3
Restart the kublet (this will not affect any running pods).
$ systemctl restart kubelet
Example
[Service]
Environment="KUBELET_KUBECONFIG_ARGS=--bootstrap-kubeconfig=/etc/kubernetes/bootstrap-kubelet.conf
--kubeconfig=/etc/kubernetes/kubelet.conf"
Environment="KUBELET_SYSTEM_PODS_ARGS=--pod-manifest-path=/etc/kubernetes/manifests
72Copyright
©
2019 by Hewlett Packard Enterprise Development LP. All rights reserved.
Documentation Feedback: [email protected]
Configuring the Kubelet

--allow-privileged=true"
Environment="KUBELET_NETWORK_ARGS=--network-plugin=cni
--cni-conf-dir=/etc/cni/net.d --cni-bin-dir=/opt/cni/bin"
Environment="KUBELET_DNS_ARGS=--cluster-dns=10.96.0.10
--cluster-domain=cluster.local"
Environment="KUBELET_AUTHZ_ARGS=--authorization-mode=Webhook
--client-ca-file=/etc/kubernetes/pki/ca.crt"
Environment="KUBELET_CADVISOR_ARGS=--cadvisor-port=0"
Environment="KUBELET_CERTIFICATE_ARGS=--rotate-certificates=true
--cert-dir=/var/lib/kubelet/pki"
Environment="KUBELET_STORAGE_ARGS=--enable-controller-attach-detach=false"
ExecStart=/usr/bin/kubelet $KUBELET_KUBECONFIG_ARGS
$KUBELET_SYSTEM_PODS_ARGS $KUBELET_NETWORK_ARGS $KUBELET_DNS_ARGS
$KUBELET_AUTHZ_ARGS $KUBELET_CADVISOR_ARGS $KUBELET_CERTIFICATE_ARGS
$KUBELET_EXTRA_ARGS $KUBELET_STORAGE_ARGS
Kubernetes Storage Controller Workflows
Creating a Storage Class
A Storage Class can be used to create or clone an HPE Nimble Storage-backed persistent volume. A storage
class can also be used to import an existing HPE Nimble Storage volume or clone of a snapshot into the
Kubernetes cluster. The following sets of parameters are grouped by workflow.
Universal Parameters
• mountConflictDelay:"X"
• Where X is the number of seconds to delay a mount request when there is a conflict. The default is 0.
Valid Parameters for Create
• limitIOPS:"X"
• Where X is the IOPS limit of the volume. The IOPS limit should be in the range [256, 4294967294], or
-1 for unlimited.
• limitMBPS:"X"
• Where X is the MB/s throughput limit for this volume. If both limitIOPS and limitMBPS are specified,
limitIOPS must be specified first.
• destroyOnRm:"true"
• Indicates that the Nimble volume (including snapshots) backing this volume should be destroyed
when this volume is deleted.
• sizeInGiB:"X"
• Where X is the size of volume specified in GiB.
• size:"X"
• Where X is the size of volume specified in GiB (short form of sizeInGiB).
• fsOwner:"X"
• Where X is the user id and group id that should own the root directory of the filesystem, in the form of
[userId:groupId].
73Copyright
©
2019 by Hewlett Packard Enterprise Development LP. All rights reserved.
Documentation Feedback: [email protected]
Kubernetes Storage Controller Workflows

• fsMode:"X"
• Where X is 1 to 4 octal digits that represent the file mode to be applied to the root directory of the
filesystem.
• description:"X"
• Where X is the text to be added to volume description (optional).
• perfPolicy:"X"
• Where X is the name of the performance policy (optional).
• Examples of Performance Policies include: Exchange 2003 data store, Exchange 2007 data store,
Exchange log, SQL Server, SharePoint, Exchange 2010 data store, SQL Server Logs, SQL Server
2012, Oracle OLTP, Windows File Server, Other Workloads, Backup Repository.
• pool:"X"
• Where X is the name of pool in which to place the volume (optional).
• folder:"X"
• Where X is the name of folder in which to place the volume (optional).
• encryption:"true"
• Indicates that the volume should be encrypted (optional, dedupe and encryption are mutually exclusive).
• thick:"true"
• Indicates that the volume should be thick provisioned (optional, dedupe and thick are mutually exclusive).
• dedupe:"true"
• Indicates that the volume should be deduplicated.
• protectionTemplate:"X"
• Where X is the name of the protection template (optional).
• Examples of Protection Templates include: Retain-30Daily, Retain-90Daily,
Retain-48Hourly-30Daily-52Weekly.
Example
---
kind: StorageClass
apiVersion: storage.k8s.io/v1
metadata:
name: oltp-prod
provisioner: hpe.com/nimble
parameters:
thick: "false"
dedupe: "true"
perfPolicy: "SQL Server"
protectionTemplate: "Retain-48Hourly-30Daily-52Weekly"
Valid Parameters for Clone
• cloneOf:"X"
• Where X is the name of the Docker Volume to be cloned.
• snapshot:"X"
74Copyright
©
2019 by Hewlett Packard Enterprise Development LP. All rights reserved.
Documentation Feedback: [email protected]
Valid Parameters for Clone

Where X is the name of the snapshot to base the clone on. This is optional. If not specified, a new
snapshot is created.
•
• createSnapshot:"true"
• Indicates that a new snapshot of the volume should be taken and used for the clone (optional).
• destroyOnRm:"true"
• Indicates that the Nimble volume (including snapshots) backing this volume should be destroyed when
this volume is deleted.
Example
---
kind: StorageClass
apiVersion: storage.k8s.io/v1
metadata:
name: oltp-dev-clone-of-prod
provisioner: hpe.com/nimble
parameters:
limitIOPS: "1000"
cloneOf: "oltp-prod-1adee106-110b-11e8-ac84-00505696c45f"
destroyOnRm: "true"
Valid Parameters for Import Clone of Snapshot
• importVolAsClone:"X"
• Where X is the name of the Nimble Volume and Nimble Snapshot to clone and import.
• snapshot:"X"
• Where X is the name of the Nimble Snapshot to clone and import (optional, if missing, will use the most
recent snapshot).
• createSnapshot:"true"
• Indicates that a new snapshot of the volume should be taken and used for the clone (optional).
• pool:"X"
• Where X is the name of the pool in which the volume to be imported resides (optional).
• folder:"X"
• Where X is the name of the folder in which the volume to be imported resides (optional).
• destroyOnRm:"true"
• Indicates that the Nimble volume (including snapshots) backing this volume should be destroyed when
this volume is deleted.
• destroyOnDetach
• Indicates that the Nimble volume (including snapshots) backing this volume should be destroyed when
this volume is unmounted or detached.
Example
---
kind: StorageClass
apiVersion: storage.k8s.io/v1
75Copyright
©
2019 by Hewlett Packard Enterprise Development LP. All rights reserved.
Documentation Feedback: [email protected]
Valid Parameters for Import Clone of Snapshot

metadata:
name: import-clone-legacy-prod
provisioner: hpe.com/nimble
parameters:
pool: "flash"
importVolAsClone: "production-db-vol"
destroyOnRm: "true"
Valid Parameters for Import Volume
• importVol:"X"
• Where X is the name of the Nimble volume to import.
• pool:"X"
• Where X is the name of the pool in which the volume to be imported resides (optional).
• folder:"X"
• Where X is the name of the folder in which the volume to be imported resides (optional).
• forceImport:"true"
• Force the import of the volume. Note that overwrites application metadata (optional).
• restore
• Restores the volume to the last snapshot taken on the volume (optional).
• snapshot:"X"
• Where X is the name of the snapshot which the volume will be restored to. Only used with -o restore
(optional).
• takover
• Indicates the current group will takeover the ownership of the Nimble volume and volume collection
(optional).
• reverseRepl
• Reverses the replication direction so that writes to the Nimble volume are replicated back to the group
where it was replicated from (optional).
Example
---
kind: StorageClass
apiVersion: storage.k8s.io/v1
metadata:
name: import-clone-legacy-prod
provisioner: hpe.com/nimble
parameters:
pool: "flash"
importVol: "production-db-vol"
76Copyright
©
2019 by Hewlett Packard Enterprise Development LP. All rights reserved.
Documentation Feedback: [email protected]
Valid Parameters for Import Volume

Valid Parameter for allowOverrides
Example
apiVersion: storage.k8s.io/v1
kind: StorageClass
metadata:
name: mysc900
provisioner: hpe.com/nimble
parameters:
description: "Volume from doryd"
size: "900"
dedupe: "false"
destroyOnRm: "true"
perfPolicy: "Windows File Server"
folder: "mysc900"
allowOverrides:
snapshot,description,limitIOPS,size,perfPolicy,thick,folder
Persistent Volume Claim
Example
apiVersion: v1
kind: PersistentVolumeClaim
metadata:
name: mypvc901
annotations:
hpe.com/description: "This is my custom description"
hpe.com/limitIOPS: "8000"
hpe.com/cloneOfPVC: myPVC
spec:
accessModes:
- ReadWriteOnce
resources:
requests:
storage: 10Gi
storageClassName: mysc900
Create a Persistent Volume
Procedure
1
Create a Persistent Volume Claim (PVC).
kubectl create -f
https://raw.githubusercontent.com/NimbleStorage/container-examples/master/dory/doryd-intro/pvc-example.yml
2
The Kubernetes Storage Controller is started.
The Kubernetes Storage Controller monitors the cluster for persistent volumes and persistent volume
claims, and checks the status of any PVC it finds. If the status is "pending" and has a recognized prefix,
FlexVolume connects with the Docker Volume Plugin and looks for the requested volume. If the volume
doesn't exist, the Docker Volume Plugin creates the volume and binds it to the PVC on the cluster.
77Copyright
©
2019 by Hewlett Packard Enterprise Development LP. All rights reserved.
Documentation Feedback: [email protected]
Valid Parameter for allowOverrides

Delete a Persistent Volume
Procedure
1
Delete a Persistent Volume Claim (PVC).
2
The Kubernetes Storage Controller is started.
The Kubernetes Storage Controller monitors the cluster for persistent volumes and persistent volume
claims, and checks the status of any previously provisioned PVC it finds. If the PVC has previously been
provisioned, has a policy of "ReclaimDelete", and has a recognized prefix, FlexVolume connects with the
Docker Volume Plugin and looks for the requested volume. If the volume exists, the Docker Volume Plugin
removes the volume.
78Copyright
©
2019 by Hewlett Packard Enterprise Development LP. All rights reserved.
Documentation Feedback: [email protected]
Delete a Persistent Volume

Nimbletune
Nimbletune is a Linux host tuning utility that is installed with the HPE Nimble Linux Toolkit (NLT). Nimbletune
can be used to automate various Linux OS settings for optimal performance with HPE Nimble Storage arrays.
Nimbletune enables you to list all current settings, and provides options to configure the settings to according
to Nimble's recommendations.
After you have installed the HPE NLT, you can locate the Nimbletune files in the
/opt/NimbleStorage/nimbletune directory.
There are five categories of settings:
1
Filesystem
2
Disk
3
Multipath
4
iSCSI
5
Fibre Channel (FC)
Note
The default Recommendations are optimal for most workloads. However, you may choose to change some
of the values to ones that are more suitable to your environment. Refer to Change Nimbletune
Recommendations on page 84 for more information.
Filesystem and FC recommendations need to be applied manually. Nimbletune lists only the recommended
settings for these two categories. Refer to the host OS administration or HBA user guide to change these
settings. Run Nimbletune with the --verbose option for more information
There is no need to reboot the host when changes are made to Nimbletune recommendations, and the
changes persist through subsequent reboots.
Nimbletune Commands
Examples of Nimbletune commands are documented in this section. Each example contains tabular output
with the following headings:
• Category – The category of the recommendation. The categories are filesystem, disk, multipath, iSCSI,
and FC.
• Device – Indicates whether the recommendation applies to a particular device
• Parameter – Name of the parameter
• Value – Current value of the parameter
• Recommendation – Recommended value for the parameter
• Status – Current status of the parameter; not-recommended indicates that the current setting needs to
be changed.
• Severity – Severity level of the parameter. Nimbletune supports three levels of severity:
1
Critical – This is a mandatory setting, which, if not applied may cause data loss.
2
Warning – Functionality is not affected, but this setting can cause performance degradation.
3
Info – A low-priority setting that might improve performance.
Get Nimbletune Help
Enter the following command to display help for the Nimbletune utility.
# nimbletune -help
79Copyright
©
2019 by Hewlett Packard Enterprise Development LP. All rights reserved.
Documentation Feedback: [email protected]
Nimbletune
Example
#nimbletune -help
Nimble Linux Tuning Utility
Usage:
nimbletune --get [--category {filesystem | multipath | disk | iscsi | fc |
all}] [--status {recommended | not-recommended | all}] [--severity {critical
| warning | info | all}] [--verbose] [-json] [-xml]
nimbletune --set [--category {multipath | disk | iscsi | all}]
Options:
-c, -category Recommendation category {filesystem | multipath |
disk | iscsi | fc | All}. (Optional)
-st, -status Recommendation status {recommended | not-recommended
| All}. (Optional)
-sev, -severity Recommendation severity {critical | warning | info
| All}. (Optional)
-json JSON output of recommendations. (Optional)
-xml XML output of recommendations. (Optional)
-verbose Verbose output. (Optional)
-v, -version Display version of the tool. (Optional)
Note
• The -json option displays output in JSON format.
• The -xml option displays output in XML format.
• The -verbose option displays verbose output.
Get All System Recommendations
Enter --get with no options to display all Nimbletune recommendations grouped by category.
# nimbletune --get
Example
# nimbletune --get
Recommendations for disk:
+----------------------------------------------------------------------------+
|Category |Device| Parameter | Value |Recommend| Status |Severity
+----------------------------------------------------------------------------+
| disk | all | add_random | 0 | 0 |recommended |warning|
| disk | all | rq_affinity | 1 | 2 |not-recommended|warning|
| disk | all | scheduler | deadline| noop |not-recommended|warning|
| disk | all | rotational | 0 | 0 |recommended |warning|
| disk | all | nr_requests | 128 | 512 |not-recommended|warning|
| disk | all | max_sectors_k | 512 | 4096 |not-recommended|warning|
| disk | all | read_ahead_kb | 4096 | 128 |not-recommended|warning|
+----------------------------------------------------------------------------+
80Copyright
©
2019 by Hewlett Packard Enterprise Development LP. All rights reserved.
Documentation Feedback: [email protected]
Nimbletune

Recommendations for iscsi:
-+------------------------------------------------------------------------+
|Cat |Dev|Parameter |Value |Recommend| Status |Severity|
--------------------------------------------------------------------------+
|iscsi|all|login_timeout |15 |15 |recommended |warning|
|iscsi|all|noop_out_timeout |10 |10 |recommended |warning|
|iscsi|all|cmds_max |128 |256 |not recommended|info |
|iscsi|all|queue_depth |64 |64 |recommended |warning|
|iscsi|all|nr_sessions |1 |1 |recommended |info |
|iscsi|all|startup |automatic|automatic|recommended |warning|
|iscsi|all|replacement_timeout|10 |10 |recommended |warning|
|iscsi|all|iscsi_port_binding |enabled |disabled |not recommended|critical|
+--------------------------------------------------------------------------
Recommendations for multipath:
+---------------------------------------------------------------------------------------------+
| Category|Device| Parameter | Value | Recommendation | Status
|Severity|
+---------------------------------------------------------------------------------------------+
| multipath|all |fast_io_fail_tmo |5 | 5
|recommended |critical|
| multipath|all |path_selector |"service-time 0" | "service-time
0"|recommended |warning|
| multipath|all |vendor |"Nimble" | "Nimble"
|recommended |critical|
| multipath|all |path_checker |tur | tur
|recommended |critical|
| multipath|all |product |"Server" | "Server"
|recommended |critical|
| multipath|all |hardware_handler |"1 alua" | "1 alua"
|recommended |critical|
| multipath|all |failback |immediate | immediate
|recommended |warning|
| multipath|all |dev_loss_tmo |infinity | infinity
|recommended |critical|
| multipath|all |prio |"alua" | alua
|recommended |critical|
| multipath|all |no_path_retry |30 | 30
|recommended |critical|
| multipath|all |path_grouping_policy|group_by_prio | group_by_prio
|recommended |critical|
+-----------------------------------------------------------------------------------------------+
Recommendations for fc:
+--------------------------------------------------------------------------+
|Category| Device| Parameter |Value |Recommend| Status |Severity|
+--------------------------------------------------------------------------+
|fc | all | ql2xmaxqdepth| 32 | 64 |not-recommended | warning|
+--------------------------------------------------------------------------+
Get Recommendations Filtered by Category
Get recommendations filtered by --category to view current settings. The example gets recommendations
for disk settings.
# nimbletune --get --category disk
81Copyright
©
2019 by Hewlett Packard Enterprise Development LP. All rights reserved.
Documentation Feedback: [email protected]
Nimbletune

Example
# nimbletune --get --category disk
Recommendations for disk:
+------------+-----------+----------------------+------------------+----------------------+-----------------+--------+
| Category | Device | Parameter | Value |
Recommendation | Status |Severity|
+------------+-----------+----------------------+------------------+----------------------+-----------------+--------+
| disk | all | add_random | 1 | 0
| not-recommended | warning|
| disk | all | rq_affinity | 1 | 2
| not-recommended | warning|
| disk | all | scheduler | cfq | noop
| not-recommended | warning|
| disk | all | rotational | 0 | 0
| recommended | warning|
| disk | all | nr_requests | 128 | 512
| not-recommended | warning|
| disk | all | max_sectors_kb | 512 | 4096
| not-recommended | warning|
+------------+-----------+----------------------+------------------+----------------------+-----------------+--------+
Get Recommendations Filtered by Status
Get recommendations filtered by --status to view current settings. The example returns all not-recommended
settings.
# nimbletune --get --status not-recommended
Example
# nimbletune --get --status not-recommended
Recommendations for disk:
+------------+-----------+----------------------+------------------+----------------------+-----------------+--------+
| Category | Device | Parameter | Value |
Recommendation | Status |Severity|
+------------+-----------+----------------------+------------------+----------------------+-----------------+--------+
| disk | all | add_random | 1 | 0
| not-recommended | warning|
| disk | all | rq_affinity | 1 | 2
| not-recommended | warning|
| disk | all | scheduler | cfq | noop
| not-recommended | warning|
| disk | all | nr_requests | 128 | 512
| not-recommended | warning|
| disk | all | max_sectors_kb | 512 | 4096
| not-recommended | warning|
+------------+-----------+----------------------+------------------+----------------------+-----------------+--------+
Recommendations for fc:
+------------+-----------+----------------------+------------------+----------------------+-----------------+--------+
| Category | Device | Parameter | Value |
Recommendation | Status |Severity|
+------------+-----------+----------------------+------------------+----------------------+-----------------+--------+
| fc | all | ql2xmaxqdepth | 32 | 64
| not-recommended | warning|
+------------+-----------+----------------------+------------------+----------------------+-----------------+--------+
82Copyright
©
2019 by Hewlett Packard Enterprise Development LP. All rights reserved.
Documentation Feedback: [email protected]
Nimbletune

Get Recommendations Filtered by Category and Status
Get recommendations filtered by --category and --status to view current settings. The example returns all
not-recommended settings for disk.
# nimbletune --get --category disk --status not-recommended
Example
# nimbletune --get --category disk --status not-recommended
Recommendations for disk:
+------------+-----------+----------------------+------------------+----------------------+-----------------+--------+
| Category | Device | Parameter | Value |
Recommendation | Status |Severity|
+------------+-----------+----------------------+------------------+----------------------+-----------------+--------+
| disk | all | add_random | 1 | 0
| not-recommended | warning|
| disk | all | rq_affinity | 1 | 2
| not-recommended | warning|
| disk | all | scheduler | cfq | noop
| not-recommended | warning|
| disk | all | nr_requests | 128 | 512
| not-recommended | warning|
| disk | all | max_sectors_kb | 512 | 4096
| not-recommended | warning|
+------------+-----------+----------------------+------------------+----------------------+-----------------+--------+
Apply Recommendations by Category
Use the --set command to apply recommendations by category. The example sets the recommendations for
disk.
# nimbletune --set --category disk
Example
# nimbletune --set --category disk
Successfully applied disk recommendations
Verify Recommendations Set by Category
Verify recommendations by category.The example verifies the settings for the disk category.
# nimbletune --get --category disk
Example
# nimbletune --get --category disk
Recommendations for disk:
+------------+------------+----------------------+------------------+----------------------+-----------------+--------+
| Category | Device | Parameter | Value |
Recommendation | Status |Severity|
+------------+------------+----------------------+------------------+----------------------+-----------------+--------+
| disk | all | add_random | 0 | 0
| recommended | warning|
| disk | all | rq_affinity | 2 | 2
| recommended | warning|
| disk | all | scheduler | noop | noop
| recommended | warning|
| disk | all | rotational | 0 | 0
83Copyright
©
2019 by Hewlett Packard Enterprise Development LP. All rights reserved.
Documentation Feedback: [email protected]
Nimbletune

| recommended | warning|
| disk | all | nr_requests | 512 | 512
| recommended | warning|
| disk | all | max_sectors_kb | 4096 | 4096
| recommended | warning|
+------------+------------+----------------------+------------------+----------------------+-----------------+--------+
Change Nimbletune Recommendations
Nimbletune uses a common JSON configuration file to validate host settings. You can change the
recommendation values by directly editing the file.
Procedure
1
Edit the configuration file.
# vim /opt/NimbleStorage/Nimbletune/config.json
2
Change the recommendation value for any parameter as needed.
3
Save and exit the file.
4
Verify that the recommendations have been changed as expected.
# nimbletune --get
84Copyright
©
2019 by Hewlett Packard Enterprise Development LP. All rights reserved.
Documentation Feedback: [email protected]
Change Nimbletune Recommendations

Block Reclamation
Space usage monitoring on a SAN is different from how space usage is monitored within a host’s file system.
A SAN reports free space in terms of how many blocks have not been written to. These blocks are sometimes
referred to as “clean blocks”. The number of clean blocks is multiplied by the block size to provide a more
user-friendly space usage figure.
In contrast, host file systems report free space in terms of the total capacity of a datastore or volume, less
the sum of all files within the file system. When a file is deleted, free space is instantly increased within the
host file system. However, in the majority of cases, deleting files on the host does not automatically notify the
SAN that those blocks can be freed up, since the physical block remains in place after the deletion; in such
cases, only the file system metadata is updated. This leads to a discrepancy between how much free space
is being reported within the file system and how much free space is being reported on the SAN. This
discrepancy is not limited to Nimble arrays as all block-storage SANs that use thin provisioning have the
same space discrepancy issue.
To work around this space discrepancy issue, Windows, VMware and Linux file systems have implemented
a feature that notifies the SAN to free up blocks that are no longer in use by the host file system. This feature
is called block unmap or SCSI unmap.
Example:
Suppose 4 TB of data are written onto a Nimble volume mounted on a Windows 2008 R2 NTFS host, and
then 2 TB of data are deleted. When files are deleted, the data blocks remain in place and the file system
headers are updated with info that the blocks are not in use and are available; however, the array continues
to see the blocks in use as data is still physically present on the volume. So, unless the host OS supports
SCSI unmap to inform the underlying storage target of the freed up space on the file system, the storage
continues to report that the data as still in use. In most cases, this is not a problem because the host file
system will eventually reuse the deleted blocks for new data and the underlying storage will not report an
increase in utilized space; however, this could become a problem if the Nimble array is becoming full and the
space is needed for other volumes / snapshots.
Note For these features to work optimally, you must be running NimbleOS version 1.4.7.0 or later. SCSI
unmap is supported in NimbleOS 1.4.4.0 and later releases.
File systems support two methods for informing storage of vacated free blocks on the file system: online
(periodic discards) and batched discards. In both methods, unused blocks are returned to the underlying
SAN storage by overwriting the unused file system blocks with zeroes.
Nimble arrays support "zero page detection" to reclaim previously provisioned space. The array will detect
the zeroes written by the host file system and reduce the reported storage space used on the fly.
Periodic (online) discards happen automatically; that is, no scheduled run is required to reclaim unused
space on the array. On the other hand, Batched discards require that a user manually run a tool or command
to reclaim unused space.
Examples of file systems that support online discards:
• NTFS (Windows Server 2012, Nimble OS 1.4.4.0 and higher)
• VMFS6 (VMware ESXi 6.5 and higher)
• VMFS5 (VMware ESXi 5.0, removed in 5.0 Update 1 due to performance overhead)
• ext4 (version 2.6.27-5185-g8a0aba7 onwards)
File systems that supportbatched discards:
• NTFS (Windows Server 2003-2008 R2, through use of "sdelete -z" utility)
• VMFS5 (VMware ESXi 5.0, Update 1 onwards, through use of "vmkfstools" utility)
• ext4 (Linux / v2.6.36-rc6-35-g7360d17)
85Copyright
©
2019 by Hewlett Packard Enterprise Development LP. All rights reserved.
Documentation Feedback: [email protected]
Block Reclamation

• ext3 (Linux / v2.6.37-11-g9c52749)
• xfs (Linux / v2.6.37-rc4-63-ga46db60)
Important Reclaiming free space under any operating system is write I/O intensive as the host OS writes
zeroes to the unused blocks. Consequently, batched discard runs should be scheduled to run when writes
to the host volumes are minimal.
Reclaiming Space on Linux
Before you can reclaim space on Linux, the Linux kernel running on the host must be one of the following at
minimum:
• ext4 (Linux / v2.6.36-rc6-35-g7360d17)
• ext3 (Linux / v2.6.37-11-g9c52749)
• xfs (Linux / v2.6.37-rc4-63-ga46db60)
Online / automatic discards can be enabled for ext4 partitions using the discard mount option.
mount -o discard /dev/sdc /mnt/test
The discards are disabled by default under Linux/ext4 due to the additional I/O overheads that are incurred.
Refer to the man pages of your Linux distribution for further details.
You can invoke manual block reclamation (batched discards) using the fstrim and dd utilities (included with
most Linux distributions in the util-linux-ng package) if the volume is already mounted without discard options.
When using the dd utility, run the following command from the volume file system folder:
dd if=/dev/zero of=/mnt/path_to_nimble_volume/balloonfile bs=1M count=XYZ
where XYZ is derived from the free space reported on the host.
For example, if the file system is showing 195GB used out of 1TB, then the balloon file size needs to be
1TB-195GB = 805GB, hence XYZ = (805 * 1024= 824320) since it is in units of megabytes (because bs is
1M). The dd command will create a file called balloonfile with zeros in 1 MB blocks with the remaining
free space of the volume. Nimble blocks that consist of all zeros become free blocks. After the file dd command
has completed, the balloon file that was created can be deleted.
Note If the volume on the array is over provisioned, do not attempt to manually reclaim the total leftover space
of the volume, but rather reclaim up to the estimated compressed volume size, and before reaching 85% of
possible used space on the array.
86Copyright
©
2019 by Hewlett Packard Enterprise Development LP. All rights reserved.
Documentation Feedback: [email protected]
Reclaiming Space on Linux
Index
B
block devices 55
settings 55
block reclamation 85
overview 85
block unmap 85
definition 85
C
CLI 21
list and filter snapshots 21
cloned database instance 30
delete 30
clones 24
local instance 24
remote instance 24
commands 79
Nimbletune 79
commands, NPM 38
configuration 12, 43, 54, 68–69
Docker Volume Plugin 43
options 43
HPE Nimble Storage Oracle Manager 12
multipath 54
NCM with RHEL HA 68
NOM 12
reservation_key parameter and RHEL HA 69
Connection Manager for Linux 54
containers 52
run from Docker volume 52
control files 23
list 23
D
database instances, cloned 30
destroy 30
diskgroup 30
devices 57
list 57
diskgroups 16, 30
describe 16
destroy 30
Docker commands 46
Docker Swarm considerations 42
Docker SwarmKit considerations 42
Docker Volume plug-in 7
prerequisites 7
software requirements 7
Linux OS 7
NimbleOS 7
Docker volumes 48
attach to container 48
create 48
inspect 48
F
FC volumes 65
troubleshooting long boot time 65
Fibre Channel configuration 55
fibre channel devices 56
discover 56
filesystems 59
create 59
mount 59
G
GRUB updates 59
H
host prerequisites 7
NCM 7
host tuning 79
Linux OS 79
hot backup mode 19
HPE Nimble Storage Connection Manager 7, 54–59, 61, 63–
64, 68–70
and kernel upgrades 63
block device settings 55
create filesystems 59
create LVM 61
discover FC devices 56
discover iSCSI devices 55
Fibre Channel configuration 55
GRUB updates 59
HA volume move limitations 69
initramfs creation 59
iSCSI configuration 55
iSCSI connections 58
iSCSI multiple subnet topology 58
iSCSI single subnet topology 57
iSCSI topologies 57
known issues 64
list devices 57
mount filesystems 59
multipath configuration 54
multipath settings 70
prerequisites 7
removing LUN from host 63
RHEL HA configuration 68–69
SAN boot device support 59
troubleshooting 64
unmapping LUN from host 63
HPE Nimble Storage Docker Volume Plugin 42–43, 46, 48–53
clone volume 49
commands 46
configuration file 43
options 43
create volume 48
import a snapshot 50
import a volume 50
Copyright
©
2019 by Hewlett Packard Enterprise Development LP. All rights reserved.
HPE Nimble Storage Docker Volume Plugin (continued)
inspect volume 48
list volumes 52
options 46
provisioning volumes 49
remove volumes 53
restore docker volume with snapshot 51
run a container 52
supported capabilities 42
Swarm considerations 42
SwarmKit considerations 42
workflows 46
HPE Nimble Storage Linux Toolkit 6, 9
installation 9
prerequisites 6
requirements 6
services 6
HPE Nimble Storage local driver 51
HPE Nimble Storage Oracle Application Data Manager 6, 12–
14, 17–18, 39
configuration 12
disable the NLT Backup Service 18
enable the NLT Backup Service 17
NORADATAMGR 12
NORADATAMGR workflows 14
software requirements 6
troubleshooting 39
workflows 14
I
import volume 76
valid parameters 76
initramfs creation 59
install 9
Docker Volume plugin 9
NLT 9
NOM 9
instances 15, 18–19, 24, 29
clone 24
delete snapshot 29
describe 15
edit 18
replicate 19
snapshot of 19
iSCSI configuration 55
iSCSI connections 58
iSCSI devices 55
discover 55
iSCSI topologies 57–58
multiple subnet 58
single subnet 57
K
kernel upgrades 63
Kubernetes FlexVolume plug-in 8
prerequisites 8
software requirements 8
Linux OS 8
NimbleOS 8
L
log files 39
logiccal volume management (LVM) 61
create 61
LUNs 63
removing from host 63
unmapping from host 63
LVM 61
LVM filter 54
M
multipath settings 70
multipath.conf file 70
RHEL 70
N
NCM considerations 54
NCM for Linux 54
Nimble Connection Manager 7, 54
host prerequisites 7
LVM filter 54
prerequisites 7
supported protocols 7
Fibre Channel 7
iSCSI 7
Nimbletune 8, 79
about 79
commands 79
prerequisites 8
NLT Backup Service 8, 21, 38
list and filter snapshots 21
prerequisites 8
requirements 8
NORADATAMGR 14, 31, 33–34
catalog diskgroups to use with RMAN 31, 33
cleanup after RMAN backup 34
Oracle Recovery Manager (RMAN) workflows 14
using catalog-backup command 33
using uncatalog-backup command 34
using with Oracle Recovery Manager (RMAN) 31
workflows 14
NORADATAMGR NORADATAMGR 12
Oracle Recovery Manager (RMAN) 12
NPM 17–18, 38
disable 18
enable 17
NPM commands 38
O
Oracle Recovery Manager (RMAN) 12, 14, 31, 33–34
NORADATAMGR 12, 31
NORADATAMGR catalog-backup command 31
NORADATAMGR workflows 14
removing catalogs 34
using NORADATAMGR catalog-backup command 33
Copyright
©
2019 by Hewlett Packard Enterprise Development LP. All rights reserved.
P
pfiles 23
list 23
port 7
requirement 7
prerequisites 6–8
Docker Volume plug-in 7
HPE Nimble Storage Linux Toolkit 6
Kubernetes FlexVolume plug-in 8
NCM 7
Nimbletune 8
NLT Backup Service 8
R
recommendations 84
change 84
requirements 6, 8
hardware 6, 8
NOM 6
software 6, 8
S
SAN boot devices 59
support 59
scale-out mode 54
SCSI unmap 85
definition 85
settings 55
settings 55
snapshots 19, 21, 29, 50–51
delete 29
hot backup mode 19
import to Docker 50
list and filter 21
replicate 19
restore offline Docker volume 51
software requirements 7–8
Docker version 7
Kubernetes version 8
Linux OS 7–8
NimbleOS 7–8
space reclamation 86
running 86
SQL Plus 39
standby paths 65
scanning 65
troubleshooting 65
supported protocols 7
Fibre Channel 7
iSCSI 7
T
troubleshooting 39–41, 64–68
ASM disks 40
boot failure 67
troubleshooting (continued)
clone workflows fail 40
controller failover 67
controller failure 40
controller upgrade timeout errors 66
disks marked offline 41
dm-switch devices disabled 68
duplicate devices found warning 65
emergency mode 68
gathering information 39
host reboot 66
information gathering 39
iSCSI messages hang 67
iSCSI targets not discovered 66
iSCSI_TCP_CONN_CLOSE 65
Linux issues 64
log files 39
long boot time 65
LVM devices missing from output 67
LVM messages hang 67
maintenance mode 66
multipath devices not discovered 68
multipathd failure messages repeat 67
NCM 64
NLT installation 40
NLT installer 68
NLT upgrades 68
noradatamgr command fails 40
old iSCSI targets 64
Oracle database fails 41
rescan-scsi-bus.sh hangs 65
RHEL 7.x 67
FC active paths not discovered 67
FC system boot failure 67
snapshot workflows fail 40
spfile 40
SQL Plus 39
system enters maintenance mode on host reboot 66
timeout errors 66
warning of duplicate devices 65
V
volume moves 69
limitations in HA environments 69
volumes 49–53, 61
clone 49
create 51
create LVM 61
import to Docker 50
list 52
provisioning with Docker 49
remove from Docker 53
W
workflows 14, 46
Docker Volume Plugin 46
Oracle Application Data Manager 14
Copyright
©
2019 by Hewlett Packard Enterprise Development LP. All rights reserved.
